
Covid-19 may be slowing down the world economy, but not the DESelect development team. This month we’re releasing not 1, not 2, but 3 new functionalities.
Folders on the selections overview
Available for: DESelect Plus, DESelect Advanced
As DESelects customers grow, we start seeing customers that have 100’s of selections. At that point it becomes useful to organize the selections a bit better, so we introduced folders on the selection overview screen.

The screen will feel very familiar to Marketing Cloud users as it has a similar structure to the data extensions overview.
On the left panel, we can see all folders. Here folders can be created, deleted, renamed, or moved. There is no limit to how many levels of subfolders you can create.
You’ll notice two special folders:
- All Selections, which shows all selections, no matter which folder they are in.
- Uncategorized Selections, which shows all selections that have not been assigned to a folder yet.
Note that you can use the search functionality in the All Selections folder to easily search across all folders at once.
On the right panel, we can see the selections in each folder. Selections can easily be moved to other folders using drag and drop. Of course, searching, pagination, and sorting are still possible within each folder or across all folders (using the All Selections folder).
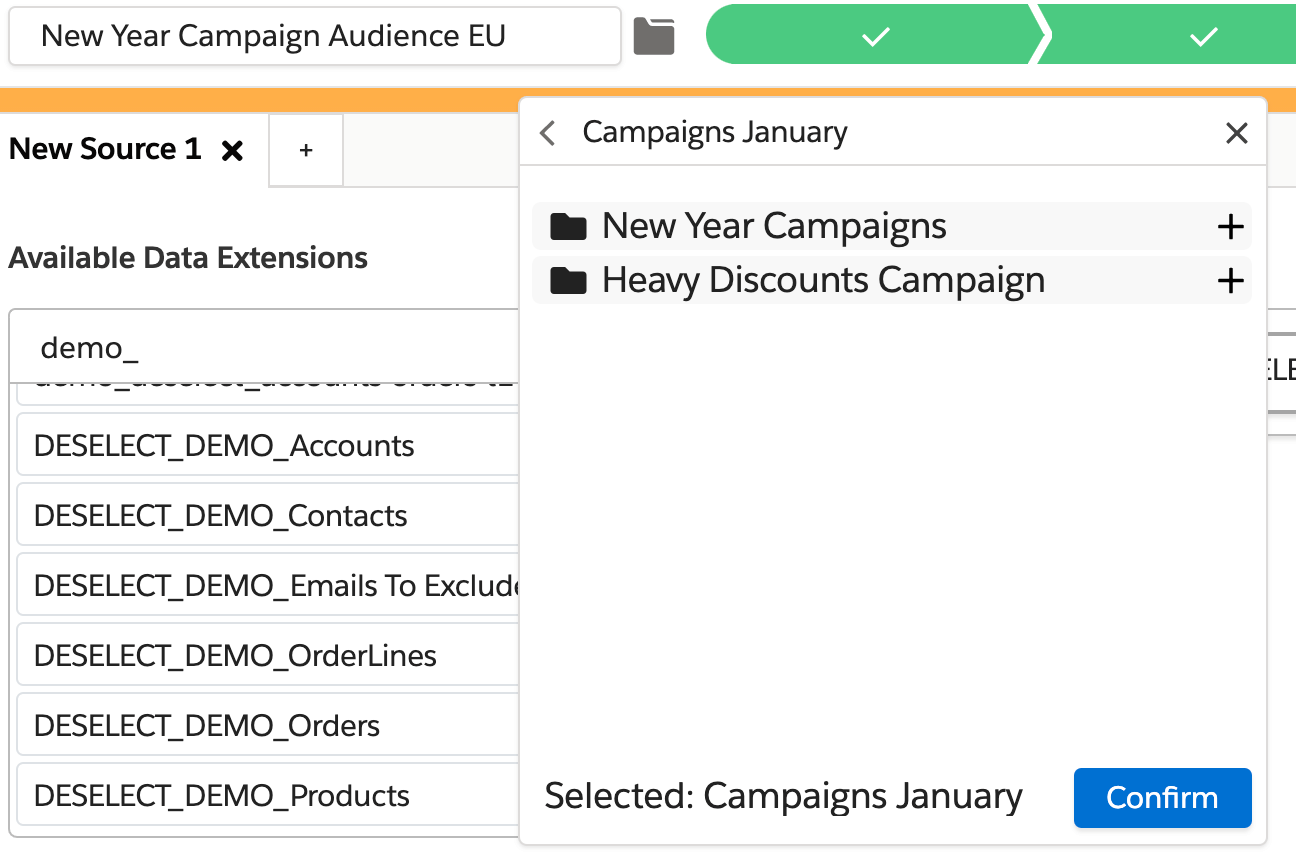
When you’re in a selection, click on the folder icon next to the selection name to change the location of your selection. If you don’t select a folder, the selection will just appear in the All Selections folder.
Advanced prio-deduplication
Available for: DESelect Advanced
DESelect has been supporting prio-deduplication for some time now. So far we’ve supported ‘basic’ deduplication, which means in case of duplicates, the ‘winner’ could be picked based on the value of one other field.
We’re now introducing advanced deduplication, which allows deduplicating based on complex rules. Here is an example:
We have a data extension containing orders, and we may have multiple orders from the same contacts.
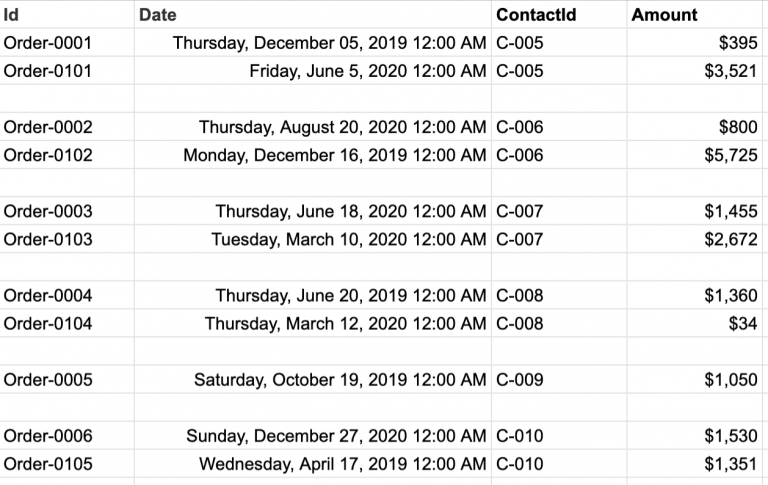
However, we only want to refer to each contact once. In case there are multiple orders for one contact, we want to:
- Choose the one with the amount over $1000
- If there are none or multiple orders with an amount of over $1000 for the same contact, choose the one placed during the holiday period in December
If we apply those rules to this data set, we would want the following results:
- For C-005, we want to select Order-0101 as it’s the only one of more than $1000.
- For C-006, we want to select Order-0102 as it’s the only one of more than $1000.
- For C-007, we have 2 orders above $1000: both Order-003 and Order-0103. In this case, the 2nd rule applies; pick the order for December. However, both orders are from other months. Since none of our 2 defined rules match, one of the 2 orders will be picked randomly.
- For C-008, we want to select Order-0004 as it’s the only one above $1000.
- For C-009, we want to select Order-0005 as it’s the only order for C-009.
- For C-010, we have two orders above $1000 (Order-0006 and Order-0105). In this case, the 2nd rule applies, pick the order from December, so Order-006.
The above can be achieved using the Prio Deduplication screen in DESelect. On the Target Definition screen, click the gear icon in the upper right corner and choose Deduplication.
Enable the Use Deduplication toggle.
Under ‘Field that needs to be unique’, select ContactId.
Click Next.
Choose Prio Deduplication Mode: Advanced.
Click Add Rule to add your first rule.
Our first rule will be that we want to choose the results with an amount of over $1000. Drag the amount field to the right, choose criteria Greater Than, and enter 1000. Press Save.
Now let’s add our second rule by clicking Add Rule again.
Our second rule will be that we want to choose the results with the date in December 2019. Drag the date field to the right, choose criteria Greater Than and pick the first of December.
Now drag the date field to the right again, choose criteria Smaller Than and pick the first of January 2020.
Press Save.
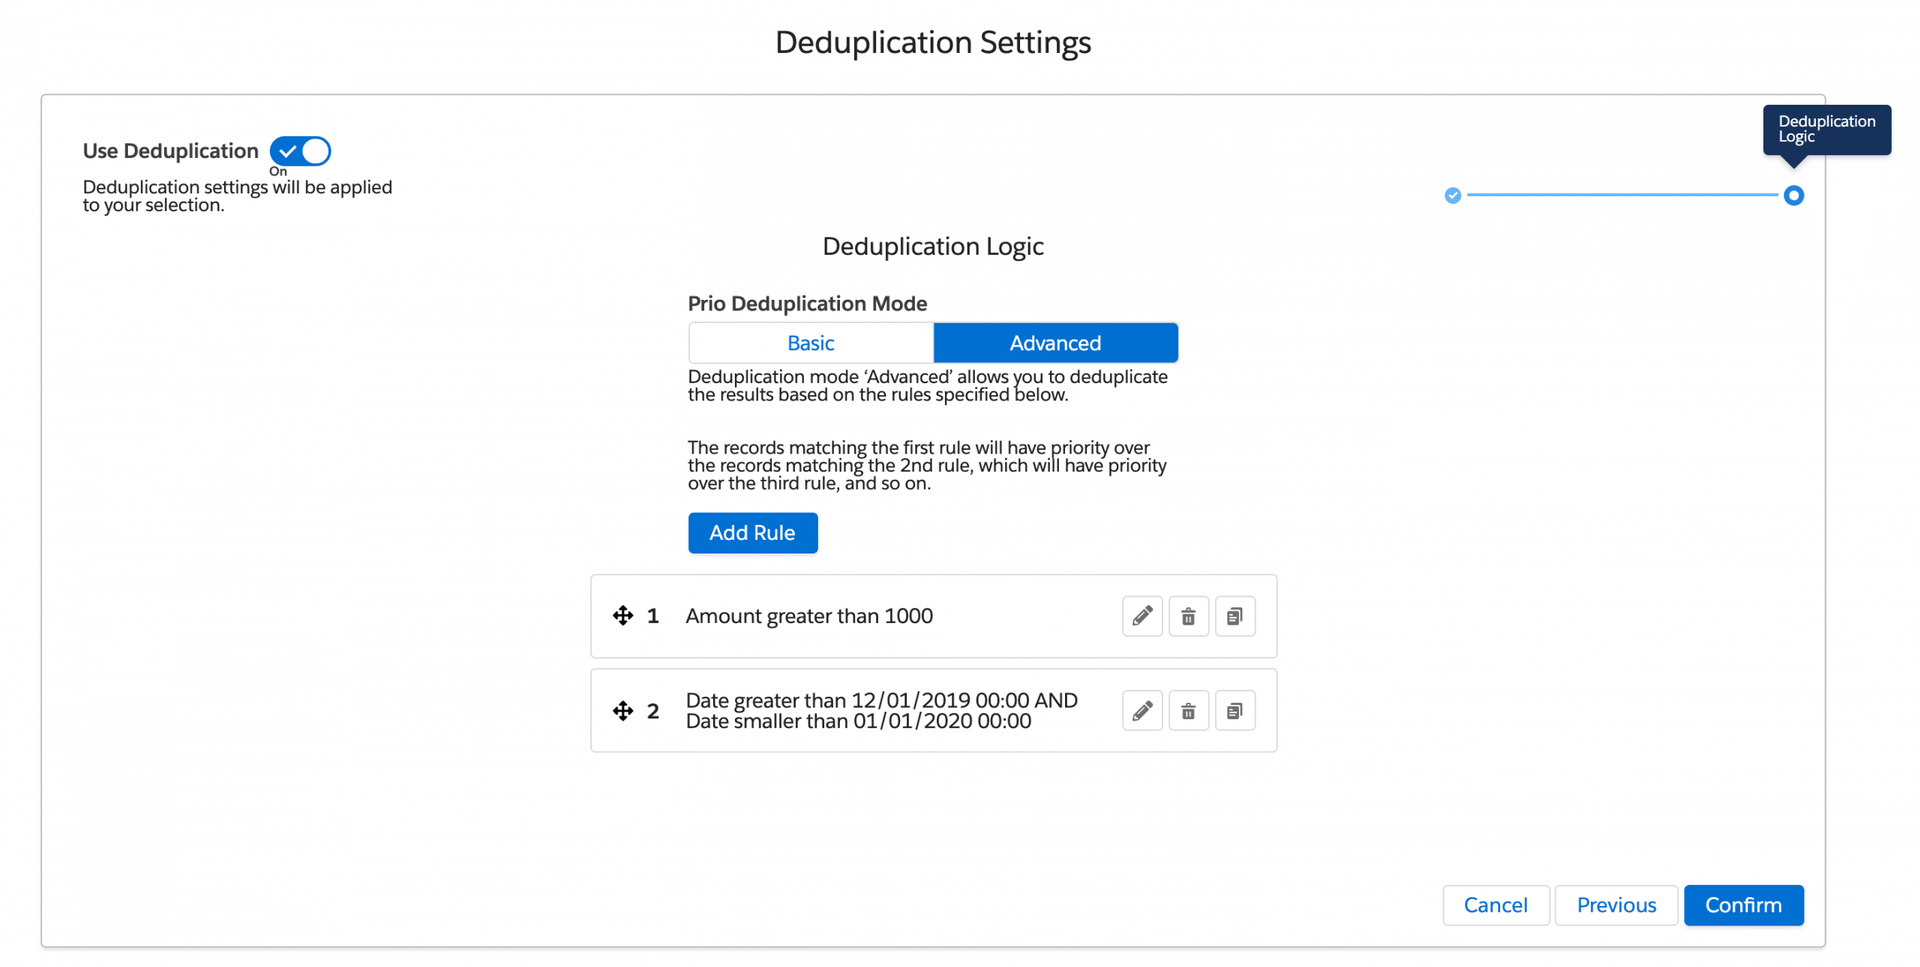
Press Confirm to close the Prio Deduplication screen. Click Save in the upper right-hand corner to save your changes.
Now when you run / preview your selection, DESelect will check if there are multiple records in the results of your selection with the same contactId. If this is the case, the rules we defined will be checked in the order we defined. If there is a match for the first rule, that record is chosen; if there is no match for the first but there is a match for the second rule, that record is chosen, and so on.

Admin panel
Available for: DESelect Enable, DESelect Plus, DESelect Advanced
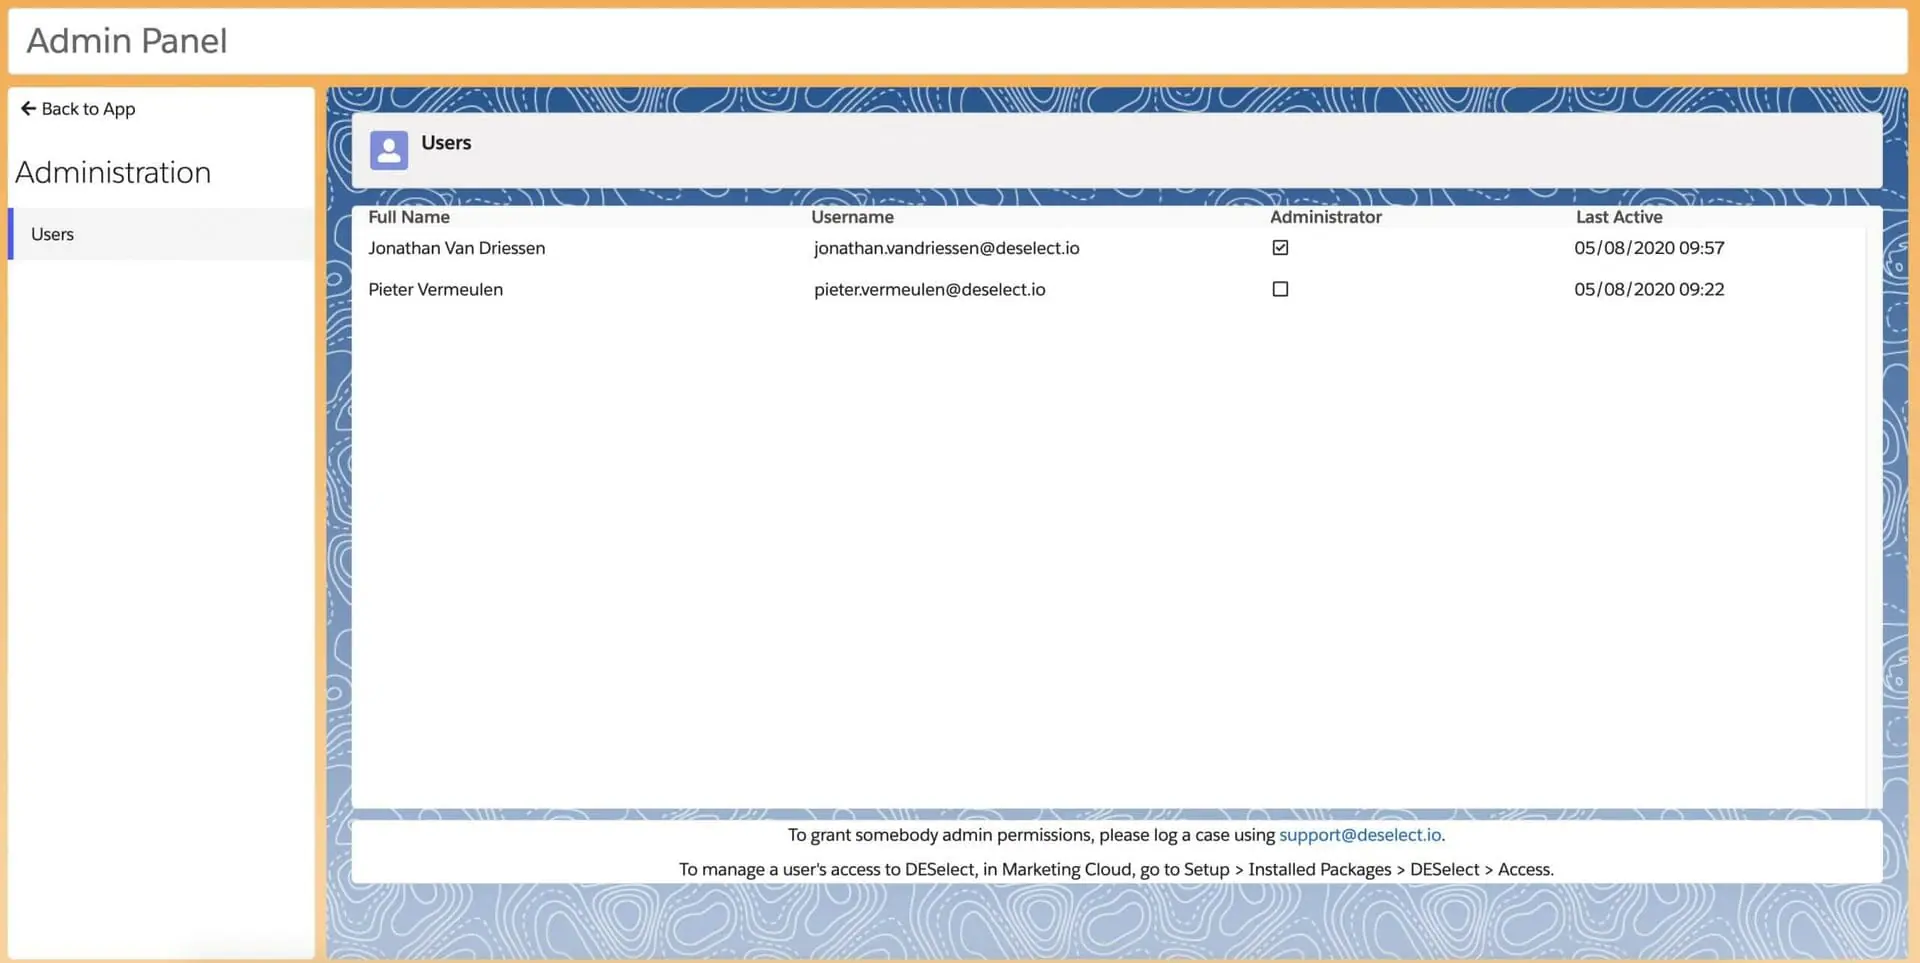
We have enabled basic roles in DESelect: admins and non-admins. Admins now have access to a Setup menu via the gear icon on the top right corner on the selections overview screen. Currently, admins can see which Marketing Cloud users are using DESelect, which users are admins, and when each user last logged in.
Soon, the admin panel will be expanded with capabilities to configure advanced functionalities in DESelect, like picklist values (so fields appear as picklists instead of free input fields in filters). More on that in the next release post 🙂
Conclusion
DESelect just got another upgrade with highly valuable functionalities. Folders on the selection overview screen will help you better manage your campaign segmentations, and advanced prio deduplication allows for deduplicating campaign segmentation results on complex rules through a smart interface.
If you want to have a look at these functionalities in detail, book a demo now or request your partner demo instance.


