Introduction to Salesforce Marketing Cloud Contact Builder
What is Contact Builder in Salesforce Marketing Cloud and what is it for? Contact Builder is a Marketing Cloud app that you use to manage contacts and related data. You use Contacts to store demographic and behavioral information about individuals. The main purpose of Contact Builder is to organize your contact data into a single view of your customer.
Why would you use Contact Builder?
- Leverage information from any Marketing Cloud app for any contact as mentioned in this Trailhead;
- Design, map and link data about your customers;
- Add synchronized data sources from Salesforce CRM to Salesforce Marketing Cloud using Marketing Cloud Connect (if applicable).
With this single view of your customer, you take an important step towards creating personalized and targeted campaigns. In other words, you can deliver a better customer experience.
Who defines access to Contact Builder?
Why should you give someone access to Contact Builder?
It is important to provide access to contact data in Contact Builder for various Salesforce Marketing Cloud users. For instance, for a marketing agency that you hired to create templates in Content Builder, you would probably like to restrict access to features like contact deletion in Contact Builder. On the other hand, you would like to provide admins with permissions for Marketing Cloud Connect and data deletion in Contact Builder.How can you provide access to Contact Builder?
To administer access to Contact Builder, you will need the necessary administrative permissions and navigate to Setup. Within Salesforce Marketing Cloud, click on your name (top right), and then click on ‘Setup’. There, under ‘Users’, you can assign roles to define access to Contact Builder. As recommended earlier, you can also create customer roles. To do so, click on ‘Roles’, and click on ‘Create’ to define a new custom role.What are “contacts” in Salesforce Marketing Cloud Contact Builder?
A “contact” is a data record that contains contact information (like email address or phone number) and to which other relevant data may be related (like personal details, demographic information, behavioral data). A contact ideally refers to a single person, although there may be situations where you may actually end up having several contacts that represent the same person. For instance, you may know a person by two email addresses, for which two “contacts” are created.
However, one of the advantages of Contact Builder is that it can help you build a single view of your customer. So ideally, your contacts represent persons one to one. This means you may need to connect different pieces of contact information (like email address or phone numbers) to the same contact in Salesforce Marketing Cloud. Because of this, it is a best practice to use a unique identifier, defined by a system or potentially by the business, as the Contact Key.
How to identify contacts in Contact Builder?
Each contact in Salesforce Marketing Cloud Contact Builder can be identified by both a unique Contact Key and Contact ID. The Contact Key and Contact ID are two sides of the same coin: You can define the Contact Key while the Contact ID is automatically generated by Salesforce Marketing Cloud.Using Contact Keys
A contact is managed across different channels (like email or SMS) using a single Contact Key. Let’s say you have a contact in Email Studio that you identify using his email address, and in Mobile Studio you use his mobile phone number. Without the Contact Key, it would be difficult for Salesforce Marketing Cloud to be able to relate these two pieces of contact information. The Contact Key identifies a contact within a Salesforce Marketing Cloud account across business units, and ties together different pieces of contact information across channels through which you interact with that contact. Ideally, a given contact has the same Contact Key regardless of the channel you use to communicate. Make sure you are consistent across all channels when assigning a Contact Key to a contact. The Contact Key is essentially a Subscriber Key in Email Studio. So to be consistent, use the Subscriber Key value in Email Studio as your unique Contact Key in Contact Builder. Note that a Subscriber Key is generated the moment you would send an email through Email Studio to the subscriber.Contact Keys across different Studios in Salesforce Marketing Cloud
A Contact Key is used across different channels in Salesforce Marketing Cloud, which means you will find it across different “studios” in Salesforce Marketing Cloud. For instance, when importing contacts in MobileConnect, you use the Contact Key as well. If you want to import data in Mobile Push, you also need to specify the Contact Key. You might use a mobile number as a Contact Key for MobileConnect or email as a Contact Key for Mobile Push. However, the best practice is to create a Contact Key using a unique digit code ( unique Id/ customer id) that you can use throughout different studios in SFMC.Where can I find my contacts?
It is possible to find contacts through the All Contacts tab within Contact Builder. Here, you can choose to view your contacts coming from different sources and channels. Contact information is also stored in data extensions. These are basically tables that contain a variety of data. Data extensions are used in Data Designer within Contact Builder, which we will explain further down this article. You can read a lot more about data extensions in our previous article about Email Studio. Note that, in Contact Builder, data extensions are also known as attribute sets.All Contacts and All Subscribers: What’s the difference?
Differentiating between contacts and subscribers is important when using multiple Marketing Cloud channels. A contact is a person you send messages to through any marketing channel. A contact appears in the All Contacts section.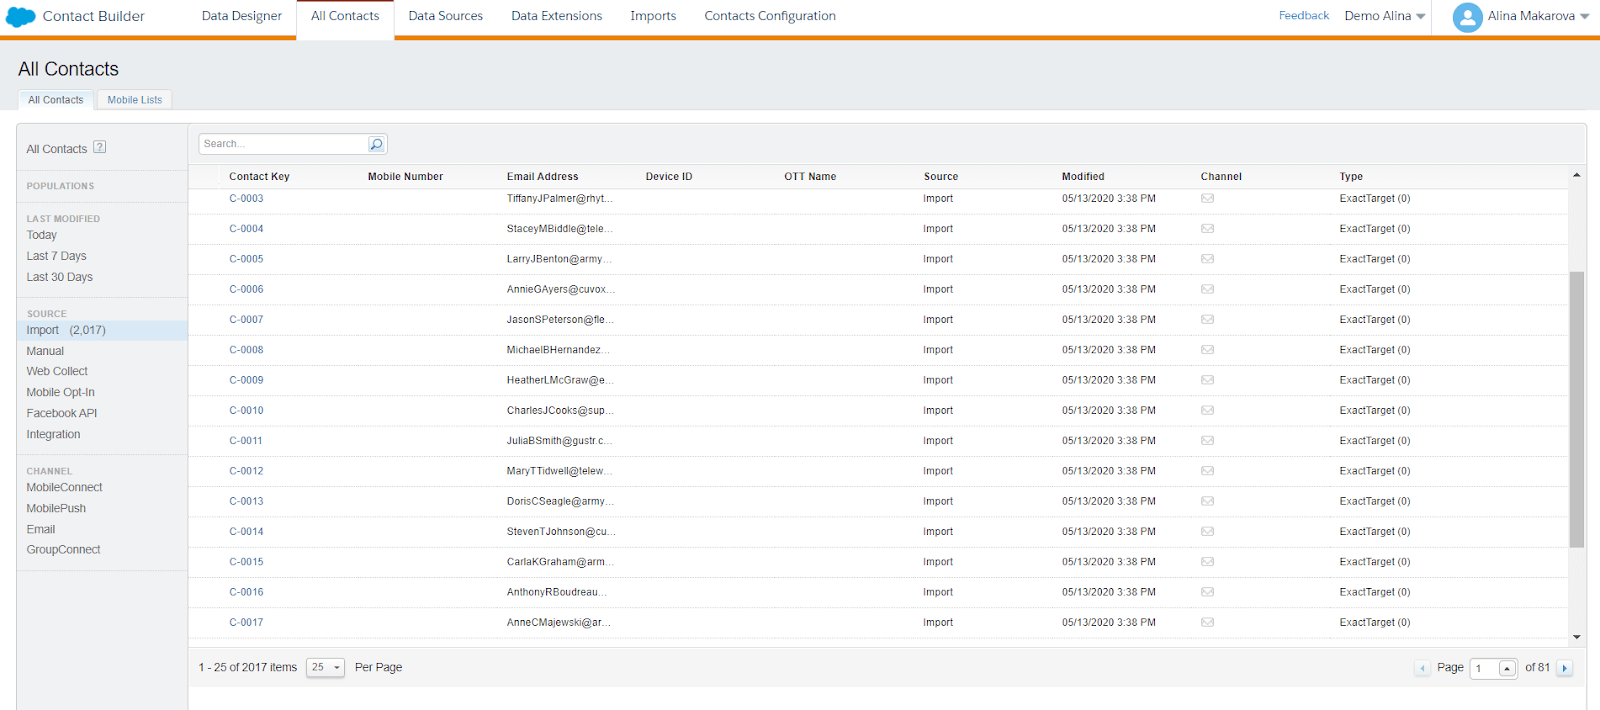
(The ‘All Contacts’ tab in Salesforce Marketing Cloud.)
Keep in mind that all subscribers are contacts, but not all contacts are subscribers. For instance, if you send an email to your contact, one becomes a subscriber. Remember that when you create a sendable data extension, you need to define a Subscriber Key. Later it will become your Contact Key in Contact Builder. However, you can also have contacts, whom you’ve never sent an email. Those individuals are still your contacts but not your subscribers.
The All Contacts list includes all contacts in a Marketing Cloud account across all Business Units. The All Subscribers list specifically refers to subscribers created in Email Studio. Email Studio contains the All Subscribers list to prevent sends to unsubscribed email addresses. However, this action applies only to Email Studio information and activities. A contact can unsubscribe from a subscription in Email Studio and still receive messages from other apps, such as MobileConnect or MobilePush.
By default, Contact Builder uses a different demographic source of information for each channel. The different demographic attribute groups displayed in Contact Builder contain this information. However, the unique Contact Key value used to identify a specific contact remains consistent for all channel apps. To use a single set of demographic information for all channels, create an attribute group in Contact Builder. Use that group as the source of information for your marketing activities.
How can you export All Contacts?
You can create a support ticket to extract All Contacts to a data extension. They can include the attributes that are part of the central Contacts table (system attributes).
You can then use this data extension for queries to isolate contacts you want to delete.
Make sure to clear the All Contacts data extension, give it a data retention policy or make it sendable if you want to completely clear out all data about the contacts you want to remove.
Where does the data about contacts come from?
Firstly, define where your data comes from and what you really need to store in Marketing Cloud. There are several options here. For instance, your data source can be an external preference center or leads collected through your website or it can be your WhatsApp audience. It can also come from POS if you use retail purchase data or from product catalog CSV. You can check out this previous article about the SFMC data model to learn out more about what data to store and how to integrate it in Salesforce Marketing Cloud.

(‘Data Sources’ overview page in Contact Builder)
Manual Contact creation in Contact Builder
Imagine that you need to test an email for a future campaign, and you would like to send a test email to a test contact. At this point you might wonder if it is possible to manually create contacts in Contact Builder? The answer is “Yes!”: When you create a data extension in Contact Builder, you can later manually add records to that data extension. It is a quick way to create fake contacts that can be later used for various tests. This is one of the main (and sometimes the only) reasons that non-admins need access to Contact Builder.Import activities in Contact Builder
You use import activities to add new data in data extensions to use in the Contact Builder. There are several opportunities to import data in Contact Builder. For instance, if your file exceeds 20 MB you need to use the FTP option to import the data. Alternatively, if your files are smaller you don’t need to rely on FTP servers. You can choose a CSV file from your computer or choose a data from an existing data extension. Some more instructions on how to use import activities in SFMC can be found here.How to add a CSV file to a data extension in Contact Builder?
The process of adding new data in a data extension in Contact Builder is very similar to the one in Email Studio. Watch this video to learn how to import a CSV file with contact information in a data extension.Data Designer
Data Designer is probably the main tool in Contact Builder. You use this tool to view and manage contact data. You need it to aggregate a contact’s demographic and behavioral data, and define how that data relates to a contact record. Businesses use the combined data to enrich the customer experience and serve customers better.
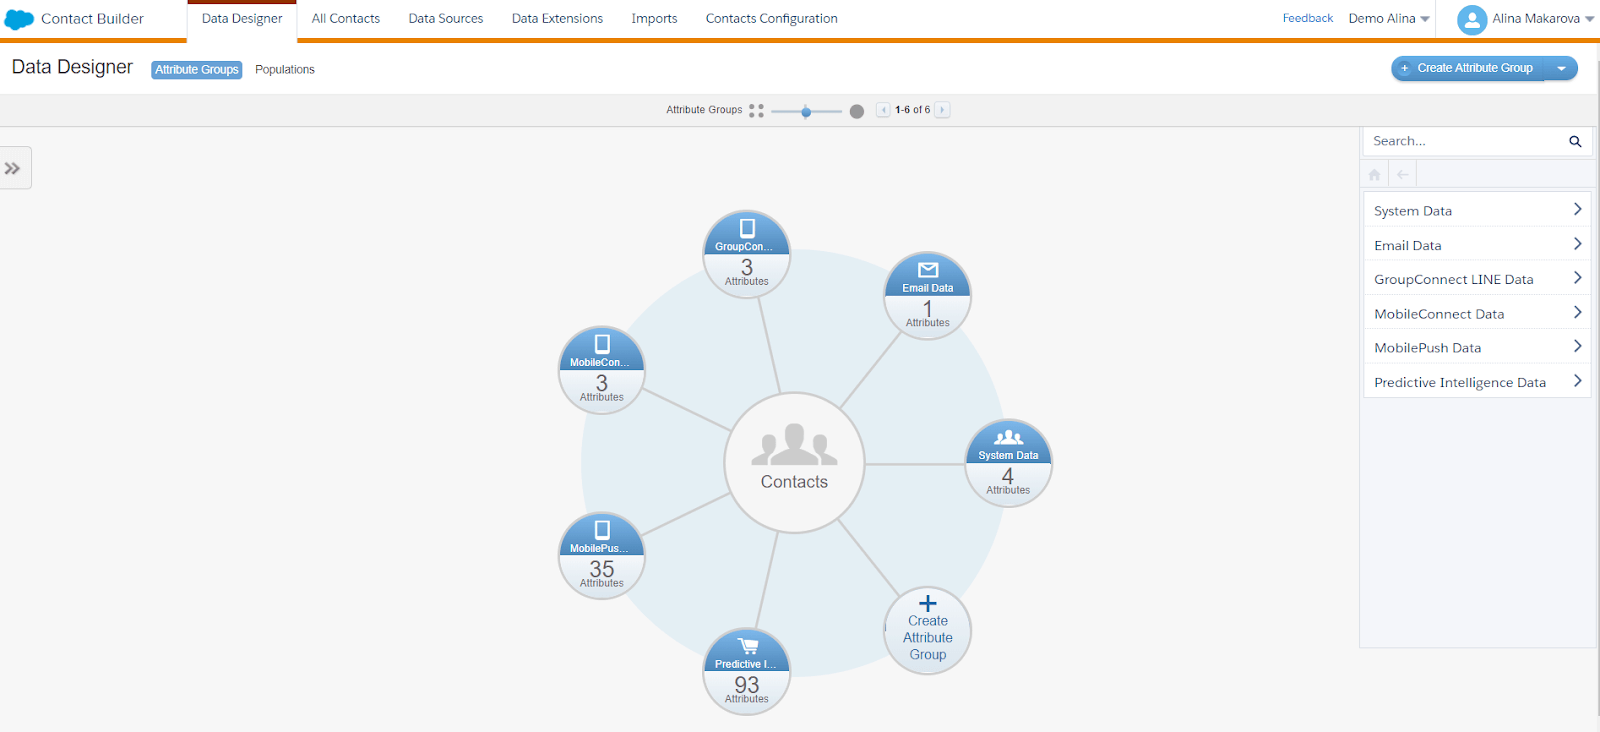
(An overview of ‘Data Designer’ within Contact Builder.)
Within Data Designer, data is stored using populations, attribute groups, attribute sets, and attributes. Attribute groups can be related to one another as well as your contacts using data relationships.
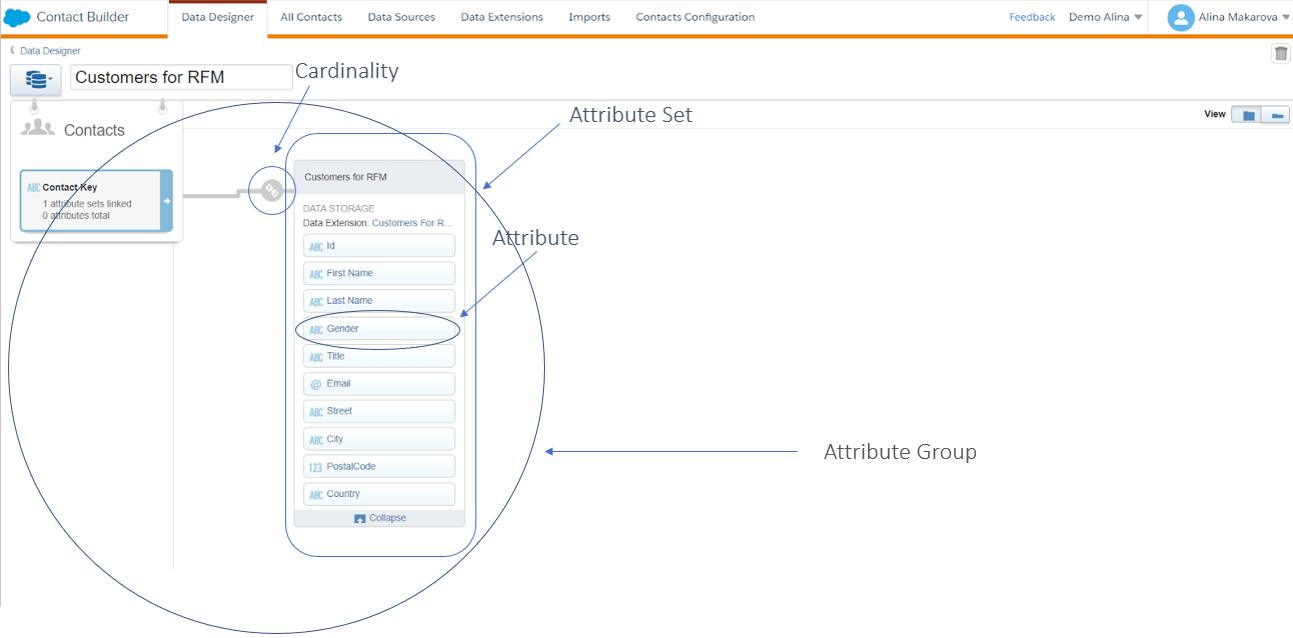
(Attribute Group overview in Salesforce Marketing Cloud.)
Populations in Contact Builder in Salesforce Marketing Cloud
Populations are used to categorize distinct various audiences in Contact Builder. Think of a population as the subset of the master list of people who could enter a journey. It is recommended to have no more than three populations. A population should never be sent directly, it is a database and they aren’t sendable. That means that the data you store in populations cannot be used for sends immediately. Firstly, it needs to be sent to sendable data extensions. For instance, populations are beneficial for a company that has a different model or structure for communicating with customers vs. employees. Other Marketing Cloud apps, such as Journey Builder, MobileConnect, and MobilePush, can use the populations you create in Contact Builder. For example, in Journey Builder, you can create an abandoned cart journey for a customer. You can use the Customers population as the journey’s entry contacts. Configure the journey to filter contacts by location. As explained here on Trailhead, if you’re using the most up-to-date Journey Builder functionality, you won’t need to use populations most of the time. Instead, it’s best to save populations for specific use cases where you need to create complex queries, such as if your account uses field-level encryption or when you’re using API Entry Sources in Journey Builder. There is also a notion of populations in Journey Builder, which is actually unrelated to the populations in Data Designer. When you use a population in Journey Builder, it simply refers to all the people who have entered that journey, don’t be confused by it.Attribute Groups in Contact Builder in Salesforce Marketing Cloud
Attribute Groups are data sources that are logically grouped together, and they allow you to organize data and configure relationships in Contact Builder. Let’s say you’re a retailer and you need to build a journey that sends an email to people who haven’t made a purchase while they were in a journey. Usually, you’d have two different tables of contact data. You’re going to have one table that contains all your customers, and another table that contains all the purchases. An attribute group connects these two tables to each other based on a particular field, such as Customer Id. Think of an attribute group as a “mini data model” that contains attribute sets (data extensions) and attributes (fields). To most effectively organize your data in an attribute group, link a data extension to the contact record. Then, link all other relevant data extensions to the contact record or, to build complex relationships, link them to other data extensions in the attribute group.Link Attribute Groups and Populations
Link attribute groups and populations using the Contact Key value. It is a best practice to not link using an email address field when the Contact Key or Subscriber Key value is available. Use populations to create distinct subgroups of your contacts, then segment contact records from there. For example, a healthcare company can create separate populations for staff, patients, and vendors.Attributes in Contact Builder in Salesforce Marketing Cloud
Attributes represent a single piece of information about a contact or related information. A good example of an attribute can be an email address or gender. Even the number of email opens can be an attribute. A contact can contain two types of attributes:- Profile attributes describe who the contact is. Some of this data may be provided by the subscriber, such as gender, state, or interest (do they like hiking or running?).
- Behavioral attributes describe what the contact has done. For example, a contact indicates some related interests or clicks links when reading a newsletter.
Data relationships in Data Designer
Data relationships can be created using a Data Designer. There are 4 main ways to define the relationship between data extensions in Contact Builder: 1:1 Relationship, Population, One-to-Many Relationship, Many-to-Many Relationship. They are also referred to as cardinalities.- A 1:1 Relationship uses a primary key to map a single record within a data extension to a contact or another record. For example, it can be a mobile number or an email address of a subscriber.
- Populations help to create a master segment of the audience. They represent a set of contacts that are joined by an overarching theme. For instance, if you work in the education industry you might have a master list of contacts that include information on alumni and freshmen. You can create two populations based on that with alumni and students separately.
- A one-to-many relationship uses the value of a primary key attribute on the contact record and relates it to one or more instances of that value on another data extension. For example, you can use the email address as the value related to multiple orders contained in a data extension to connect a contact record to the products ordered from a specific retailer.
- A many-to-many relationship can match several different values between two data extensions. For example, you could link one data extension containing multiple instances of customers who completed orders, including repeat values for some customers, with a data extension containing information on those orders.
Deleting contacts in Salesforce Marketing Cloud
Why is contact deletion important?
At some point your customers may ask to delete their personal information from your records which you are obliged to in order to comply with GDPR or CCPA regulations. Hence will need to know how to delete the relevant contact information in Salesforce Marketing Cloud, which also happens in Contact Builder.How to delete contacts in Contact Builder?
Firstly, you need to enable the feature of contact deletion in Contact Builder. You can do it by accessing the Contacts Configuration tab.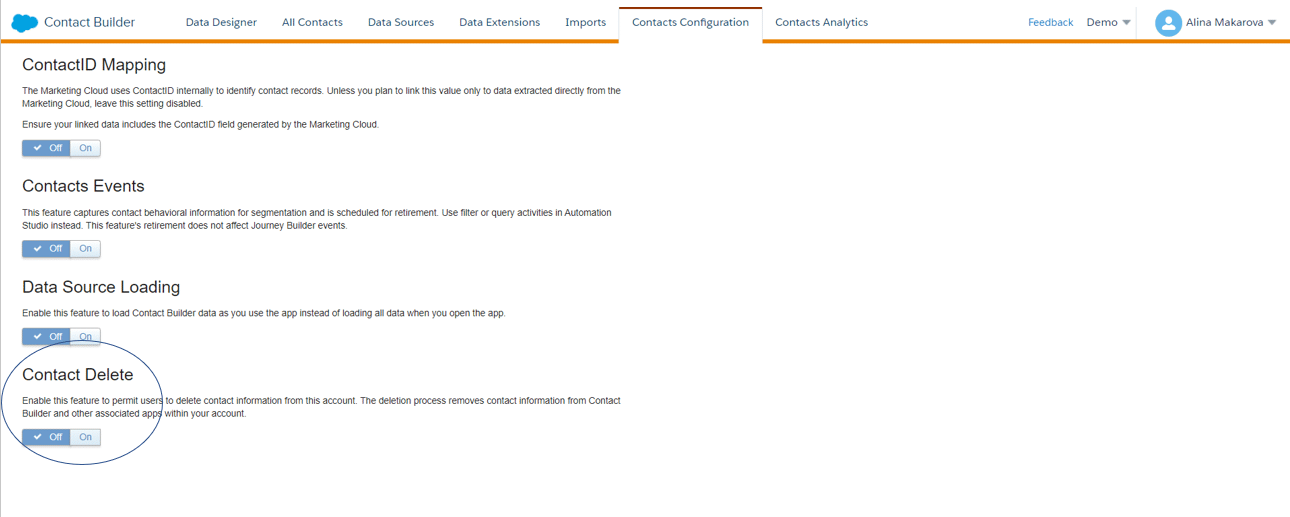
(‘Contacts Configuration’ tab in Contact Builder.)
Different accounts require different approaches for contact deletion. For example, if you have an Enterprise 2.0 account, the enablement occurs at the parent account level for the entire organization. It is important to note all contact deletion processes are final, and Marketing Cloud cannot restore deleted contact information.
What are the steps that you need to take to delete contacts in Contact Builder?
- There is a 2-day default suppression period, during which the contact information remains in your account, but you cannot view or access it. You can change the suppression period if you like.
- Then manually delete the Contact. For instance you can delete a contact from the All Contacts tab.
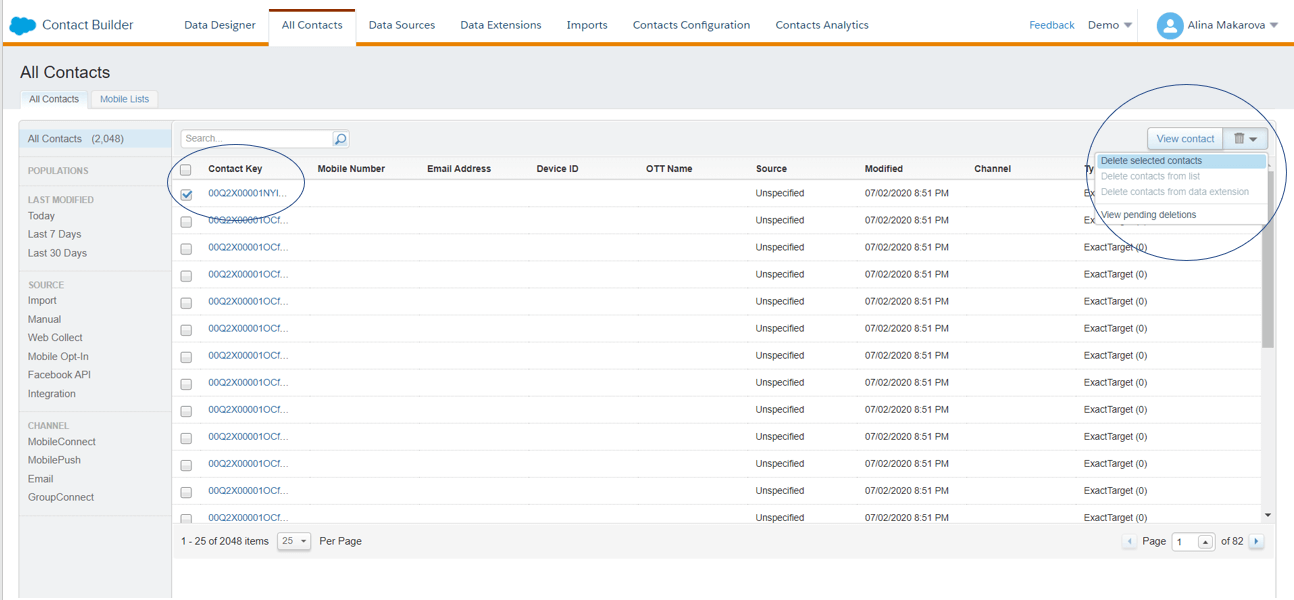
- Then Marketing Cloud will completely remove the contact from your account, which is final.
Marketing Cloud deletes contact information from lists and sendable data extensions. You can delete up to one million records. This process does not apply to any non-sendable data extensions not included in a population via Data Designer, and you are responsible for deleting applicable information from those sources on your own.
Contact deletion best practices: Use Contact Key or Contact ID values to delete contacts.
If you linked multiple Subscriber Key or Contact Key values to the same contact, perform the Contact Delete process for all values.
Apart from the individual contact deletion, you can also delete all contacts in a given data extension. In order to do that, navigate to the data extensions tab and select a data extension containing contacts you want to delete. Then click delete.
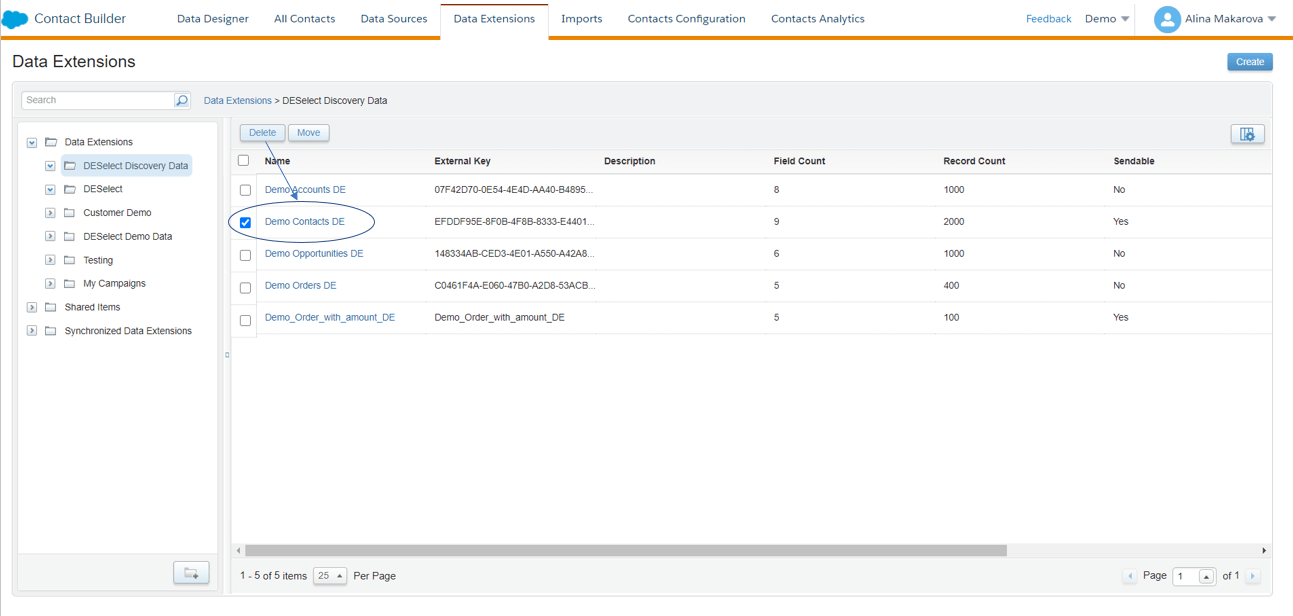
(The ‘Data Extensions’ tab in Contact Builder.)
Marketing Cloud Connect and Contact Builder
What is Marketing Cloud Connect (MC Connect)? MC Connect helps you synchronize your CRM data coming from Sales Cloud or Service Cloud to your Marketing Cloud. You do this through synchronized data sources, where you define which CRM “objects” (accounts, contacts,…) need to sync to Marketing Cloud. These objects will then show as “synchronized data extensions” in Marketing Cloud. All the CRM’s standard and custom data is synchronized with Salesforce Marketing Cloud. However, the best practice would be to sync only the data you need.
Have a look at this Trailhead on how to implement MC Connect.
Why is it useful for you? This feature allows creating highly interactive and personalized messages to send to your customers using synchronized data sources from Salesforce CRM.
Where can you find the synchronized data in Salesforce Marketing Cloud? In Contact Builder, Under ‘Data Sources’, you can choose ‘Synchronized’. Then, you can choose to ‘Set up Object’, and choose what data you would like to synchronize with your Marketing Cloud account.
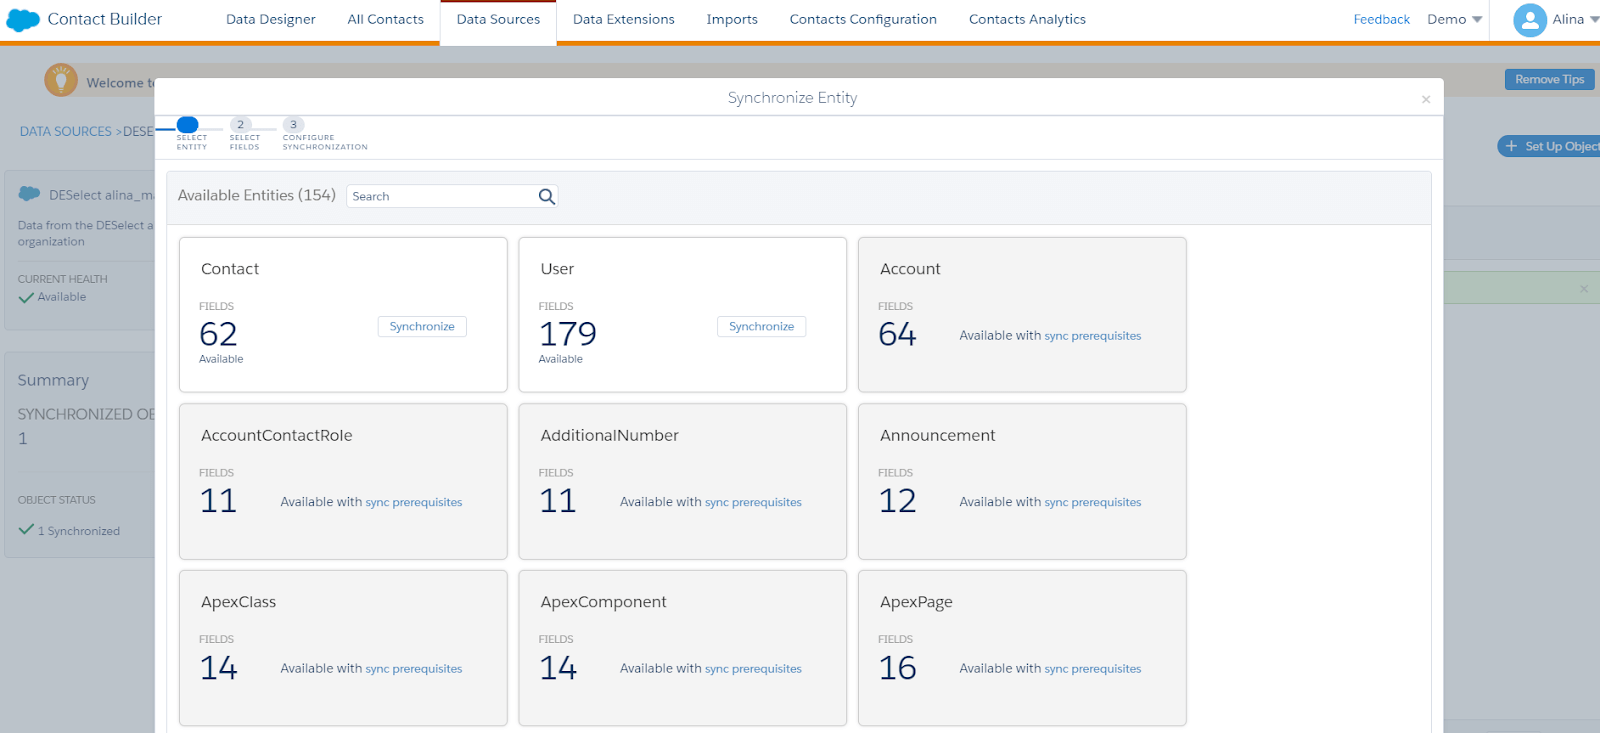
(Here you can choose entities to synchronize with Salesforce Marketing Cloud.)
After you choose CRM objects that you would like to synchronize with Marketing Cloud, you will see the CRM data in the Contacts overview.
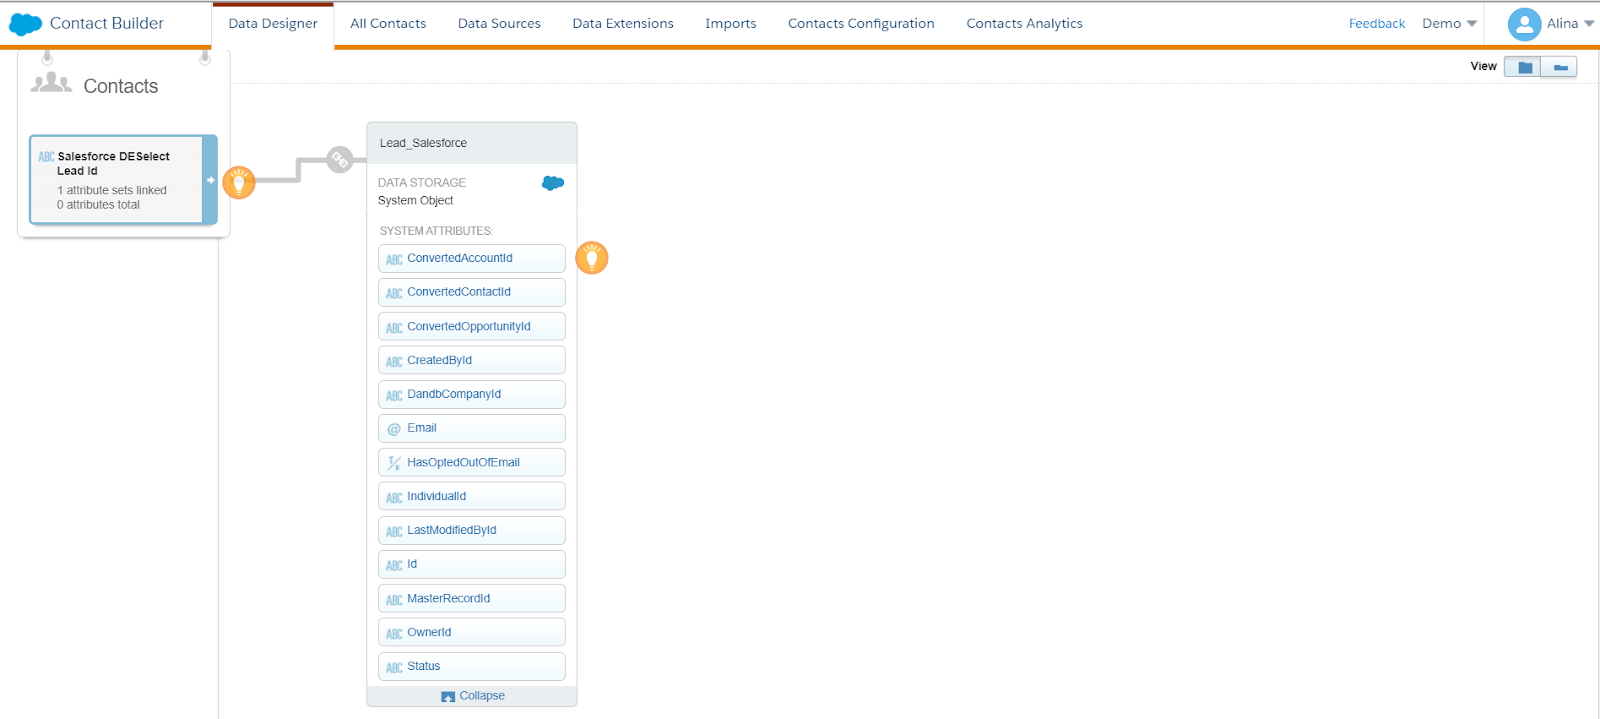
(Synchronized Leads in Contact Builder.)
What about deleting synchronized Data Sources?
For Synchronized Data Sources, delete the information from the original data source in Sales Cloud, Service Cloud, or another cloud. This deletes the corresponding record in the Synchronized Data Extension, but it doesn’t delete the contact record from Marketing Cloud. Marketing Cloud recommends that Marketing Cloud Connect users delete information from Sales or Service clouds first, then delete information from Marketing Cloud. Use API calls to delete contact information from triggered send lists, Salesforce legacy lists, or Microsoft Dynamics CRM lists.How to leverage your synchronized data extensions?
The Salesforce CRM objects you sync to Salesforce Marketing Cloud as synchronized data extensions are not “sendable”. What this means, is that you cannot immediately use them for campaigns. Instead, you must create a new data extension and populate it with data from the synchronized data extension using for example a filter, SQL query, or a DESelect selection. The newly populated data extension can then be used for your campaign. You may also want to use data from synchronized data extensions across business units. Typically, you will have Salesforce CRM data sync with your enterprise business unit (the main business unit in your Salesforce Marketing Cloud account). To share the data from the synchronized data extensions also with child business units, a common approach is to:- Set up an automation that queries the synchronized data extensions on a regular base and populates data extensions that are sendable.
- Share these data extensions across business units.
Salesforce Marketing Cloud Contact Builder: Key Takeaways and Next Steps
With Contact Builder, you can organize your contact data into a single view of your customer. In fact, Contact Builder provides you with the tools to define ‘contacts’ in Salesforce Marketing Cloud and relate useful data to these. In Contact Builder, Data Designer is the main tool that you can use to build data models around your contacts. Within Data Designer, you can leverage different data sources, including – but not limited to – data from Salesforce CRM.
With all this, you have taken an important step in your Salesforce Marketing Cloud journey. Congratulations! Now, you need to make good use of your contacts by targeting them effectively and personalizing your communication. To target your contacts effectively, you need to understand how to best segment your contacts and send them relevant messages. To personalize your communication for your contacts, you need to gather information from across different data extensions and bring this information together into a single campaign.
While targeting and personalization can be challenging, you will find they become easy with intuitive drag-and-drop segmentation. That is why we created DESelect, so you can easily leverage your contacts data and deliver targeted and personalized campaigns. Your data model will be unique, so we are happy to show you how exactly DESelect can help you. All you have to do is simply get a demo here.
Continue reading Salesforce Marketing Cloud Data Model Part 4: How to work with Automation Studio.
FAQs
-
How does Contact Builder handle data privacy and compliance regulations such as GDPR or CCPA?
Contact Builder in Salesforce Marketing Cloud offers features to facilitate compliance with data privacy regulations such as GDPR or CCPA. While the article mentions the importance of deleting contacts upon request, Contact Builder also provides mechanisms for managing consent, implementing data retention policies, and enabling data encryption. Additionally, administrators can configure access controls to restrict user permissions based on regulatory requirements.
-
Can Contact Builder integrate with other CRM platforms besides Salesforce CRM?
Yes, Contact Builder can integrate with other CRM platforms besides Salesforce CRM. While the article focuses on synchronizing data between Salesforce CRM and Marketing Cloud through Marketing Cloud Connect, Contact Builder supports integration with various CRM systems through APIs and third-party integration tools. This enables businesses using different CRM platforms to centralize and manage contact data effectively within Salesforce Marketing Cloud(SFMC).
-
Are there any limitations or challenges associated with using Contact Builder, especially when dealing with large volumes of data or complex data models?
While Contact Builder offers powerful capabilities for organizing and managing contact data, there are some limitations and challenges to consider, particularly when dealing with large volumes of data or complex data models. Users may encounter performance issues when processing extensive datasets or creating intricate data relationships within Data Designer. Additionally, maintaining data consistency and accuracy across multiple data sources can require careful planning and management. It's essential for organizations to thoroughly assess their data requirements and implement best practices to optimize the performance and reliability of Contact Builder.
- Introduction to Salesforce Marketing Cloud Contact Builder
- Who defines access to Contact Builder?
- What are “contacts” in Salesforce Marketing Cloud Contact Builder?
- How can you export All Contacts?
- Where does the data about contacts come from?
- Data Designer
- Deleting contacts in Salesforce Marketing Cloud
- Marketing Cloud Connect and Contact Builder
- Salesforce Marketing Cloud Contact Builder: Key Takeaways and Next Steps
- FAQs
Latest Articles
-
Your Essential Guide to Dreamforce 2025 Highlights and Insights
Your Essential Guide to Dreamforce 2025 Highlights and Insights Attend Dreamforce 2025 Dreamforce 2025 is shaping up to be one of the most impactful events in Salesforce’s history. Scheduled to take place at the Moscone Center in downtown San Francisco, this three-day event attracts tens of thousands of attendees from the Salesforce ecosystem, developers and […]September 4, 2025A Practical Salesforce Implementation Guide
A Practical Salesforce Implementation Guide Implementing Salesforce isn’t just about installing software. It’s about getting your systems, teams, and data aligned to support better customer experiences and business results. When done right, a Salesforce implementation can boost efficiency, support growth, and provide a clearer view of your customers. Our Salesforce implementation guide walks you through […]September 3, 2025SalesForce Contact Builder
Making Sense of Salesforce Contact Builder Salesforce Contact Builder is the engine that helps bring customer data together inside Marketing Cloud. If you want to send the right message to the right person at the right time, this is where it all starts. Contact Builder allows marketers to collect, organise, and connect contact data from […]July 30, 2025How Consumer Brands Can Avoid Email Overload and Choice Paralysis
How Consumer Brands Can Avoid Email Overload and Choice Paralysis Consumer brands operating multiple labels under one corporate umbrella often face a unique set of challenges when it comes to email marketing, particularly when a large multibrand company attempts to manage email campaigns across its various brands simultaneously. One of the biggest pitfalls is overwhelming potential buyers […]July 29, 2025Join our newsletter to receive updates and helpful SFMC guides.


