Perhaps you haven’t heard about Automation Studio’s script activity yet? Or maybe you’re still wondering what you can do with it. You’re not alone, as this powerful activity type’s sorely underused. However, you’ll appreciate its flexibility and power once you see what it can do. Many MVPs, Marketing Champions, and passionate power users swear by these activities and utilize them for complex situations otherwise requiring external software solutions.
The basics
You can find script activity in the “Activities” section of Automation Studio and add it to the automation workflow just like any other activity.
As it can be utilized to run Server-Side JavaScript (SSJS) code, it bears all the capabilities of SSJS without the hassle of worrying about long page load times and how to schedule tasks. Furthermore, using a script activity avoids anyone guessing the CloudPage URL, as it’s not accessible publicly.
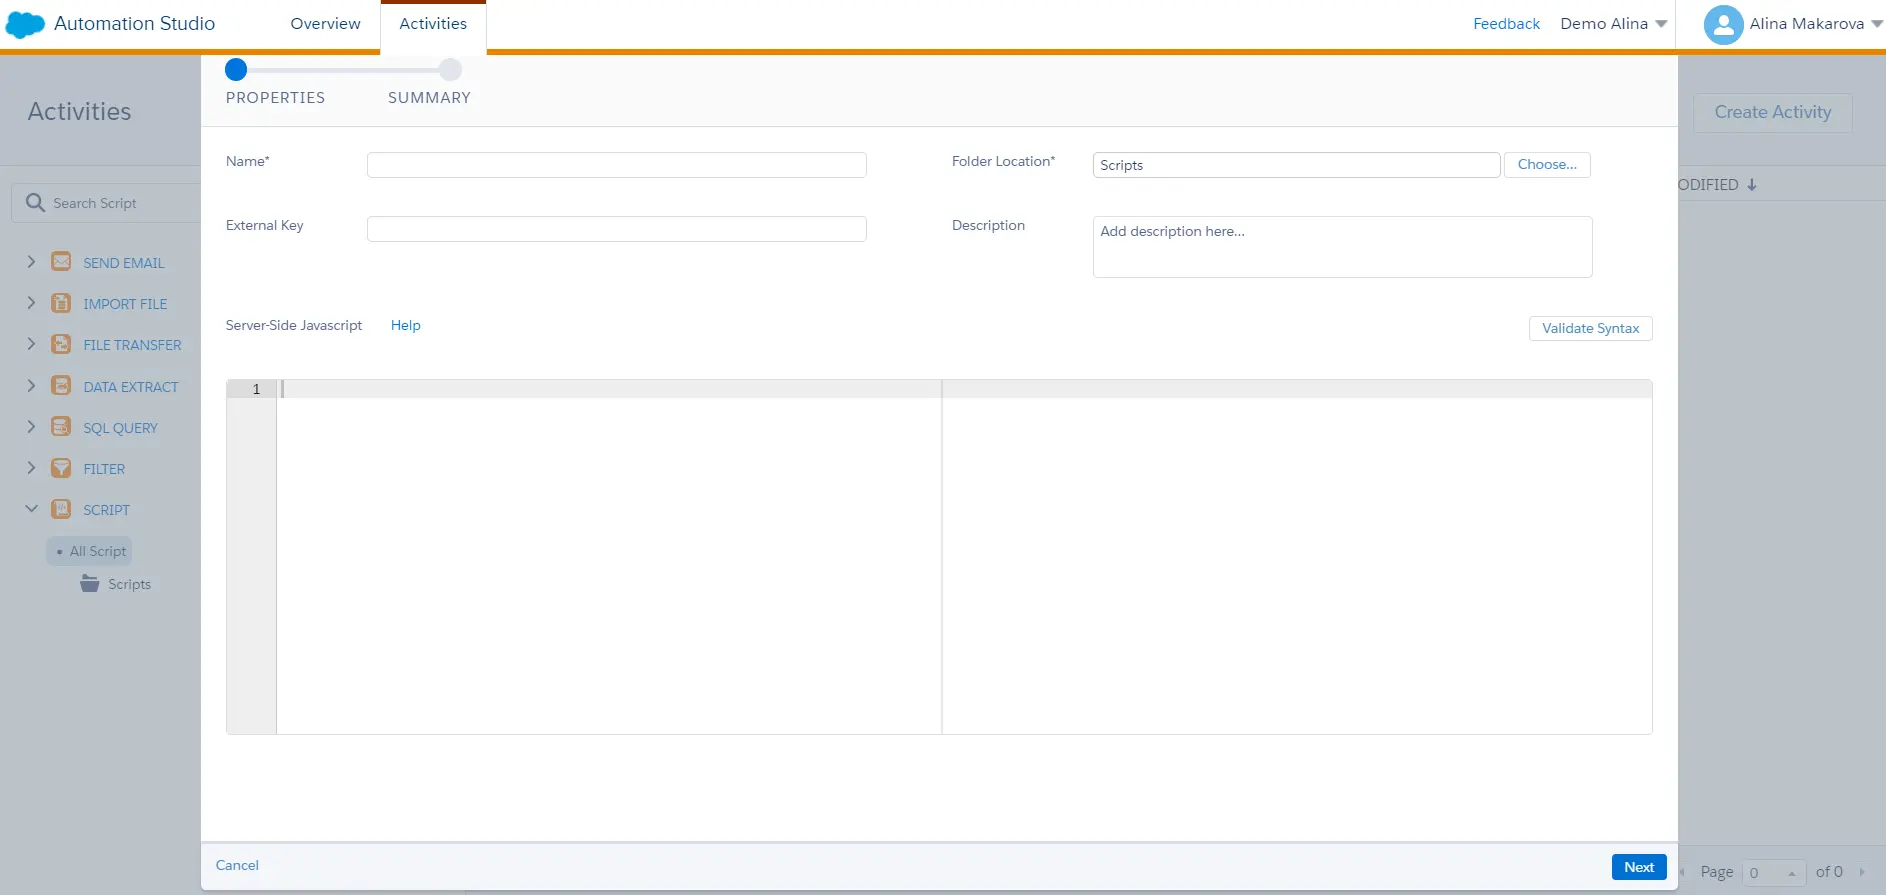
While it is a “Script Activity” and should therefore be clear to Marketing Cloud that it contains SSJS code, you must use a script-tag within the activity configuration just as you would on a CloudPage to indicate where the SSJS code is located:
<script runat="server" defer src="data:text/javascript;base64,CiAgIC8qIFlvdXIgY29kZSBnb2VzIGhlcmUgKi8K"></script>
But what exactly can I do with it?
Here are some examples of how you can use script activity:
- Interact with the Marketing Cloud API or SSJS Marketing Cloud functions to:
- Trigger other automations or activities within an automation. Run them on demand or as soon as a task is finished rather than the typical schedule.
- Dynamically create data extensions based on data fetched using your script.
- Initiate the contact deletion process.
- Interact with external APIs:
- Fetch data from a blog via API and write it to a data extension to send a fully automated newsletter.
- Perform batch updates in Sales and Service Cloud using the Salesforce Bulk API to optimize for performance and avoid mass updates from Journeys or CloudPages.
- Connect external services (print providers, snail mail providers, custom push or SMS, etc.).
- Fetch key metrics or data required for personalization using an API to avoid heavy API use within emails. Avoid using integration middleware for minor data points (e.g., number of current auctions at an auction platform, the number of job offers for a career page, etc.)
What if something goes wrong?
As with your Marketing Cloud Server-Side JavaScript code, you must take care to avoid errors.
First, every time an error is thrown, the automation will fail; thus, the activity will show as failed. No further steps will run automatically. Unfortunately, the error message isn’t displayed anywhere in Automation Studio. That’s where you must be prepared to step up your debugging game: Create a log for your error messages.
Create a data extension as an error log and catch any errors using try-catch, logging the message, and then throwing the error again. Hence, the automation still fails if an error occurs (this step is essential because otherwise, the activity will be seen as successful by the system).
Here’s what such an error logging code would look like:
<script runat="server" defer src="data:text/javascript;base64,CiAgUGxhdGZvcm0uTG9hZCgiQ29yZSIsICIxIik7CiAgdHJ5IHsKICAgICAgLyogWW91ciBjb2RlIGdvZXMgaGVyZSAqLwogIH0gY2F0Y2ggKGUpIHsKICAgICAgbG9nRXJyb3IoZSk7CiAgICAgIHRocm93IGU7CiAgfQogIC8vIEZ1bmN0aW9uIGZvciBlcnJvciBsb2dnaW5nCiAgZnVuY3Rpb24gbG9nRXJyb3IoZSkgewogICAgICAvLyBJbml0aWF0ZSBkYXRhIGV4dGVuc2lvbiB1c2VkIGZvciBlcnJvciBsb2dnaW5nCiAgICAgIHZhciBlcnJvckxvZ0RFTmFtZSA9ICJTY3JpcHRBY3Rpdml0eV9FcnJvckxvZyI7CiAgICAgIHZhciBlcnJvckxvZyA9IERhdGFFeHRlbnNpb24uSW5pdChlcnJvckxvZ0RFTmFtZSk7CiAgICAgIC8vIFRydW5jYXRlIGRhdGEsIHJlbW92ZSBkaXN0dXJiaW5nIGxpbmUgYnJlYWtzLCBldGMuCiAgICAgIHZhciBtZXNzYWdlID0gZS5tZXNzYWdlID8gZS5tZXNzYWdlLnN1YnN0cmluZygwLCAyMDAwKSA6ICIiOwogICAgICB2YXIgZXJyb3JUcmFjZSA9IFN0cmluZ2lmeShlKS5yZXBsYWNlKC9bXG5ccl18XFxufFxcci9nLCAnJykuc3Vic3RyaW5nKDAsIDQwMDApOwogICAgICAvLyBXcml0ZSBlcnJvciB0byB0aGUgZGF0YSBleHRlbnNpb24KICAgICAgZXJyb3JMb2cuUm93cy5BZGQoewogICAgICAgICAgInNjcmlwdE5hbWUiOiAibXlUZXN0U2NyaXB0IiwKICAgICAgICAgICJpZCI6IFBsYXRmb3JtLkZ1bmN0aW9uLkdVSUQoKSwKICAgICAgICAgICJtZXNzYWdlIjogbWVzc2FnZSwKICAgICAgICAgICJlcnJvciI6IGVycm9yVHJhY2UKICAgICAgfSk7CiAgfQo="></script>
You can also add custom error codes if you’re writing longer scripts with custom checks that throw errors for invalid input data, etc. That’s the beauty of SSJS activities; you’re free to extend and customize to fit your needs!
Conclusion
The great flexibility that comes with Script Activities (and Custom Activities for Journey Builder, for that matter) might just be what sets Salesforce Marketing Cloud apart from its competition. So if you have a requirement that seems unsolvable, think again and consider using a script activity.
We hope this sparks enough interest for you to embark on your SSJS journey. And if you’re not that experienced with JavaScript, perhaps this will motivate you to start exploring and learning.

Markus Dang
Markus is a guest author at DESelect. He's a Marketing Cloud Unit Lead & Solution Architect. He is also a Salesforce Marketing Cloud Champion.


Automation Studio in SFMC: Understanding Activities | DESelect
A Roundup of Data-Related Activities in SFMC Automation Studio and How to Use Them
Automation Studio in Salesforce Marketing Cloud offers a comprehensive suite of data management activities that empower marketers to automate and streamline their workflows. These automation studio activities are designed to handle everything from extracting and importing data to advanced segmentation and file transfers, reducing the need for manual intervention and ensuring data accuracy.
Key data-related activities include the Data Extract activity, which allows you to pull data from data extensions or data views and prepare it for use outside of Marketing Cloud. The Import File activity makes it easy to bring external data—such as CSV or XML files—into your Marketing Cloud account, ready for use in automations or campaigns. The File Transfer activity is essential for securely moving files into and out of Marketing Cloud, supporting both inbound and outbound file transfers via enhanced FTP.
For marketers looking to segment their audience or manipulate data, the SQL Query activity enables the execution of SQL queries on data extensions, allowing for advanced segmentation and data transformation. The Filter activity provides a user-friendly way to filter subscribers or contacts based on specific attributes and conditions, making it easier to create targeted segments for your campaigns.
By leveraging these automation studio activities, marketers can efficiently manage their data, automate repetitive tasks, and ensure that their marketing campaigns are powered by accurate, up-to-date information. This not only saves time but also enhances the effectiveness of your marketing efforts in Salesforce Marketing Cloud.
Data Extensions in Automation Studio
Data extensions are at the heart of Automation Studio in Salesforce Marketing Cloud, serving as the primary storage solution for all your customer data. These flexible tables allow marketers to store, organize, and manage large volumes of data, from basic contact information to complex behavioral or transactional records. Within Automation Studio, data extensions can be created, modified, or deleted as your data management needs evolve.
By utilizing data extensions, marketers can import data from various sources—such as CSV files, XML files, or even data extracted from other systems—and use this information to build highly targeted segments. This ensures that your customer data remains accurate and up-to-date, providing a solid foundation for effective marketing automation and personalized campaigns. Whether you’re pulling data for a one-time campaign or maintaining ongoing automations, data extensions make it easy to access and leverage the information you need to drive results in Marketing Cloud.
Email Send Activity
Sending emails is a part of your average marketer’s package, but sending emails through Automation Studio is a different story. Nowadays, it’s more likely to send emails using Journey Builder or a good-old Email Studio. Although, you can still use Automation Studio to send recurring email campaigns like Birthday emails. This Trailhead module explains in detail how you can do it in Salesforce Marketing Cloud.
To use Email Send Activity in Automation Studio, you need to configure the email message to send on its own or in sequence according to a schedule. Emails can be sent on a scheduled basis and at specific intervals, such as daily, weekly, or monthly, allowing for systematic and recurring campaigns. Scheduling activities opens many possibilities for recurring campaigns that can be easily automated in the studio. It’s also possible to reuse email activities, so you don’t need to create a new one every time.
You can choose and configure an email message to send on its own or in sequence according to a schedule. Configuring the Send Email Activity creates a Send Definition that can be used in other automations. It’s also possible to edit the email in the running automation. You can learn more about how to do it
You can also configure email sends to target specific subscribers based on their attributes, making segmentation and targeting more precise within Automation Studio.
You have to keep in mind that sending emails via Automation Studio has its limitations. For instance, the test sends are better to do outside the Automation Studio. That’s because editing a user-initiated email with a test audience in Automation Studio automatically removes the test audience. It’s better to use Email Studio for these purposes.
Send email activities that were created with classic email editor inside automation are no longer editable. If you want to edit the activity, you must replace it. The send definition that each Send email activity uses for sending is still valid.
Journey Builder is more often used as an alternative for Automation Studio for email sends purposes, and it allows more reporting and tracking possibilities than Automation Studio. It’s possible to build reports in Analytics Builder or use Email Studio and then see tracking results. In contrast, Automation Studio reports are limited to opened/ clicked information, and a more detailed analysis is available if you only use SQL to extract and analyze the data.
Script Activity
The Script activity in Automation Studio unlocks advanced automation capabilities by allowing marketers to execute Server-Side JavaScript (SSJS) within their automations. This powerful tool is ideal for scenarios where you need to manipulate or transform data in ways that go beyond the standard activities. With Script activity, you can automate complex business logic, perform custom calculations, or integrate with external systems via API calls.
Each Script activity requires an external key and a description, which are used for identification in the application interface and for managing API calls. This ensures that your automations remain organized and easy to maintain, even as they grow in complexity. By leveraging Script activity, marketers can create highly customized automations that address unique business requirements, making Automation Studio in Salesforce Marketing Cloud a truly flexible and robust platform for data-driven marketing.
Data Extract Activity
As you can see from the activities we’ve already covered, Automation Studio is an app for technical marketers, and the next activity isn’t an exception. You need to use data extracts to export certain important marketing events such as bounces, clicks, conversions, etc. data extract creates a file to operate outside of Salesforce Marketing Cloud. You can also use this activity to extract data from data extensions or data views. For instance, if you prepare reports outside of Marketing Cloud, you can leverage data extracts and download them on your desktop. Then you can use Excel or any other tool you use for managing data and analyze it there.
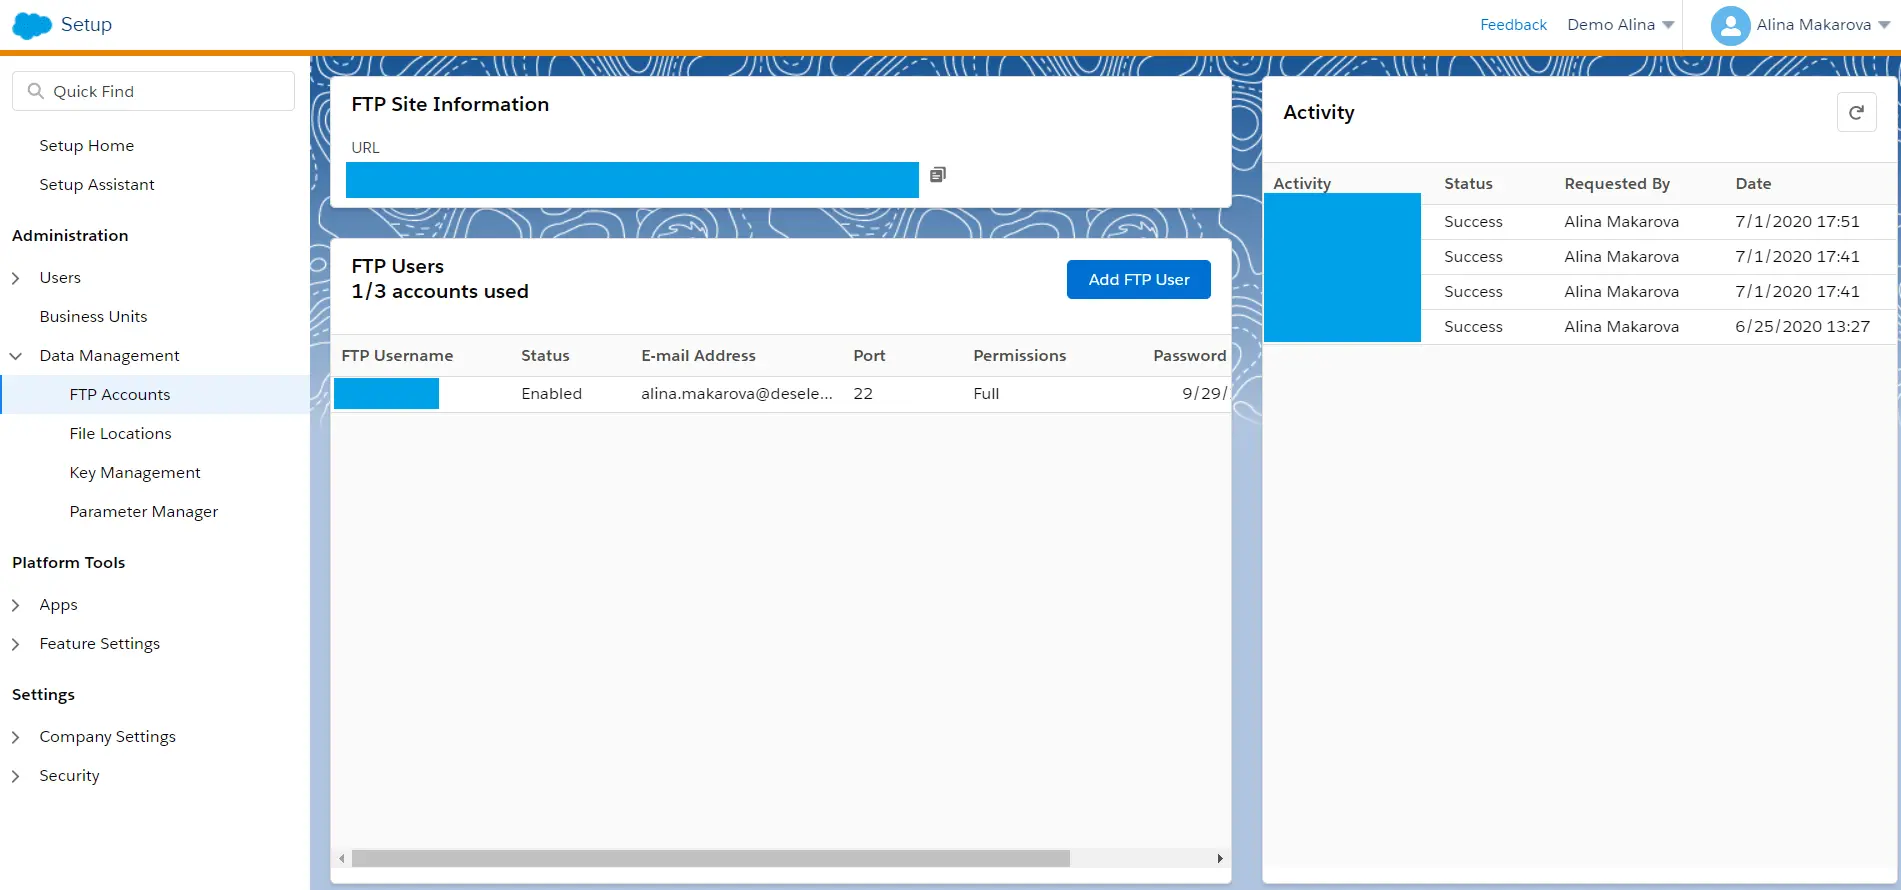
Firstly, to use data extracts, you have to configure where this data extract will be saved. Since most Marketing Cloud clients handle massive amounts of data, you can’t download the files directly on their desktop. You need to create an FTP user for privacy reasons and to be able to extract large files with data. That’s why you need to configure a File Transfer Location, and you have to specify it under your account settings before using data extract activity. There, under Data Management, you have to create an FTP user. Files can be placed in a designated enhanced FTP folder, which acts as an ftp location for triggering file drop automations.
How to set up an FTP in Salesforce Marketing Cloud
The advice for using the data extract activity is to include the file transfer activity in a separate step and not stacking it in the same step on the automation canvas. This action prevents the file transfer activity from looking for the data extract file before the data extract is complete. File drop and file drop automation allow automations to be triggered automatically when a new file, such as a csv file, is uploaded to the designated folder via file transfer protocol. This enables real-time data processing and campaign automation without relying on scheduled triggers.
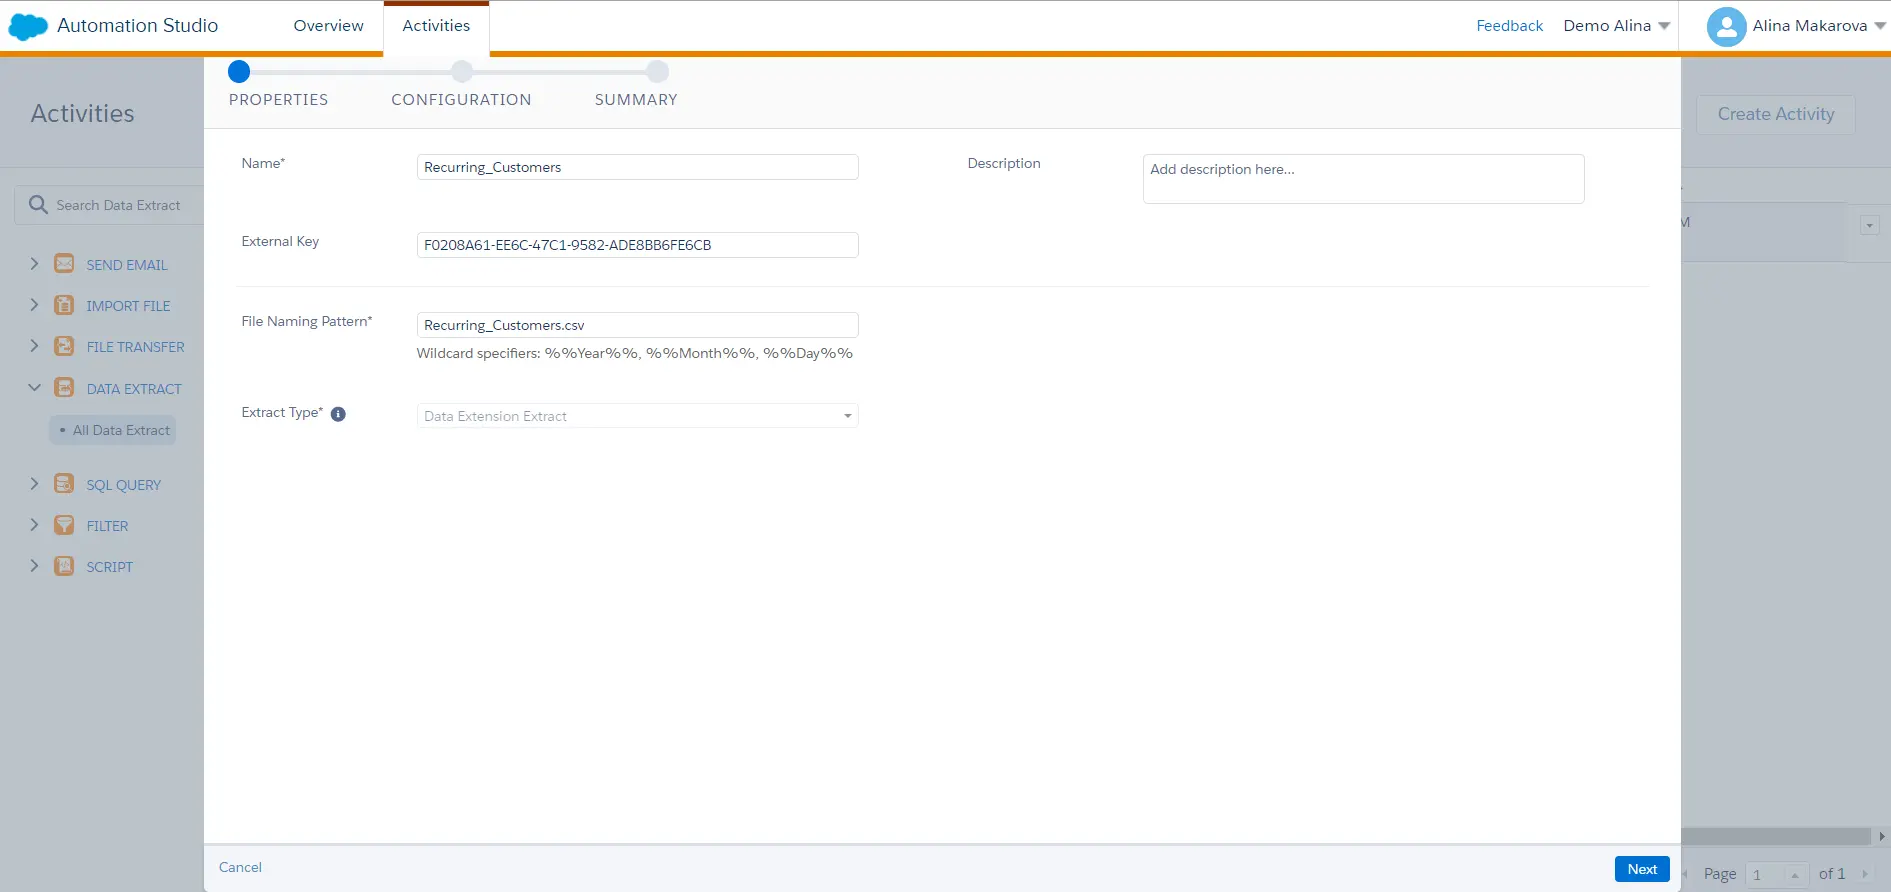
When creating a data extract activity, remember to fill in an appropriate file naming pattern, where you need to specify the file type, for instance, ‘.csv.’ That enables you to later use the extracted document in Excel, for example. You can also convert activity to an XML file, tab-delimited, or pipe-delimited file for import into your account.
In our extensive guide on Automation Studio, we show a use case that includes creating a data extract activity.
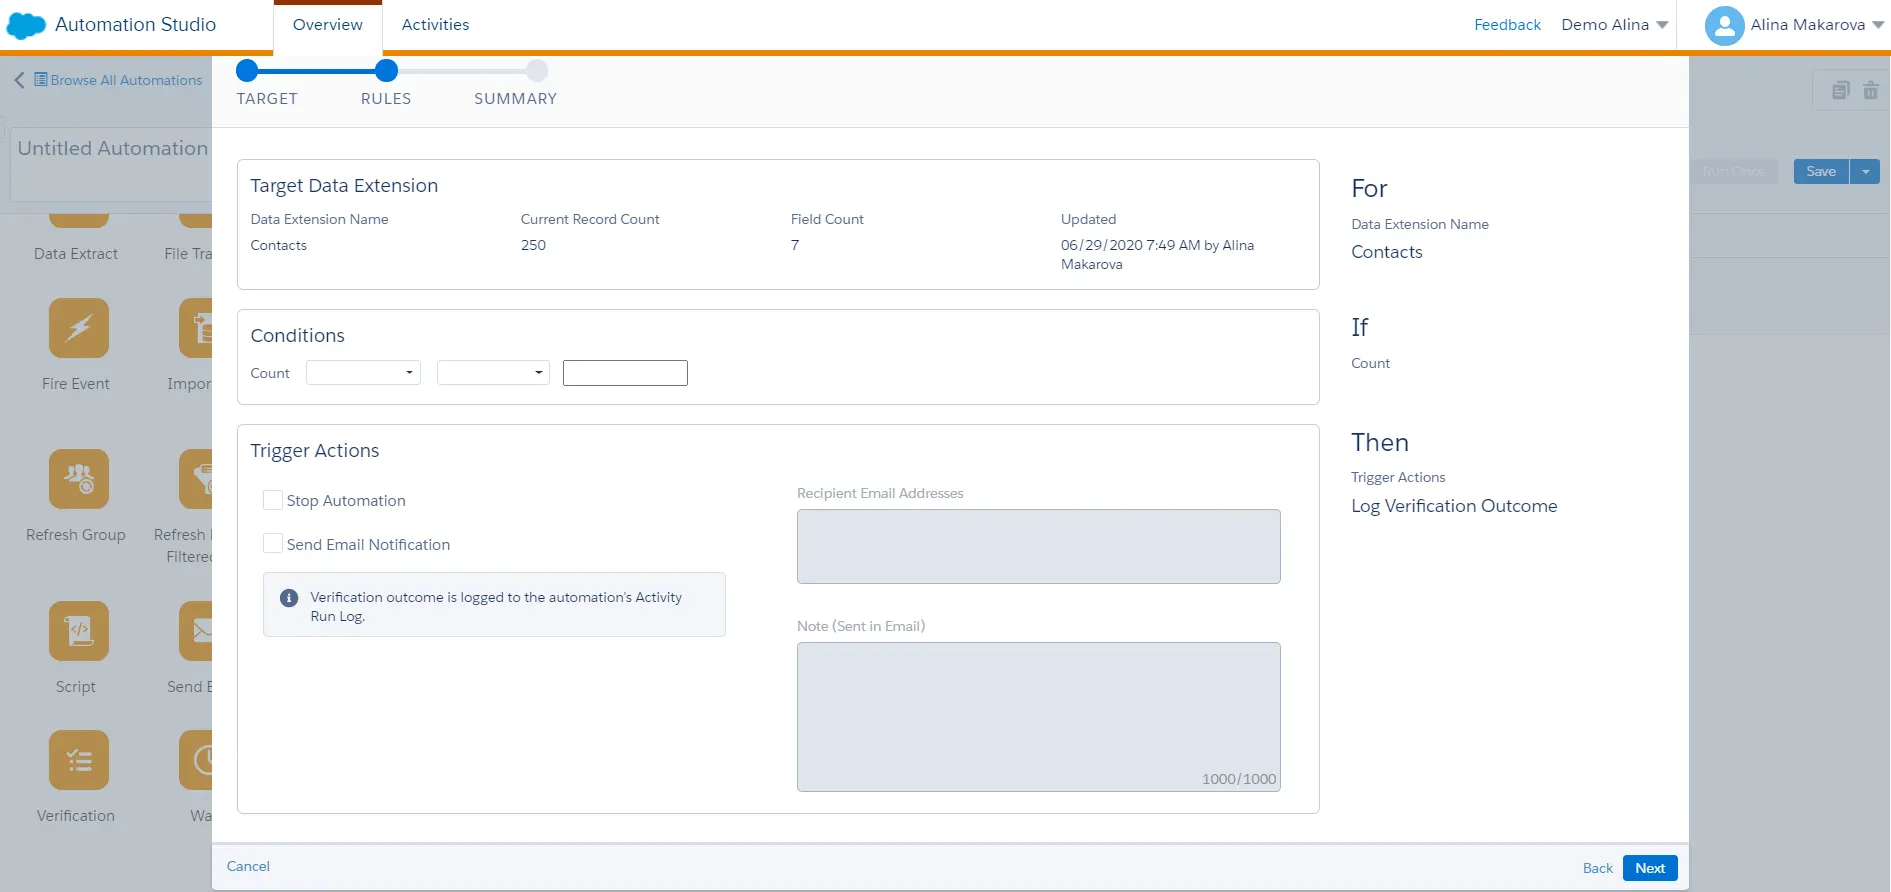
Verification Activity
This activity you need to use for precaution reasons to avoid unintended automation outcomes. The action lets you select a target data extension in your automation and evaluate the target data extension for conditions you set. For instance, you can use this activity to track why the target data extension contains more records than expected. Using this step in the automation will prevent the email sends to the records that aren’t supposed to receive it.
When the activity detects that the conditions you have set are met, the activity can stop the automation or send you an email notification or both, depending on the actions you define. If you choose to receive a notification when the conditions are met, you can include a note in the email to provide more context for investigation or troubleshooting.
There are a few things to keep in mind when using this activity. You can only use it in particular automation and can’t reuse it across multiple automations compared to many other reusable automation activities. You can’t configure a verification activity outside automation. However, it’s possible to add various verification activities in a single step, but don’t place them in the same step as any other activity on the automation studio canvas; it’s better to add it in the separate one.
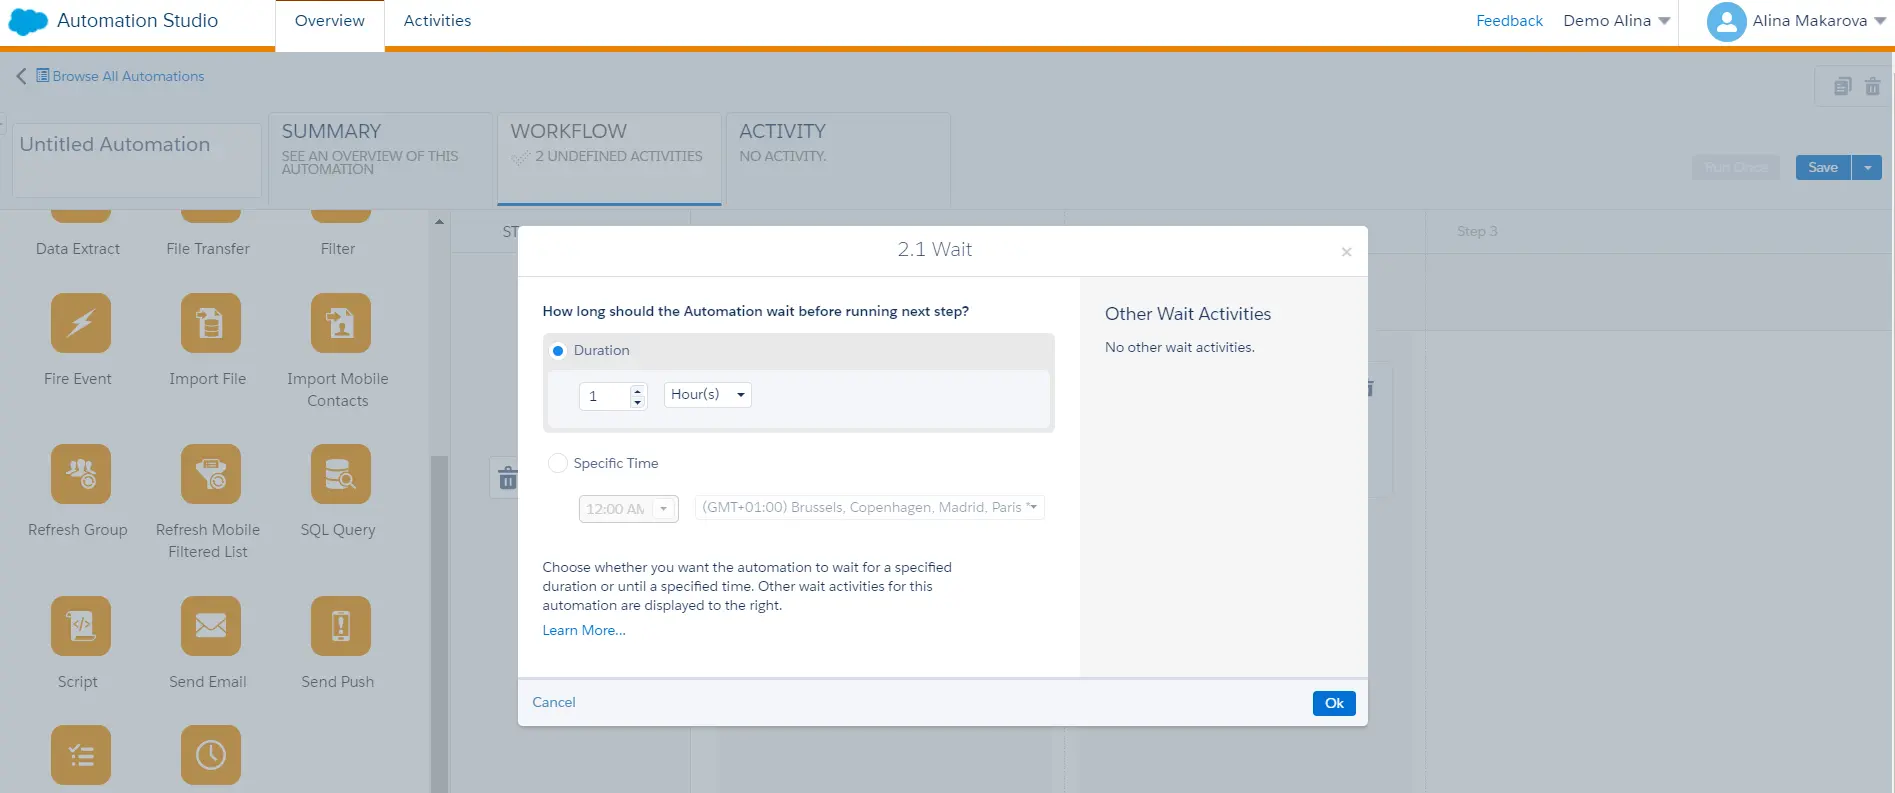
Wait Activity
If you want to have a pause between activities in Automation Studio, you can use the wait activity. You use it to wait for a specific duration or until a particular time before performing the next step. There’s no limit of wait activities you can include in single automation.
However, there are considerations to be aware of when using this activity. For example, even though there’s no limit to the number of wait activities to add to the automation, the combined time limit for them cannot be more than one year. To avoid that, you can see wait times for previous wait activities and calculate the total wait time in the automation.
If you specify the duration of the first wait activity, any wait activities occurring later in the automation’s workflow begin after this wait time ends.
Lastly, when automation is in the middle of a wait activity, that run is skipped when the next scheduled or triggered run occurs. To avoid errors with the automations, pay attention to adding the wait activities to avoid conflict.
Conclusion
It can’t be stressed enough that with great power comes great responsibility, and Automation Studio is a perfect example of that. This Salesforce Marketing Cloud studio is a great tool to use if you want to automate the data-related activities in the platform and perform technical marketing tasks.
However, you need to choose carefully whom you give access to this tool, and we recommend limiting access to it as much as possible. Suppose you still want marketers to have the power to schedule specific campaigns and create advanced segments based on the data you have in Salesforce Marketing Cloud leverage this functionality in DESelect Segment.
To use these functionalities in the DESelect Segment, a marketer doesn’t need access to Automation Studio and data-sensitive information or have technical knowledge of the platform. You can book a call with one of our certified consultants to have a personalized demo of DESelect Segment and find out how it helps you fulfill your data automation needs in Salesforce Marketing Cloud.