How to manage data in Salesforce Email Studio

Introduction to Email Studio in SFMC

Email Studio in Salesforce Marketing Cloud is an exceptional tool to manage your email communication. This advanced functionality can be of great use to companies and enterprises processing a large amount of subscriber data.

You use Email Studio for email sends, storing subscribers, checking email deliverability, and reviewing reports. Email Studio allows you to create subscriber segments for targeted campaigns too. Overall, it’s a flexible tool that opens many opportunities. However, to master it, you first need to understand its processes. This compelling guide aims to elaborate on Salesforce Email Studio’s functionality, highlighting its nuances for better user adoption.

Subscribers in Email Studio

To begin to understand Email Studio, first, let’s define its lingo. Customers or contacts in Email Studio are referred to as Subscribers. If you open this studio, you’ll see the All Subscribers list. This is a master list of all subscribers receiving emails from your company. The All Subscribers list contains more than just the names of your subscribers. You’ll also find information on unsubscribes, bounces, and deliverability. Subscribers in Email Studio may constitute a subset of your “contacts” and hence count towards the number of contacts covered by your Salesforce contract. You can learn more about how Subscribers and Contacts are related here. Let’s define a subscriber in SFMC and determine the difference between a contact. A subscriber opted to receive communications from you via a specific channel, such as email, SMS, MMS or push notifications.  A contact is a single individual who can receive messages via multiple channels. Contacts can receive messages from the channel apps or the triggered send API. Note that Marketing Cloud also considers an individual a contact if Journey Builder processes that individual in a journey, regardless of whether Marketing Cloud sends a message via any channel to that contact. Remember that all subscribers are contacts in SFMC, but not all contacts are subscribers.

Subscriber Key

Each subscriber in Marketing Cloud has a unique subscriber key. In SFMC, a subscriber key is a user-defined identifier that represents a subscriber. There are two other keys in Marketing Cloud worth knowing:

  • Contact Key: This is a unique value you assign to identify a contact within your Marketing Cloud account found in Contact Builder. The contact key is essentially a subscriber key in Email Studio.
  • Primary Key: The primary key is a unique field on a data extension that identifies a unique data point. This can be the contact key, but can also be something unique to the data, like a stock-keeping unit (SKU).

Subscriber Key Best Practices


Many admins choose to use email addresses as subscriber keys, which have the benefits of simplicity and can lower your contacts count (and hence be more cost-efficient). This approach can work if you have a relatively simple data model and primarily use Email Studio within Salesforce Marketing Cloud (SFMC).

However, best practices dictate the use of a unique ID as a Subscriber Key. For instance, a customer may have more than one email address or phone number. Using a unique ID allows you to link these different addresses and numbers to a single contact instead of having multiple contacts for the same customer.

This unique ID will often be a Salesforce CRM ID, assuming you synchronize your data between Salesforce CRM and Marketing Cloud. For instance, companies who use Salesforce Sales Cloud often use the contact ID and lead ID as Subscriber Key. You should note that this may increase the number of contacts you have in SFMC. Companies that do not use Salesforce CRM may use a unique ID generated by another system. This depends on what data you decide to store in SFMC.

Subscribers in SFMC also receive a Subscriber ID, which is a unique system-generated identifier representing a subscriber. Essentially, SFMC will generate a subscriber ID for each unique subscriber key. These are typically not visible to SFMC users and can be utilized as surrogate keys by internal Marketing Cloud systems. These fields are visible when tracking extracts and system data views in query activities. It’s best to avoid using these values for Marketing Cloud activities, as they can cause performance issues.

Subscriber Status


Subscriber Status refers to a single subscriber’s email deliverability. There are several statuses available:

  • Active: The subscriber can receive emails.
  • Bounce (Returned): The subscriber cannot receive emails due to 1 or 2 soft bounces or one hard bounce, and the subscriber has not opened or clicked through the received email.
  • Held (Undeliverable): This status occurs after three soft or hard bounces, the subscriber has not opened or clicked through an email, and at least 15 days have passed since the first bounce.
  • Unsubscribed: the subscriber has requested to be removed or was removed from a Subscriber List.
  • Deleted: The subscriber was deleted from a Subscriber List. It’s better to change the status to Unsubscribed rather than deleting Subscribers to prevent accidental future sends.

You can also manually change the subscriber status, but remember: Subscribers in an undeliverable status previously bounced an email sent from your account. Changing subscribers from undeliverable to active can result in high bounce rates in future sends. Subscribers in an unsubscribed status previously unsubscribed from emails sent from your account. Changing subscribers from unsubscribed to active can result in high spam complaints in future sends.

You can check Subscriber Status under All Subscribers, where you’ll find the Status field.

How to organize your subscribers in Salesforce Marketing Cloud Email Studio

There are three main methods of storing subscriber data in SFMC’s Email Studio: lists, data extensions, and groups. Each one has specific advantages depending on the size of your data and how you intend to use them. Here are some essential factors to consider when using lists and groups.

Lists in Email Studio

Lists are the default method of storing data. You can set different attributes to your subscribers using lists, representing a collection of subscribers, and providing a simple audience segmentation. These attributes are used to store a subscriber’s status within a given list.

You can only use lists when your Subscriber count is below 500,000. Lists work best to manage a relatively simple subscriber model that does not contain other commercial or transactional information. You can also manage personal data in lists.

Groups in Email Studio

You can also store data in Email Studio by using groups, subsets of list subscribers. There are a few methods to create groups in Email Studio.

You can build both random and filtered groups in SFMC. You can do it by accessing My Groups and clicking on Create on the right-hand side.

Filtered groups are basically segmented lists. Create filtered groups by filtering on profile attributes, preference attributes, filters, and measures. Random groups are segments of lists or filtered groups, and you can create a random group by splitting a subscriber list or filtered group. These groups can be renamed, moved, refreshed, and more. Groups can be used to create a segmented list of subscribers.

Best practices for using groups are similar to lists since groups are segmented lists in SFMC. If you prefer simplicity over performance, groups can be an easy solution. For instance, groups with random subscribers can be used when you A/B test new email templates.

Data Extensions in Email Studio

Data Extensions (DEs) are tables containing various data. They’re a popular alternative to lists in Salesforce Marketing Cloud (SFMC) due to their features.

There are several instances where data extensions are recommended. If you have more than 500,000 subscribers, you must use data extensions since lists will not support this many subscribers. Also, if you require a fast-import, or multiple subscriber data sets with separate definitions, then Data Extensions are your best option. Data Extensions also support more advanced segmentation.


Types of data extensions:

  • Standard DEs –  relational database table that can store any subscriber-related data.
  • Filtered DEs – Filtered data extensions create a subset/segment from an existing data extension.
  • Randomized DEs – Randomly selects subscribers from a source DE.
  • Synchronized DEs bring data from Salesforce Sales Cloud into Marketing Cloud through Marketing Cloud Connect.
  • Salesforce DEs – You can import data from SFMC back to Sales or Service Cloud using Salesforce data extensions. Utilize tracking data for emails sent to Salesforce data extensions using SFMC Salesforce Sends to the Salesforce (SF) Contact or Lead record in the connected org. Interactions create import activities with accessible Sales or Service Cloud reports with Salesforce data extensions. Salesforce DEs are not made in the same way as a standard DE. To utilize a Salesforce DE, you must copy its data to a standard DE using a query activity.
  • Test DEs – These are useful for users who need to send test emails but cannot view customer data. Test DEs hide this information for testing purposes.

Shared DEs – DEs placed in the shared data extensions folder are accessible by team members working in other SFMC business units. You can set access permissions to decide which information is shared with whom. You can also choose the time frame which defines the access to shared DEs.

Field Types in Data Extensions

There are a variety of data types to use in the following options when you create a field in a data extension (DE) in Email Studio.

  • Text —  This character limit goes up to 4,000 characters. Text field definitions can only be updated to increase the size of the field.
  • Numbers — These are integer values between -2,147,483,648 and 2,147,483,648. If you want to import a decimal value, use the Decimal data type instead.
  • Date — Dates are accepted in various formats, such as 1/1/2005 or January 1, 2005, but all dates are converted to MM/DD/YYYY format once inputted. You can add HH:MM time values following the date value. You can use an AMPscript function to format this value. 
  • Booleans — These include true values such as 1, Y, Yes, and TRUE, and false values such as 0, N, No, and FALSE.
  • Email Addresses — A field of this type must exist for you to send an email to a DE. However, the system does not verify that the email address is valid when importing data. The system checks the syntax of email addresses and provides an error message if the syntax is incorrect. The limit for email addresses is 254 characters.
  • Phone Numbers — This data type accepts any string with 15 digits and strips out non-digit characters.
  • Decimal — When you define a field as a decimal, you set the length by indicating the total maximum length of the field, which is called precision. You also set how many places the field can hold after the decimal, which is called the scale.
  • The first field is the total maximum number of digits. The second field is the maximum number of digits after the decimal point. For example, a decimal field with a length of 8.2 sets the total maximum number of digits the field can hold to 8, with two digits after the decimal point. This leaves up to 6 digits before the decimal point. If not otherwise declared, the scale will be filled with 0s.
  • Locale — These include an ISO language and country code. A minimum of two characters are required to define the subscriber’s country. You can enter as many as five characters if you want to add the language. For example, an English-speaking resident of the United States would have an “EN-US” Locale value.

Data Views

Data views are system-generated tables (or “data extensions, DEs”) in Marketing Cloud. They contain different information about the Subscribers and events, such as email/SMS sends, email opens, or links clicked. Also, you can view behavioral information such as emails forwarded to friends. There are 24 different data views in SFMC that you can check out here.

Measures

In Email Studio, you can define Subscriber behavior in units known as ‘measures.’ Once you’ve created a measure, it can be included as data filter criteria to segment a Subscriber list. Examples of measures include:

  • Unique unsubscribes in the last 30 days.
  • Total opens in the last 30 days.
  • Hard bounces in the last month.
  • Total click-throughs in the last 30 days.

Working with measures helps to understand SQL and relational data structures.


Measures vs. Data Views

What is better for behavioral segmentation: Measures or data views? Since Email Studio only provides a limited view of behavioral information, marketers using SFMC often turn to data views directly as a simpler alternative. 

If you prefer to have all your behavioral data in one place, you might find this useful:

  • Replicate the data view structure (so-called “archive”) in your data extensions. This is especially useful for retaining data for more than six months since data extension data won’t update automatically the same as a data view.
  • Create an automation flow to extract and archive data every six months by choosing ‘overwrite’ as a data action.
  • Use the’ archive’ data for analysis/reports/RFM/behavioral segmentation, etc.

Profile & Preference Attributes

Email Studio uses profile and preference attributes to store information about subscribers. The profile attribute contains information to characterize a subscriber profile. For example, each subscriber is asked to provide their birth date and email address. By default, every account has three profile attributes: Full Name, Email, and user-defined, intended as a generic attribute that you can use as needed. By default, every account receives an HTML Email preference attribute, set to Yes. You can’t modify these attributes. 

Profile & Preference Attributes are defined globally and apply to all Subscriber Lists and Business Units. They are also used to build groups within Subscriber Lists and drive dynamic content.

  • Profile Attribute refers to information used to characterize a subscriber. Full Name, Email, and user-defined exist by default and cannot be modified. 
  • Preference Attribute refers to how and what kind of communication a user wants to receive and is defined as Yes or No choices. 

How to set up the Profile Center


The Email application uses the information in the Profile Center to personalize emails sent to Subscribers. The links in each ‘email send’ connect your Subscribers directly to their Profile Center page, and Subscribers can access their Profile Center page to view and change this information. This link appears in a default footer. To remove the default footer, you must contact your representative. To help protect your Subscribers’ privacy, be sure that the information you enter in the Profile Center does not include sensitive or personal information about your Subscribers. Include only the information you need to manage the profile and nothing more if an email is forwarded to another person via an email client instead of Forward To A Friend. The links in the email lead to the original Subscriber’s Profile Center page. This also applies to the Subscription Center and Unsubscribe links. Include only the information you need to manage the profile, nothing more.

Suppression Lists

A suppression list is a subset of your subscribers that you don’t want to receive certain communications. These lists filter out email addresses to prevent them from receiving your communications. They act as a “do not contact” list for your email campaigns. Types of suppression lists you may want to maintain could be: For more information on avoiding unsubscribers and spam complaints in your future email campaigns, check out our article on how to exclude customers who have been targeted recently in Salesforce Marketing Cloud.

Publication Lists

You use Publication lists to control which emails your Subscribers receive, such as opting out of future sends on a list. If no Publication List is selected at send time, the All Subscriber list is used by default. If a Publication List is defined as public, it becomes visible in the Subscription Center, from which subscribers can opt-out. Subscribers can opt-in to Public Publication Lists but only receive emails if they exist in the Sendable Data Extension.

Segment your subscribers in Email Studio

Defining Data filters in Salesforce Marketing Cloud Email Studio

You can find data filters under All Subscribers in Email Studio and use them to filter a data extension.

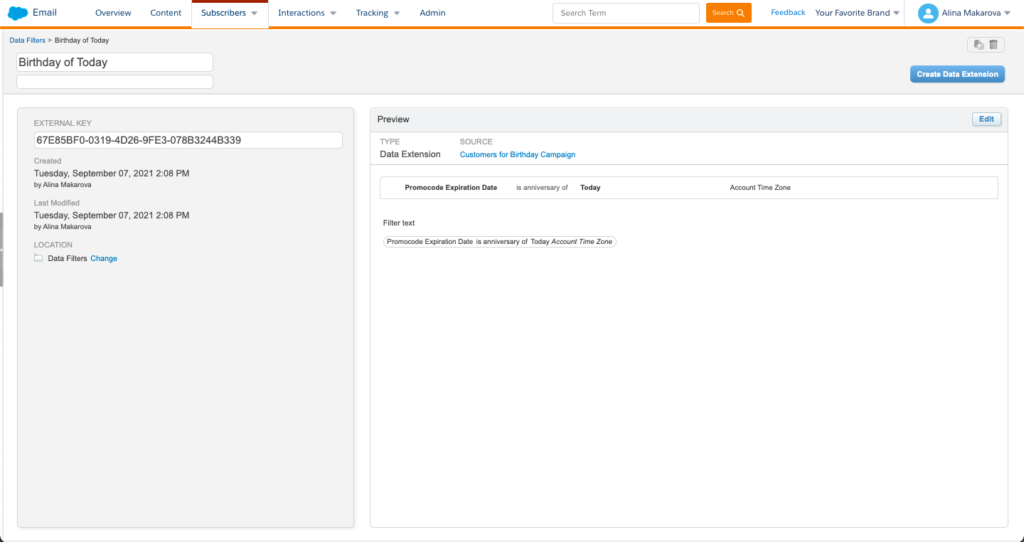
As shown in the example above, you can choose a field in a data extension ( e.g., language) and filter only those contacts that speak Dutch. You can set multiple filters on one data extension and save it next to create a filtered DE. 

You can also create relationships between two DEs using data relationships and apply cross-filters. Creating relationships between more than two data extensions is often unreliable. This has been confirmed by our experience working with data relationships and communicating with Salesforce Support. As such, we do not recommend using data relationships. In the past, we’ve written a guide on using filters in Email Studio.

More segmentation opportunities with DESelect

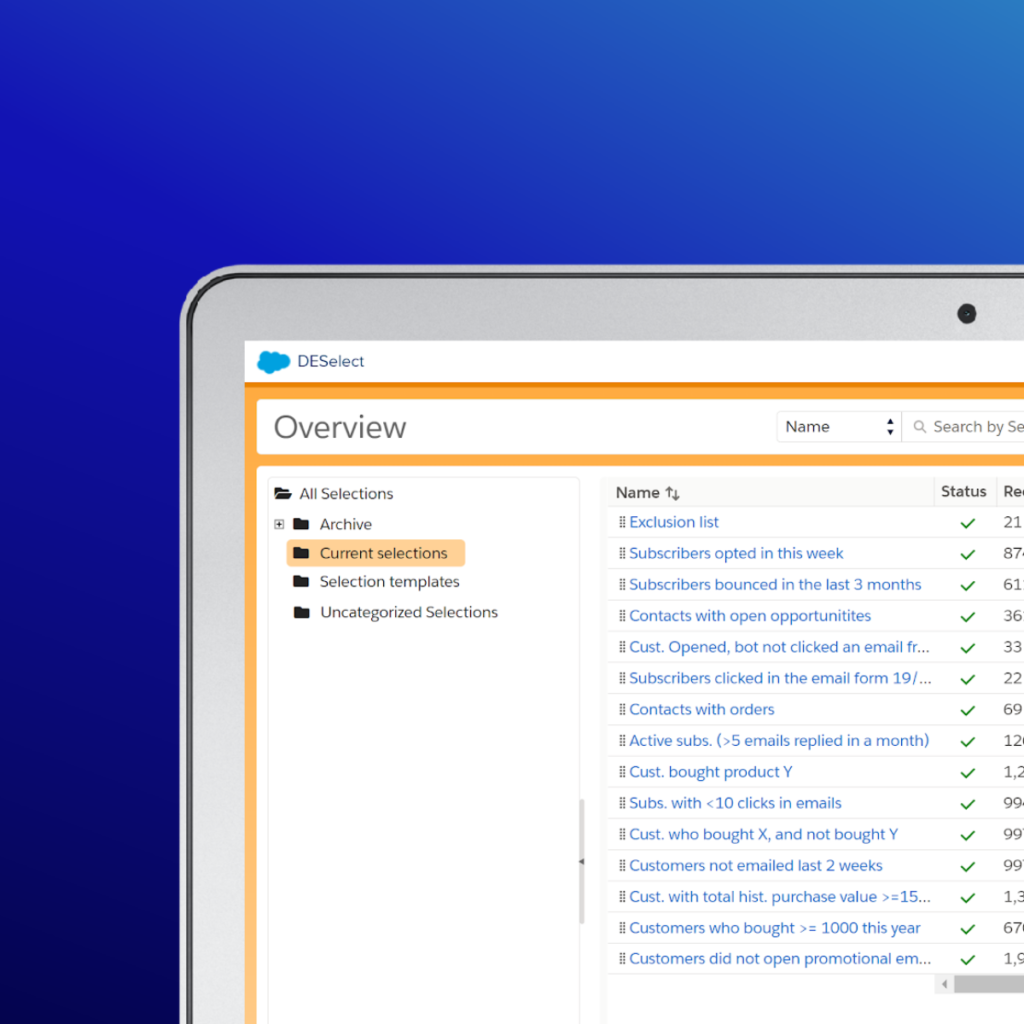
There are alternatives if you like the user-friendliness of data filters but find their functionality somewhat limiting. DESelect Segment is a drag-and-drop segmentation solution for Salesforce Marketing Cloud that allows you to create top-notch segments with an unlimited number of filters. Since DESelect Segment is integrated with SFMC, your work in the app is seamless. You can connect as many data extensions as you want and generate target data extensions right inside the app.

salesforce email studio

Discover the Ultimate Segmentation Solution

Launch campaigns 23% faster and optimize data management in Salesforce Marketing Cloud with DESelect Segment

How to create and send an email to your most engaged audience?

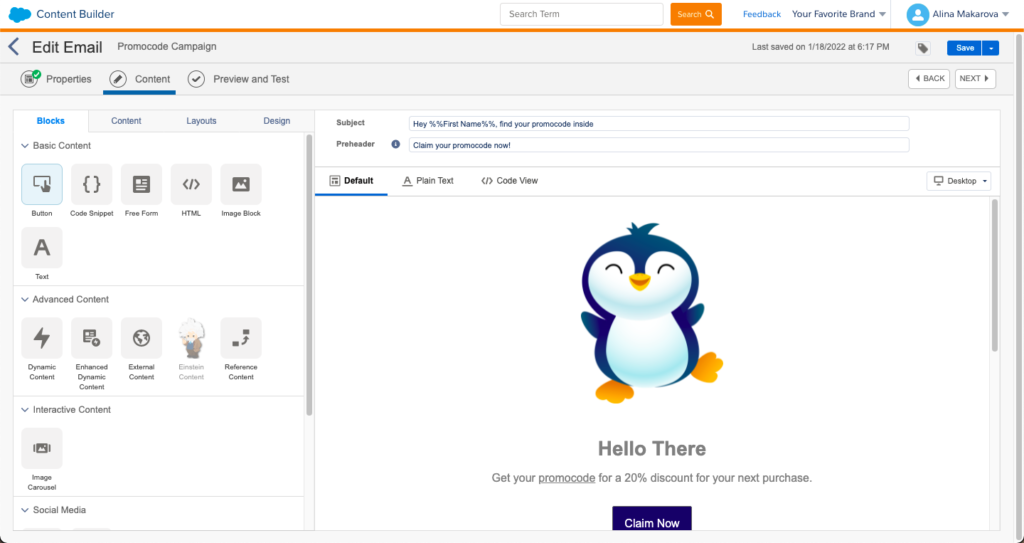
  1. Create an email in Content Builder that can be accessed from a toolbar. You can specify the campaign, the folder, and the description for your email if you want to re-use it. You can choose to create a text-based or HTML-based email, or you can create one from templates. The templates can be a good alternative for a non-HTML savvy user. In the email itself, you can already add personalization strings for your subject line and the body of the image.
  2. Navigate to DESelect (which you’ll find under AppExchange).
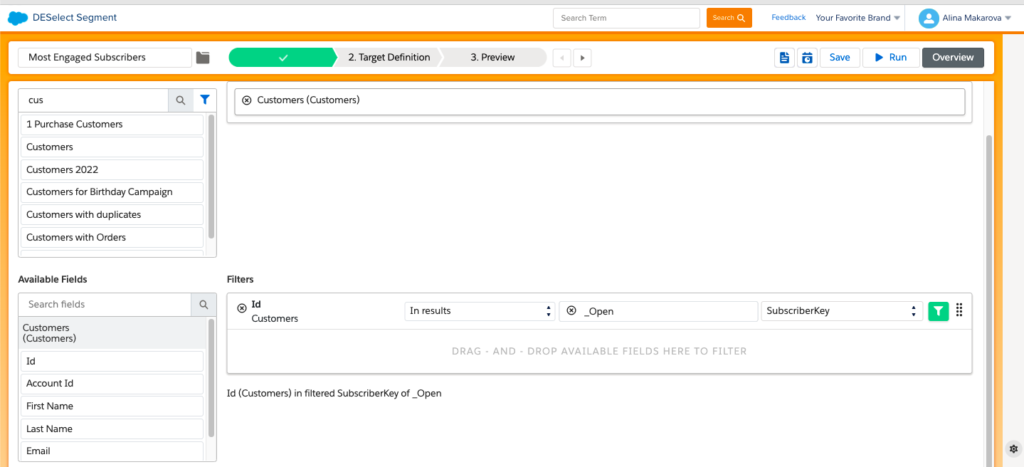
    1. You need to find the data extension you want to send your email. In our example, it’s a data extension called Customers.
  3. Then, you move to the filtering criteria. Here you drag and drop Id fields and choose the In Results filter.
    1. Choose a data view _Open.
    2. Create a relationship based on the Subscriber key.
    3. Choose the Count of Subscriber Key and select Great or equal to 5.
    4. Drag and drop EventDate and choose a relative date three months before now.
  4. Now you can move on and create a target data extension. Choose the fields from your source data extension and ensure it’s sendable and testable. Save it in a designated folder that will be easy to find when creating your selection.
  5. In the last step, you can run a preview of your selection to double-check if the results are correct. Suppose you’re satisfied with the results, press Run. That way, your data extension will be populated with the results and ready to use in Email Studio.At this step, you have two options to send the email. You can send it via the Content tab (new option) or from Interactions (old option) in Email Studio.To send an email using the Content option, you need:
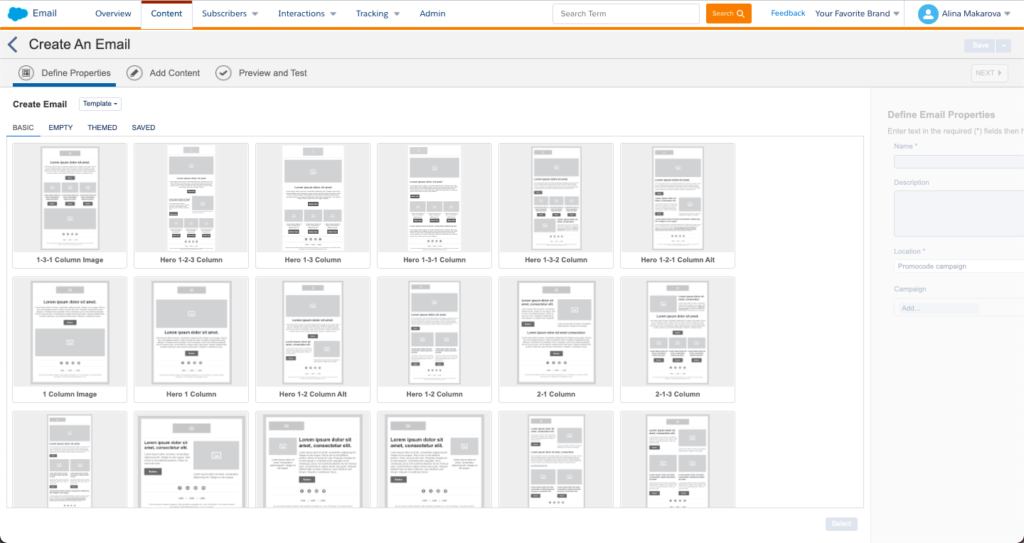
    1. Click on Create an Email and in the Define Properties, choose the created template.
    2. In the Add Content option, define the subject line and the preheader text. You can also adjust any additional content
    3. Next, move on preview & test screen. You can test the layout of your email on different screens using Litmus and send test emails to yourself or your colleagues to see if everything is displayed correctly.
    4. In the last step, you add the data extension you’ve created with DESelect Segment with the segmented audience. Don’t forget to check if the personalization strings work.
    5. Now you are ready to send your email campaign!

To send an email using Interactions:

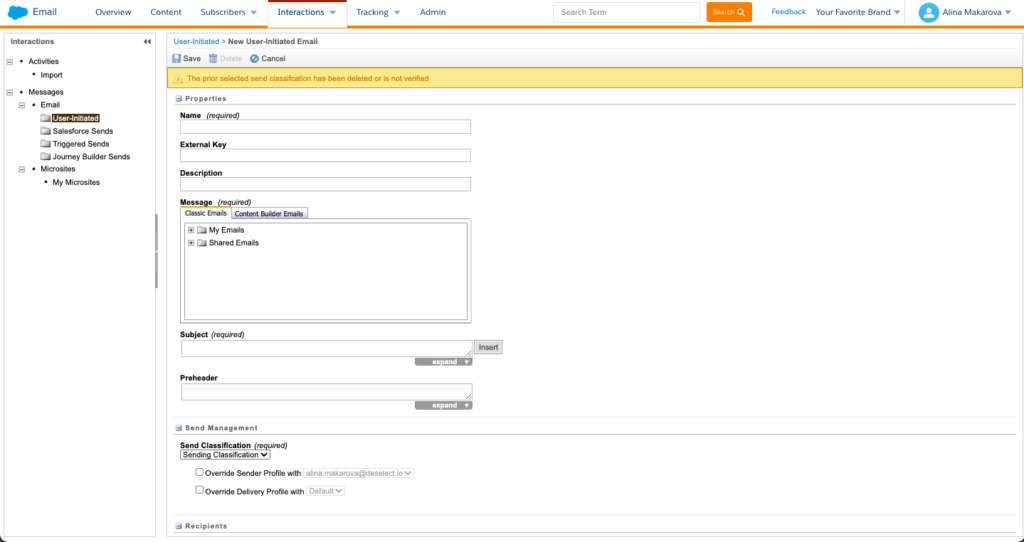
  1. Navigate to Email Studio and choose Interactions from the toolbar. Choose User-Initiated email. Provide a name for your email, then from Content Builder emails, select the template you have just built in Content Builder.
  2. Check if your subject and preheader text have been transferred correctly.
  3. Configure the sender management information. Here you define from whom your email is sent.
  4. Under recipients, choose who should receive the email. Click on Edit Recipients to select the segmented data extension you have created with DESelect.
  5. Configure the test audience if needed.
  6. Configure Tracking: you can select where the tracking information will be sent in this step. This will help you to analyze the campaign you are about to send.
  7. Check if everything is correct, and save the email.
  8. Now you are redirected to the overview page. From here, select the email you’ve configured and first test-send. Check the email for performance before sending it. If it behaves as expected, you can choose to send it now.
  9. Voila, congratulations on your Email Studio campaign!

Stop Organizing Your List with Tedious SQL and Make the Campaigns About the Content & the Offer

Approximately 2,003 words of this article was about navigating SQL to segment your list before even creating and sending the email itself! 

Without SQL, your ability to use SFMC to it’s full potential is impossible. That means your technical team gets asked to quick turn SQL queries so the marketing team can send more campaigns. 

Teams feel squeezed for time and bandwidth, and your marketing campaign efforts never feel fully utilized.

This inefficient process has been the norm for teams big and small in Salesforce Marketing Cloud, and keeps companies like yours from unlocking its full potential.

That’s why we created the DESelect Segment tool to help marketers, campaign managers, and CRM admins get out of one another’s way so each of you can do the things you’re great at.

DESelect’s Segment unlocks the full potential of Salesforce Marketing Cloud to allow your marketing team to independently create their own segmented lists without needing to learn or use SQL. That means your team sends better, more personalized campaigns and helps you get more ROI out of your SFMC instance.

Your entire team gets what they want. IT is free to work on meaty projects. Campaign Managers get to think more about the content and the offer than briefing the technical team on the list. And Marketing leaders get to show much more return from their campaigns because they are better segmented and more personalized. 

And teams can start getting value from Segment for as low as $700 / month per SFMC organization, depending on your use case.  

Ready to see what no code SFMC audience segmentation can do for your marketing team? Our incredible account team is ready to help you start your segmentation journey. Get a no pressure demo of DESelect Segment here.

Join our newsletter to receive updates and helpful SFMC guides.

Deselect icon
Subscribe to the Newsletter
Receive Salesforce Marketing Cloud tips,
tricks, and DESelect updates

By clicking the “Subscribe now” button, you agree to the DESelect Terms of Use and Privacy Policy.

Deselect icon
Subscribe to the Newsletter
Receive Salesforce Marketing Cloud tips,
tricks, and DESelect updates

By clicking the “Subscribe now” button, you agree to the DESelect Terms of Use and Privacy Policy.