Harnessing the Power of Relative Dates in Salesforce Marketing Cloud (SFMC)

A marketer configuring relative data filters in Salesforce Marketing Cloud (SFMC)

The ability to adapt and react with timely precision is key in the marketing world. Marketing Cloud Engagement (MCE), also often referred to as Salesforce Marketing Cloud (SFMC), offers robust tools to facilitate such agility, particularly through the use of relative dates. This feature enables marketers and SFMC admins to automate campaigns with a precision that aligns perfectly with their audience’s engagement patterns. Whether you’re a seasoned marketer or just getting to grips with SFMC, understanding how to leverage relative dates can significantly streamline your processes and enhance campaign effectiveness.

Understanding Relative Dates in SFMC

Relative dates in Salesforce Marketing Cloud are a powerful way to schedule and trigger marketing activities based on dynamic date values rather than fixed ones. This approach allows for the automatic updating of campaigns to reflect real-time changes and customer interactions, making your marketing efforts more responsive and timely.

Using Filters to Handle Relative Dates

One of the simplest ways to implement relative dates in SFMC is through the platform’s built-in data filters. These tools allow marketers to segment and target their audience based on date criteria that change over time, such as “last week” or “past 30 days.”

Relative dates in Salesforce being applied with Email Studio

Step-by-Step Guide to Setting Up Data Filters

  1. Access the Filter Criteria: Navigate to the Email Studio > Subscribers > Data Filters
  2. Create a New Filter: Select ‘Create Filter’ for a Data Extension (DE) and choose your DE
  3. Define Relative Date Conditions: For example, below we have selected a ‘Birthday’ field and filtered on 30 days after today.
  4. Save and Apply Filter: Name your filter and apply it to your target audience segment
Setting up a relative date filter in Salesforce Marketing Cloud, with drop-down menus to select date attributes and define the range as 'next 30 days'

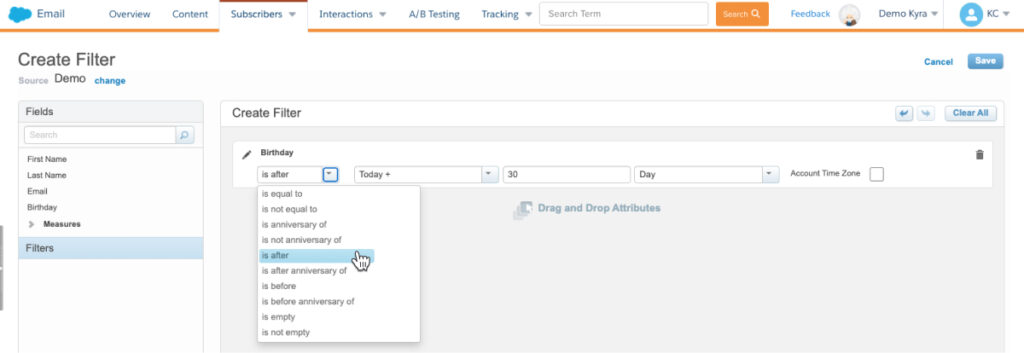
This image illustrates the step-by-step process of creating a new data filter in Salesforce Marketing Cloud, focusing on setting a relative date criterion to target customers who have a birthday in the next 30 days.

Practical Application

Imagine you’re running a re-engagement campaign targeting customers who haven’t interacted with your brand in the last six months. By setting a relative date filter to identify and segment these users automatically, SFMC can help you maintain a continually updated mailing list, ensuring your messaging hits the right inboxes at the right time.

Crafting SQL Queries for Dynamic Date Handling

For those who need more customization and control, using SQL queries within Automation Studio offers a deeper level of data manipulation.

Basic SQL for Relative Dates

    
     SELECT SubscriberKey, EmailAddress
FROM myDataExtension
WHERE DATEDIFF(day, JoinDate, GETDATE()) <= 30


This SQL snippet selects subscribers who joined in the last 30 days, using GETDATE() to fetch the current date dynamically. Remember to change the FROM selection to the name of your data extension.

Relative dates in Salesforce being applied with Automation Studio

Integrating SQL in Automation Studio

  1. Create a New SQL Query Activity: Navigate to Automation Studio > Activities > SQL Query
  2. Click ‘Create Activity’ then select ‘SQL Query’
  3. Input Your SQL Code: Use the query designed to handle relative dates
  4. Specify the Target Data Extension: Direct the output to a new or existing data extension
  5. Activate the Automation: Schedule or trigger the automation as required
SQL query editor in Salesforce Marketing Cloud with a code snippet using GETDATE() to filter subscribers who joined in the last 30 days.

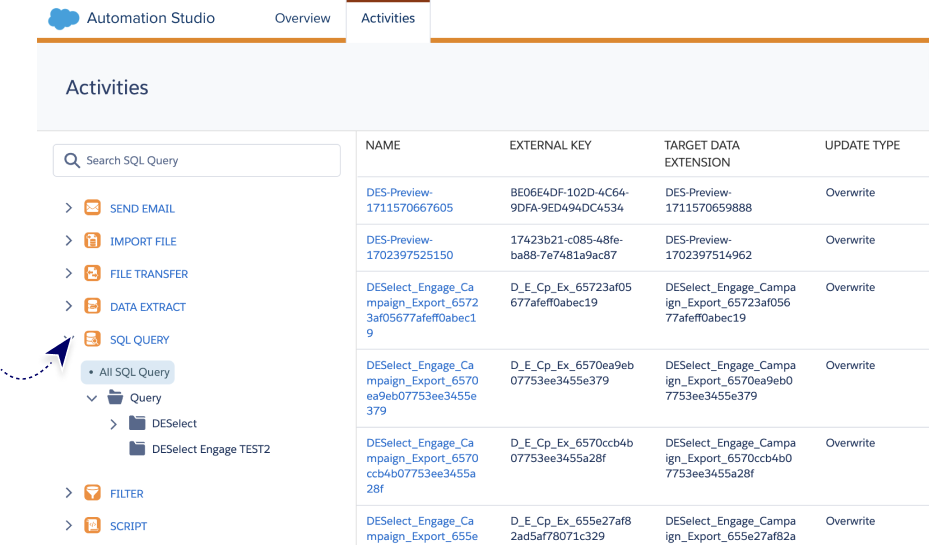
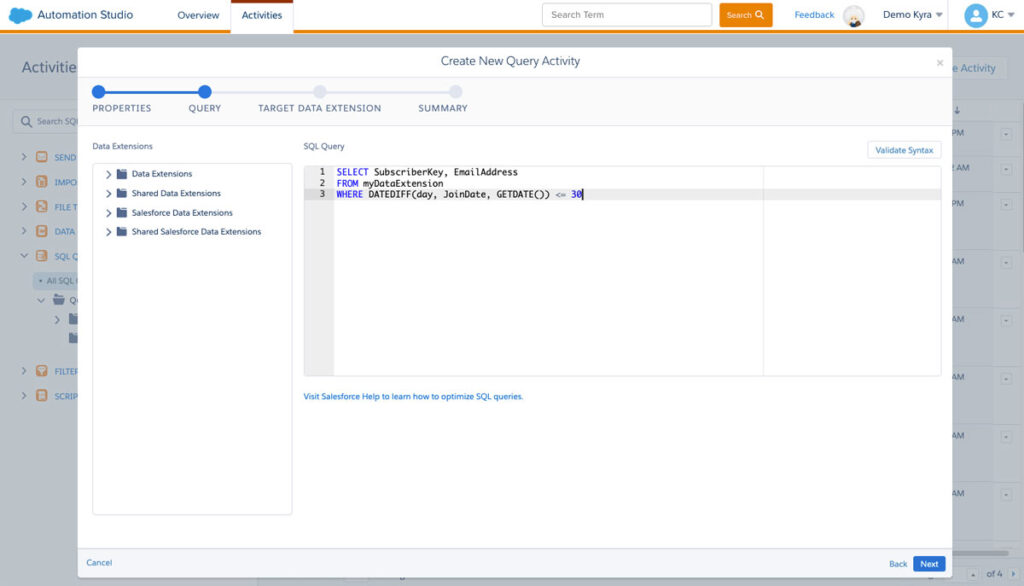
This screenshot displays how to write a SQL query in Automation Studio, utilizing the GETDATE() function to dynamically fetch the current date and compare it with a subscriber’s join date to filter records from the last 30 days.

Simplifying Campaigns with DESelect Segment

While filters and SQL provide robust options, DESelect Segment offers a user-friendly and highly efficient alternative, particularly for marketers without technical backgrounds.

Why Choose DESelect Segment?

DESelect Segment integrates seamlessly with SFMC, providing a drag-and-drop interface to create complex segmentations without SQL. The tool allows for precise audience targeting based on any data point within SFMC, including relative dates.

DESelect Segment interface showing a drag-and-drop setup for a relative date condition, targeting users based on their recent purchase date within Salesforce Marketing Cloud

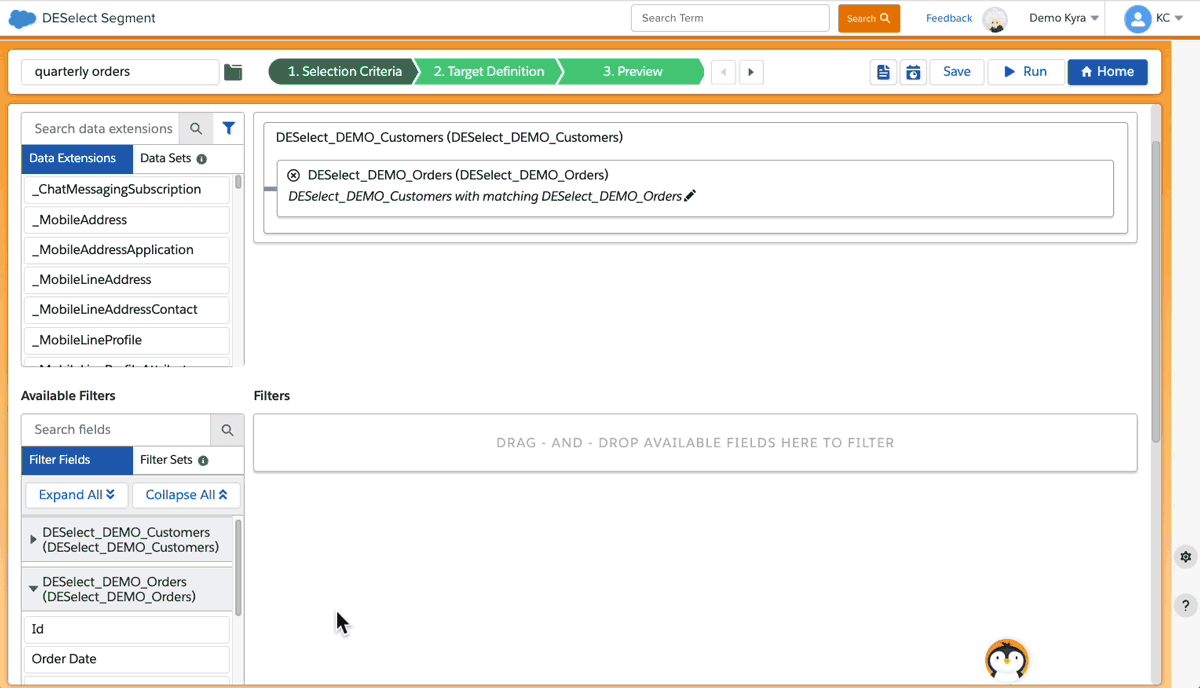
Displayed here is DESelect Segment’s interface within Salesforce Marketing Cloud, where users can effortlessly create precise audience segments by simply dragging and dropping fields to customize relative date conditions without any need for coding.

Using DESelect for Relative Dates

  1. Open DESelect Segment: Navigate to the DESelect app within your SFMC environment
  2. Define Your Selection: Use the intuitive interface to set conditions based on relative dates, such as ‘customers who have made a purchase in the last X days’
  3. Apply and Execute: Once your segment is defined, apply it directly to your campaigns for more targeted marketing efforts

FAQs

  • How do relative dates improve campaign effectiveness?

    By ensuring that your marketing messages are always relevant to the current date or customer action, enhancing timely engagement and response rates.

  • Can I use relative dates for reporting in SFMC?

    Yes, relative dates can be applied to both campaign management and analytics, allowing for dynamic reporting and insights.

Reach the most targeted<br/> audiences in half the time

Reach the most targeted
audiences in half the time

Deselect icon
Subscribe to the Newsletter
Receive Salesforce Marketing Cloud tips,
tricks, and DESelect updates

By clicking the “Subscribe now” button, you agree to the DESelect Terms of Use and Privacy Policy.