How to use date filters in Marketing Cloud - DESelect Blog
Imagine you’re creating a campaign to target a set of people that performed a certain action X time ago. In our example, we’d like to find people who attended an event 6 months ago and inform them about a new event coming up. But how can you do this in Salesforce Marketing Cloud? Out-of-the-box filters are no use when you want to find people from a certain period of time, so what’s left?
One option you can make use of is to write SQL queries. As you might already know, if you want to perform advanced segmentation in SFMC, you need to understand how SQL works. Some time ago we wrote a short guide on how to make use of SQL queries in Salesforce Marketing Cloud, which you can read here.
So, how will your query look if you want to find people who attended your event six months ago? Note that the examples we’re going to use most likely will not represent your own data model. We’re using them to show how the query can be technically done.
In our example, we have a data extension for Events with dates, and another extension for Event attendees.
Example data extensions:
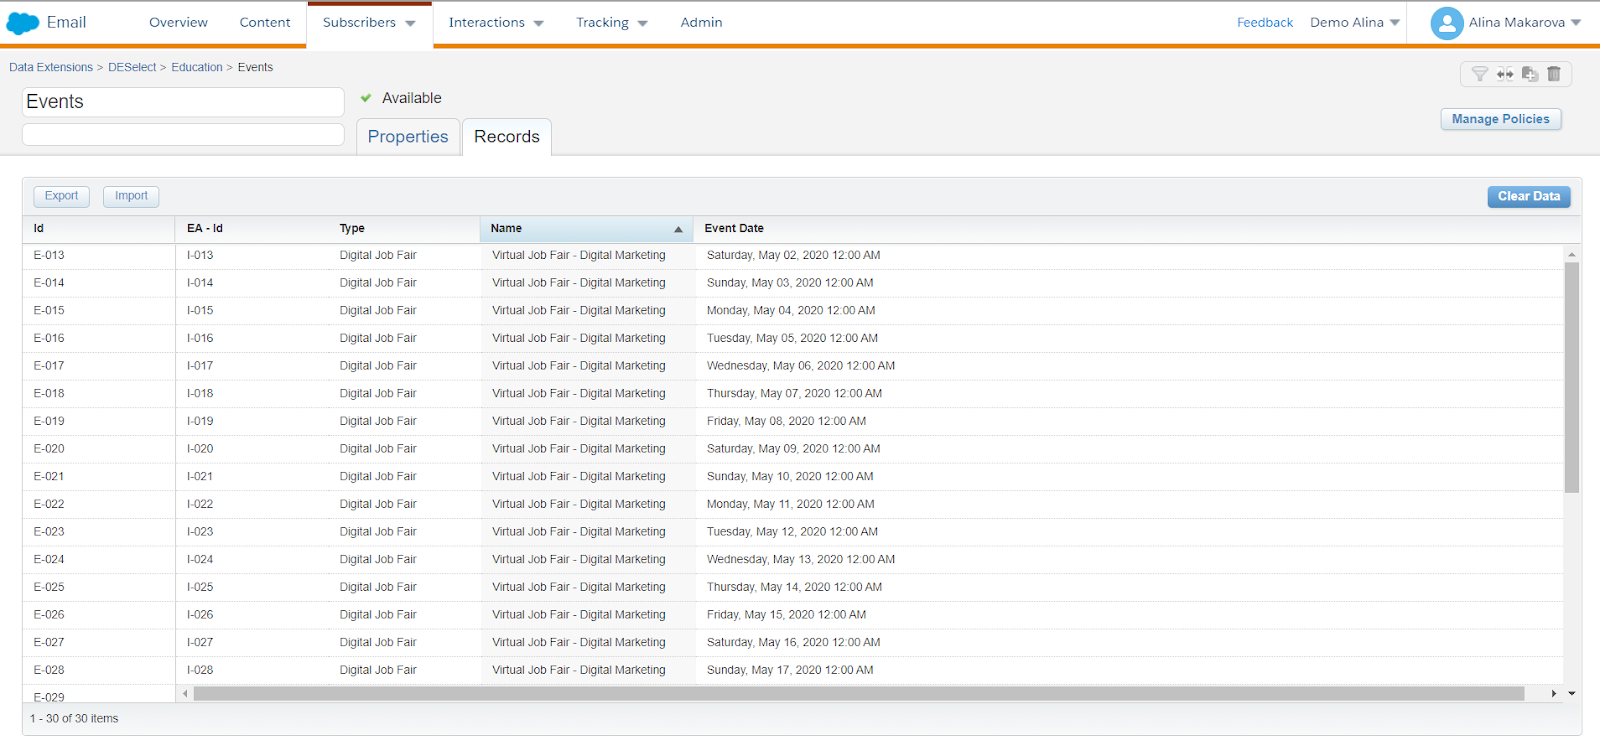
(Events data extension)
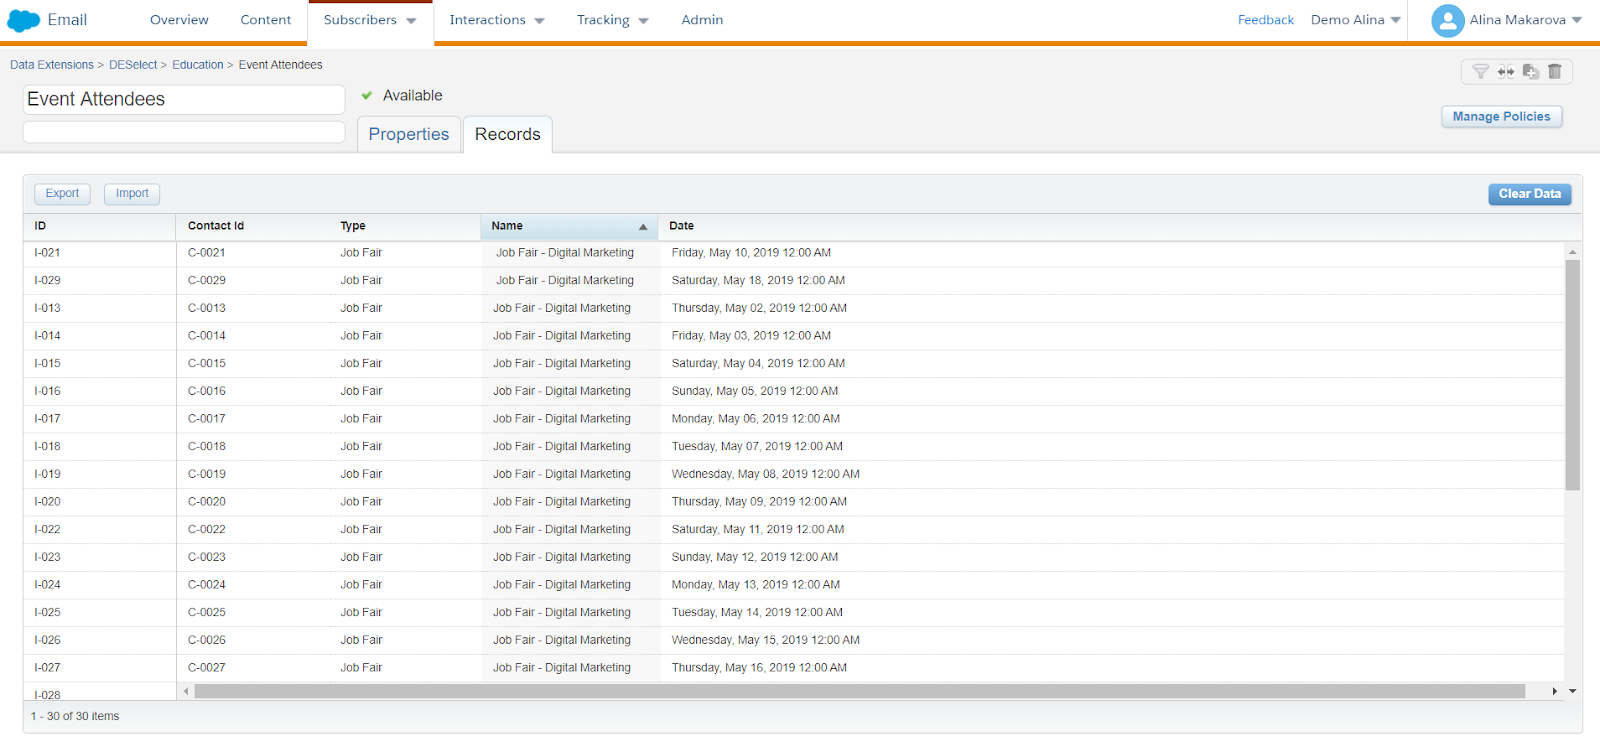
(Event Attendees data extension)
Filter on a date with SQL
Then you need to proceed to Automation Studio, located under Journey Builder and choose the tab Activities, where you can create a new SQL activity. Using the data extensions we have, your query will look like this:
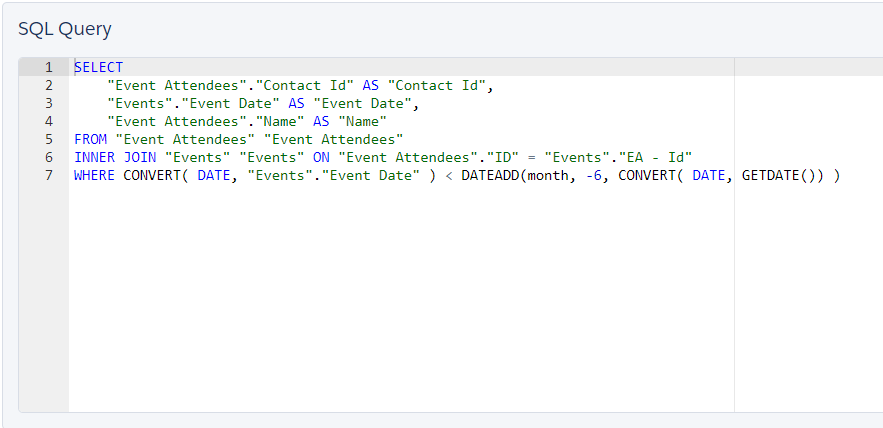
(SQL query example)
You have to combine two data extensions using INNER JOIN. That way we know that we are combining only the attendees who have actually been to the event. We combine them using an event attendees Id. Then we have to actually find the people who have attended the six-month-old event. For that, we query the relative date on the last line.
This is a rather simple query, however, even just querying the date can get messy if you’re not well acquainted with the information.
Alternatively, you can fall back to using Excel for this. First, you need to extract the data extensions into CSV files to modify them; filter the rows, and then create a lookup to join data together across tables. You use the lookup function to look up a value in a one-column or one-row range, and retrieve a value from the same position in another one-column or one-row range. You can learn more about this functionality and the example here. Of course, working with large data sets in this way is far from ideal due to the opportunities for human error. Furthermore, Excel needs time to process large data sets.
Filter on a date with DESelect
If you’re wondering whether there’s an alternative to writing code to segment Salesforce Marketing Cloud audiences or to Excel spreadsheets, the answer is yes. You can leverage the drag-and-drop SFMC segmentation solution, DESelect.
This walkthrough video will show you how to tackle the same activity in DESelect. Read on for a step-by-step guide.
First, you need to open DESelect, under the AppExchange icon on the tab bar. Then on the right-hand side, you click on the button and create a new selection. We refer to segments as selections in DESelect.
On the next screen, you choose the source data extensions, which in our scenario are Events and Event Attendees. On the left side, you can find all the available data extensions and Salesforce Marketing Cloud data views. The only thing you need to do is to drag-and-drop them to the right. Then drop one extension on top of the other.
You’ll see the following on-screen.
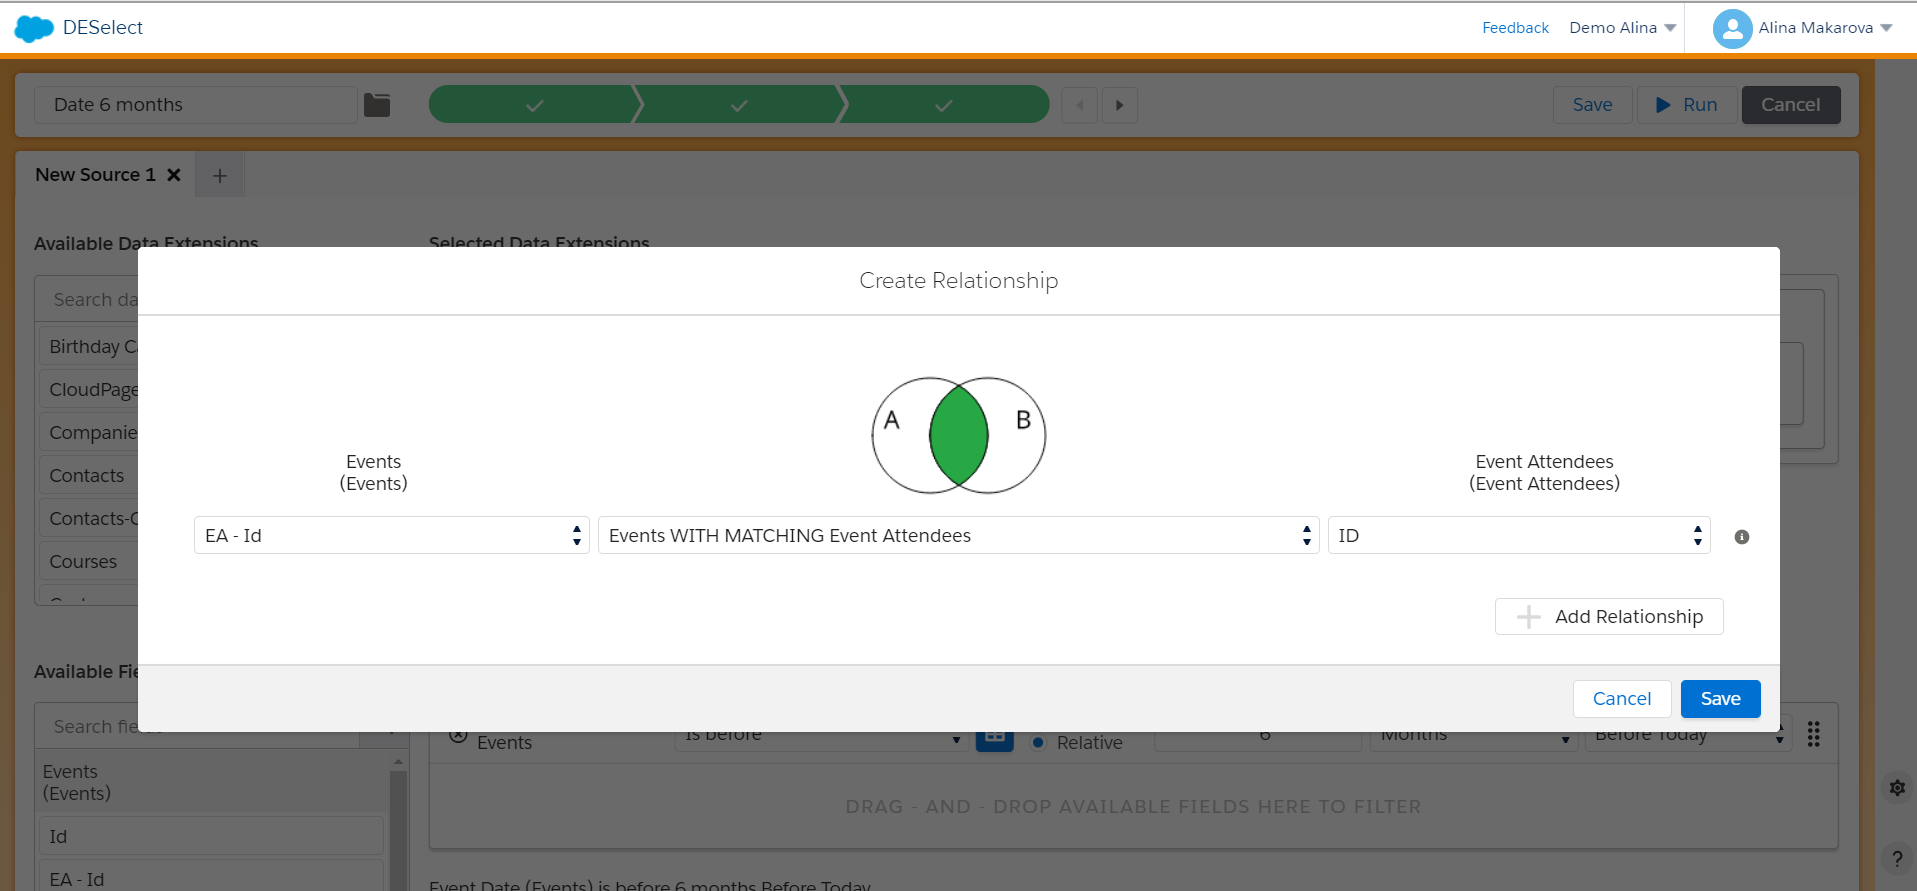
(Create a relationship in DESelect)
Here you define the relationship between two data extensions. As mentioned, you need Event Attendees Id from the Events data extensions and the Id from the Event Attendees data extensions. Note that you only need Events with matching Event attendees. You will note that this looks similar to the SQL JOIN function. This, however, is easier to understand, and no requires no code.
Then you need to move on to the actual date filters. Choose the fields from your data extensions that you want to filter. In the example below, you choose the Event date field from the Events data extension. Select is before and choose the relative date 6 months before today.

(Date filter in DESelect)
Apart from choosing the before today option, you can also choose the before now option. What’s the difference between these two?
Today is used to refer to a date value that contains a year, a month and a day without any time information.
Now is used to refer to a date value that in addition to the year, month, and day, information also contains hours, minutes, seconds, and milliseconds.
In this example, the exact time information isn’t relevant, so you can choose before today.
You can move on to the next step of target definition. At this step you choose where your segment will be saved. You can populate an existing data extension with it or create a data extension on the fly.
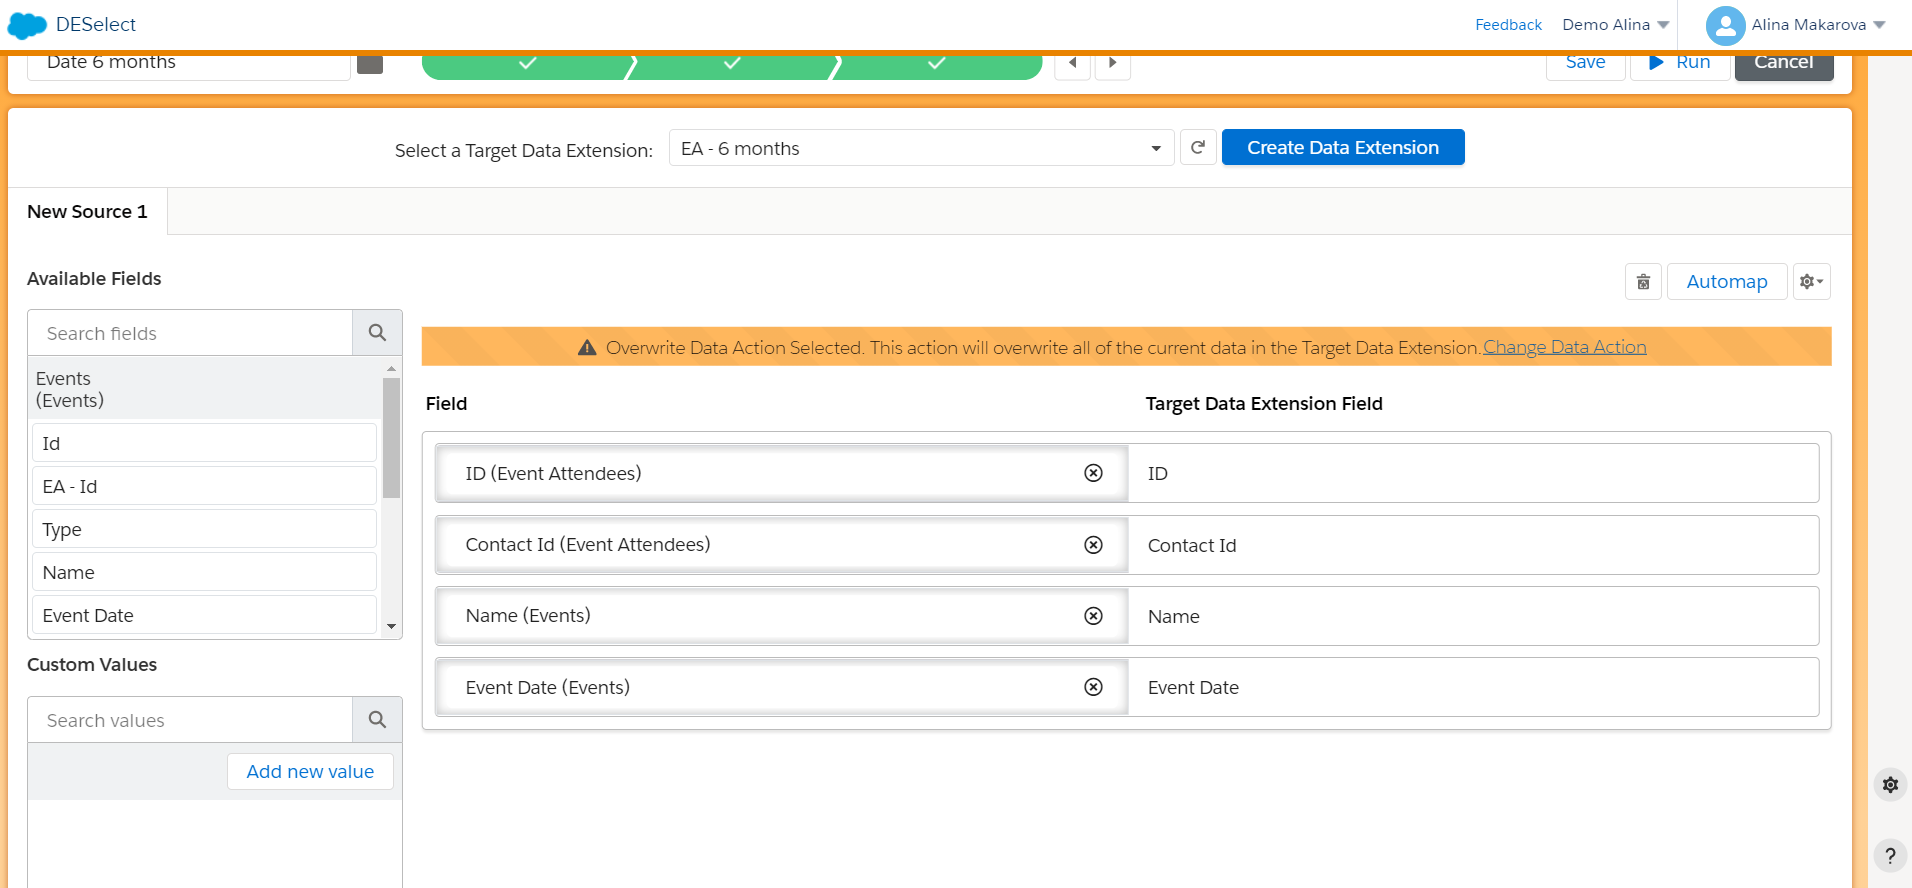
(Target definition in DESelect)
You can create a data extension right here in DESelect, and then simply choose what fields you would like to see in it. In this example, we chose Id of the Event Attendees, their Contact Id, the Name of the events they attended, and the Event Date.
The last step is to run a preview. The preview in DESelect doesn’t yet populate your data extension with the filtered data; it shows the first 20 results of the future selection. This gives you an opportunity to tweak and modify the selection if needed. Once you’re satisfied with the result, you can press run, which runs the selection in Salesforce Marketing Cloud, populating your data extension.
Conclusion
We hope this article has helped with your understanding of how to filter a date in Salesforce Marketing Cloud without the need for code. If you want to try DESelect to solve your date filtering needs and much more, book a demo with one of our professionals here.
- Filter on a date with SQL
- Filter on a date with DESelect
- Conclusion
Latest Articles
-
Beyond Limits – Exploring Smart Communication Capping
Beyond Limits: Exploring Smart Communication Capping In this comprehensive guide, we explore why communication capping matters and how smart communication capping maximizes engagement, marketing ROI, and compliance. Why Communication Capping Matters In today’s landscape, customers can be overwhelmed with marketing messages across multiple channels. In our 2024 study of 234 consumers across the United States, […]February 18, 2025Top 10 Marketing Operations Predictions for 2025
We’re excited to unveil our Top 10 Marketing Operations Predictions for 2025. The exponential growth of marketing automation, the impact of AI on strategy and execution, and the drive to become more intentional and data-driven means we’re going to see a lot of interesting dynamics and progress in marketing. As 2024 closes out, we took a step back to think about what the future holds for marketing operations and came up with our first-ever list of predictions. Let’s dive in!December 19, 2024The Ultimate Guide to Salesforce Marketing Cloud Advanced Edition
At the Marketing Keynote at Dreamforce 2024, Salesforce announced an exciting expansion to its suite of marketing solutions — the Marketing Cloud Advanced Edition, which builds upon the existing Marketing Cloud Growth Edition and offers even more powerful tools to help small and medium-sized businesses (SMBs) engage their customers in a more personalized and efficient way. This article explores the features, benefits, and impact of Advanced Edition and what it means for SMBs striving to innovate.September 19, 2024DESelect Segment vs Audience Builder: Which Salesforce Marketing Cloud Solution to Choose
DESelect Segment VS Audience Builder Audience Builder Sunset: DESelect Segment for Marketing Cloud Segmentation Create audiences without the need for code through DESelect Segment Learn more → Case Study: Boozt Boozt turned to DESelect Segment to perform their segmentation after moving from Audience Builder and SQL queries. The results: Technical marketers save 15% […]July 1, 2024Join our newsletter to receive updates and helpful SFMC guides.


