Audience Engagement Scoring 101: Finding Your Best Subscribers DESelect | Best Salesforce Marketing Cloud Solutions
63% of marketers segment and personalize customers’ messages based on their behavior. But what does that really mean?
It is always crucial for companies to establish what kind of relationship they possess with each subscriber, no matter how they operate. You should know exactly which contacts resonate with your content, need more nurturing, or should be completely abandoned.
Luckily, there is a practical and efficient method to determine each subscribers’ engagement level that will empower your marketing team with precious insight for future campaigns.
What is Audience Engagement Scoring?
Engagement scoring is a method used to discover and sort customer engagement into tiers used to power future campaigns. At the end of this process, each customer will have a score indicating the individual level of interaction with your content, giving marketers a clear criterion to segment their audiences. With this knowledge, your team can engage with your audience on future behavior-based campaigns using the appropriate amount of content.
This method applies to both B2C and B2B audiences. For example, retail companies benefit from audience scoring by sorting their customers for proper retargeting. B2B companies benefit from it by driving alignment between sales and marketing and giving insights into the best moments to reach out to the right audience. Another typical model for evaluating the value of your subscribers is RFM (Recency, Frequency, Monetary Value) analysis.
How does it work?
Engagement scores depict your customers’ behavior through numeric values and that change over time based on subscriber interactions (e.g. clicks, bounces) or how marketers influence them (e.g., sending more personalized communications).
On the other hand, each customer is characterized by a grade. This grade shows how interested you are in your customers, and is usually a non-numeric label (i.e., a grade from A – F). Marketers typically rely on demographic attributes (e.g. industry, city, job title, company name) to generate customer grades.
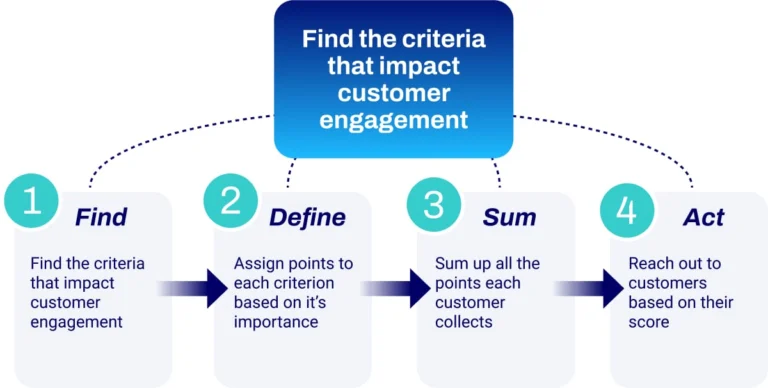
In order to calculate the full engagement score, use both behavioral data and customer attributes. The process consists of the following steps.
- Finding the criteria/attributes that have either a positive or negative impact on the customer’s engagement.
- Defining how important each criterion/attribute is and assigning positive or negative points that reflect the impact of each. For example, a customer making routine purchases will have more impact on the final score than signing up for a newsletter.
- Summing up the points each customer collects based on their actions/attributes into an overall engagement score.
- Based on the engagement score for each subscriber, placing each into corresponding tiers and devising a marketing plan for next steps.
Why use an Audience Engagement Scoring Model?
As businesses grow, your marketers are bound to receive more and more unqualified leads. Scoring allows for better tracking of customers, ranking them based on how qualified they are to make a purchase. By knowing how high each customer scores, marketers are able to allocate more resources to more qualified customers and minimize the time spent chasing dead ends.
Additionally, efficiently engaging with the most passionate customers has a positive impact on campaign metrics, increasing conversions, close rates, and response times, with more targeted campaigns, for example.
Things to keep in mind before creating your Model
To create the most effective model, you need to collect as many customer insights as possible to understand the driving factors that lead them to take action.
Sync with your sales representatives to best understand what factors affect the buying process, either positively or negatively, or conduct customer research to find what they consider important. Pro tip: do not neglect old customers’ buying behaviors – analytics give insight into factors that have historically driven purchases.
While creating scores, it is also important to define negative criteria. You should not only try to find factors that positively influence your customers’ chances of buying your products but also the ones that seem to discourage them. It is very important to filter out people who are not interested in buying your products. For instance, someone might have subscribed when visiting your website, but then only visited the job applications page. Include such criteria in your model with a negative score.
Building an Engagement Scoring Model in SFMC
Step 1: Make sure data is available in SFMC
Let’s assume you already have the required data to build your model. Before you start, make sure to bring all necessary data inside your Salesforce Marketing Cloud instance – whether it originates in Sales Cloud or an external CRM, CloudPages form submissions, an internal Marketing Cloud platform such as Contact Builder, or imported via FTP.
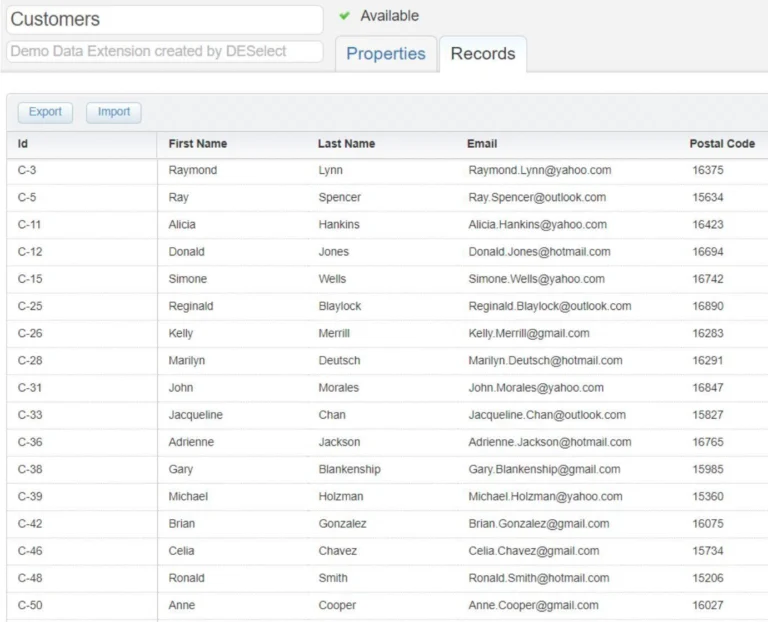
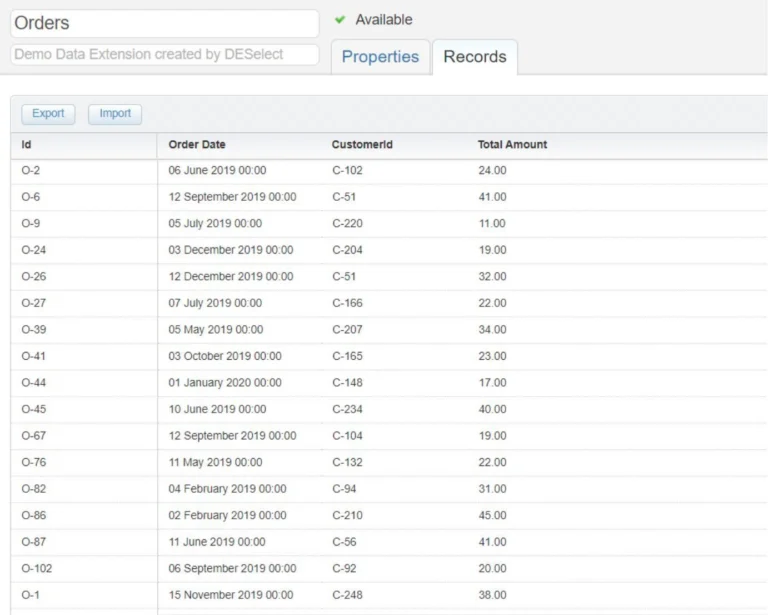
For this article, let’s use a hypothetical physical retailer as an example. To build our model we will use information about our customers’ location, orders history, and reaction to past emails. We store this data in Data Extensions and Data Views. To build our engagement model we are going to use one Data Extension that contains customer information and one that contains order information. Have a look at the two Data Extensions below.
Step 2: Define your model
After compiling the data, you need to choose the factors that make your customers more qualified. For the example we are presenting here and based on the information we have for our customers, we ended up with the following criteria and scores.
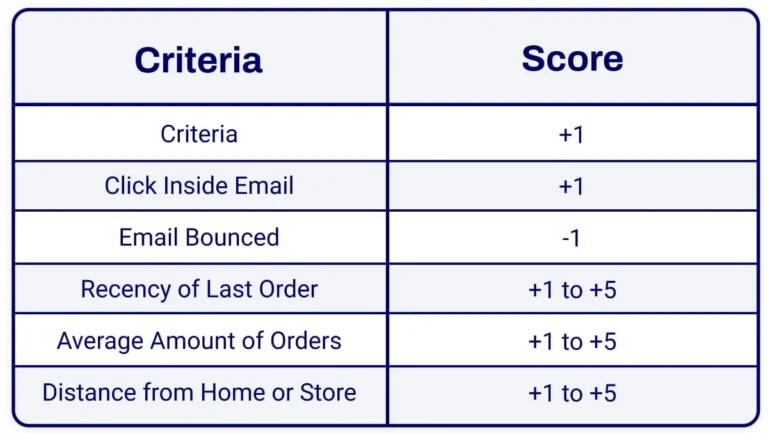
Notice how many factors have wide variations. Focusing on one, recency of last order, we find there is a scale from 1-5 correlating to how long ago a customer made their most recent purchase. Customers with orders in, say, the previous month are given a high score of 5, while customers at the opposite end of the spectrum, say, one purchase 11 months ago, are given a 1. Customers whose last order was over a year ago may be removed from this scoring system entirely to reflect how cold of a lead they are.
Ranged scoring provides greater nuance, as opposed to fixed scoring. For criteria involving frequency, having a given value often provides similar insight into customer intent. In this example, clicking an email adds one point to a customer’s score, so multiple clicks across multiple emails enhances their overall rank.
Step 3: Implement your model using DESelect
With your score criteria defined, it is time to implement the engagement scoring model using DESelect. The image below indicates the different selections created for the example, and the scores that will be calculated individually.
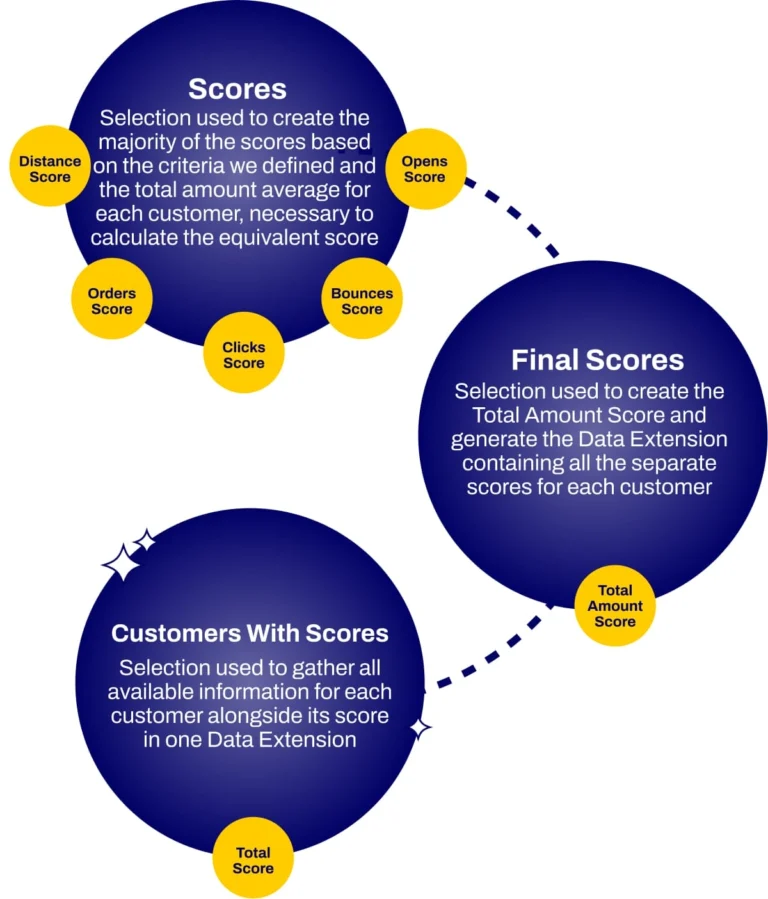
Here is a step-by-step breakdown of the process for our example.
The first thing you need to do is create a selection that will calculate the points each customer collects for each criterion and store it in a Data Extension.
1. Open DESelect inside your Marketing Cloud instance
2. Click on New Selection to create a new selection.
3. Provide the name Customer Engagement Scores (or similar) for your selection.
4. Choose your Selected Data Extensions, in this case Data Extensions Customers and Orders.
5. Create a relationship between them on Id and CustomerId fields, and keep all records from Customers Data Extension.

6. Move on to the Target Definition screen and click on Create Data Extension.
7. Provide the name Customer Engagement Scores and click Save.
8. Add the Id field of the Customers Data Extension to Target Data Extension fields.
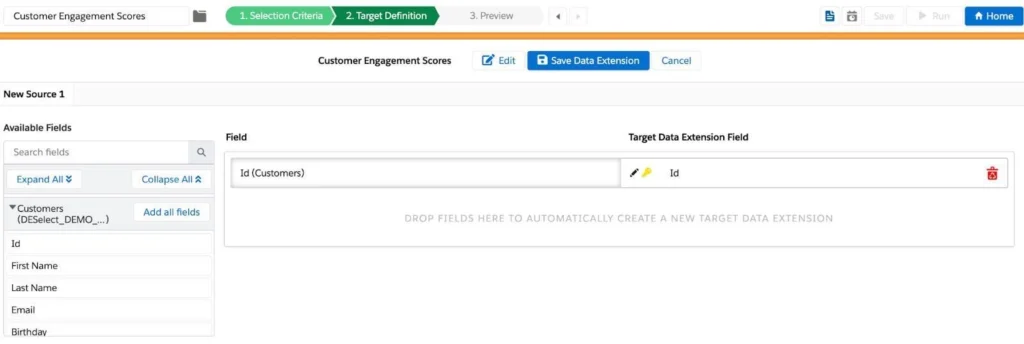
Opens – Clicks – Bounces Score
We will now calculate the points for opens, clicks, and bounces. At this point we are not yet interested in positive and negative scores, therefore we will calculate these three fields in exactly the same way. This will also help evaluate overall email deliverability and engagement by counting how many times a customer has opened an email, clicked inside an email, or bounced out of an email.
This information can be found inside Data Views, which are tables generated by SFMC. Through Data Views you’ll find data such as subscribers and Marketing Cloud event tracking (e.g., email/sms sends, email opens, link clicks).
1. Click on Add new value inside the Custom Values section.
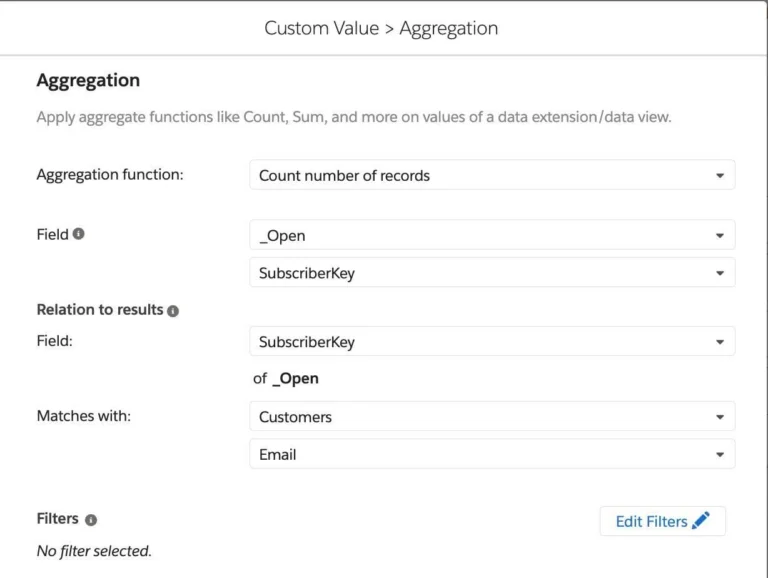
2. Set name to Opens Score, choose Aggregation as type and click on Next.
3. Choose Count as the aggregation function.
4. Choose SubscriberKey of _Open Data View as the field.
5. Match Customers’ Email field with _Open ’s SubscriberKey field. The Custom Value looks like this:
6. Click on Save.
7. Repeat steps 1 – 6 for _Click and _Bounce and name them Clicks Score and Bounces Score respectively.
8. Add all the created values to the Target DE’s fields.
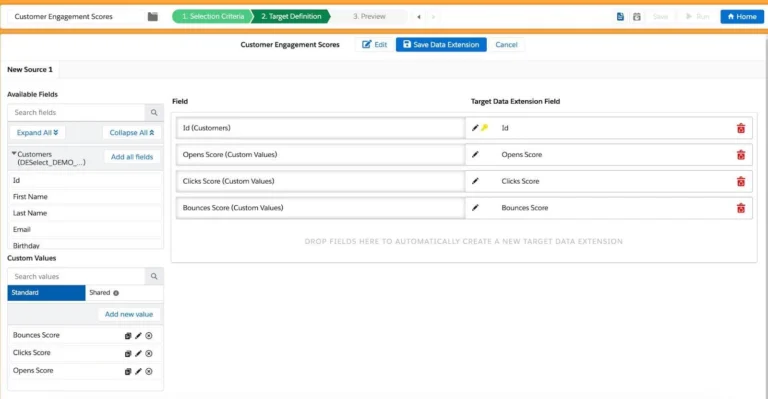
Orders Score
Next, we will assign points to customers based on when they placed an order. Based on our data we defined the following rules:
- 1 point, for orders in the past year.
- 2 points, for orders in the past 9 months.
- 3 points, for orders in the past 6 months.
- 4 points for orders in the past 3 months.
- 5 points, for orders in the past month.
To assign the different scores to our customers we will perform the following steps:
1. Click on Add new value inside the Custom Values section.
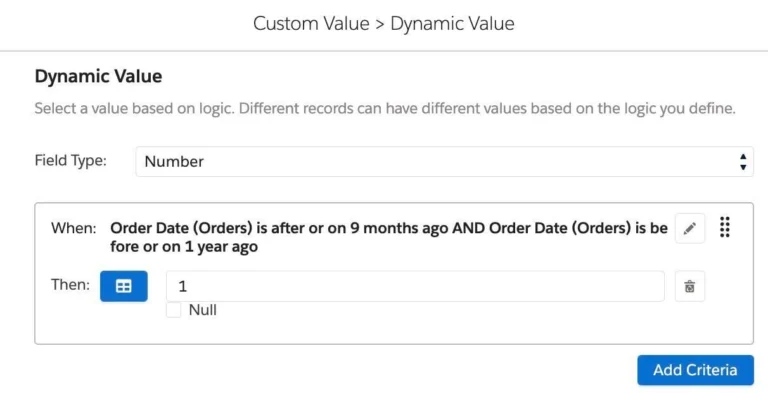
2. Set name to Orders Score, choose Dynamic Value as type and click on Next.
3. Select Number as field type and click on Add Criteria.
4. Add Order Date from Orders DE to the filters section.
5. Choose Is After Or On as filter type.
6. Select Relative date and set it to 9 months ago.
7. Add Order Date from Orders DE second time to the filters section.
8. Choose Is Before Or On as filter type.
9. Select Relative date and set it to 1 year ago.

10. Set the Then value equal to 1. Our custom value looks like this:
11. Repeat steps 3 – 6, but set the Relative date to match the criteria we defined above, and the then value to the equivalent amount of points.

12. Make sure the Default value is 0 and click on Save.
13. Add the created value to our Target DEs fields.

Distance Score
Moving forward, we want to assign scores based on the distance from customers’ homes to our physical location. We will do that based on their postal codes. We know about the Postal Codes that values:
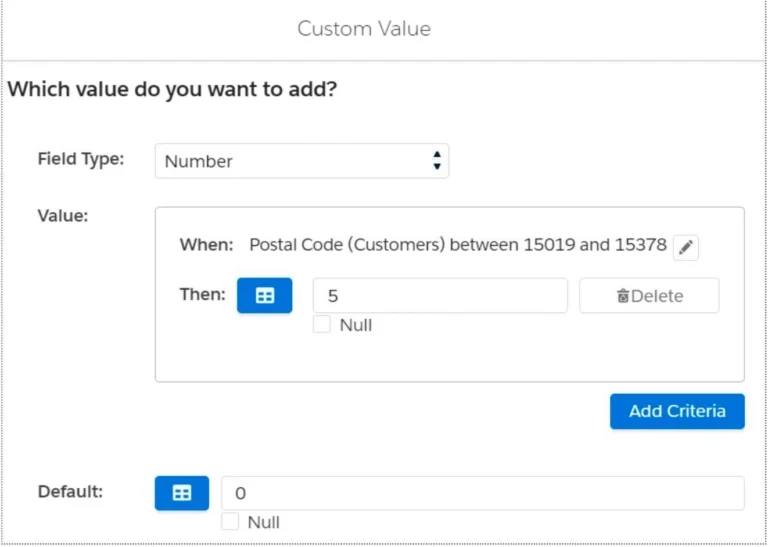
- Between postal codes 15019-15378 are 5 km away from our store, and will get 5 points.
- Between postal codes 15378-15737 are 10 km away from our store, and will get 4 points.
- Between postal codes 15737-16096 are 15 km away from our store, and will get 3 points.
- Between postal codes 16096-16455 are 20 km away from our store, and will get 2 points.
- Greater than postal code 16455 are more than 20 km away from our store, and will get 1 point.
To assign the different scores to our customers we will perform the following steps.
1. Click on Add new value inside the Custom Values section.
2. Set the name to Distance Score, choose Dynamic Value as type and click on Next.
3. Select Number as field type and click on Add Criteria.
4. Add Zip Code from Orders DE to the filters section.
- Note: Depending on your organization’s data model, this field may be labeled Postal Code and may be nestled under the Customers data extension.
5. Choose Between as the filter type.
6. Set the first input field to 15019 and the second to 15378.

7. Click on Save and set the Then value equal to 5. Our Custom Value looks like this.
8. Repeat steps 3 – 7 for the rest of the postal codes mentioned above, each time decreasing the Then value by 1. In the last group choose Greater Than as filter type.

9. Make sure the Default value is 0 and click on Save.
10. Add the created value to our Target DE’s fields.
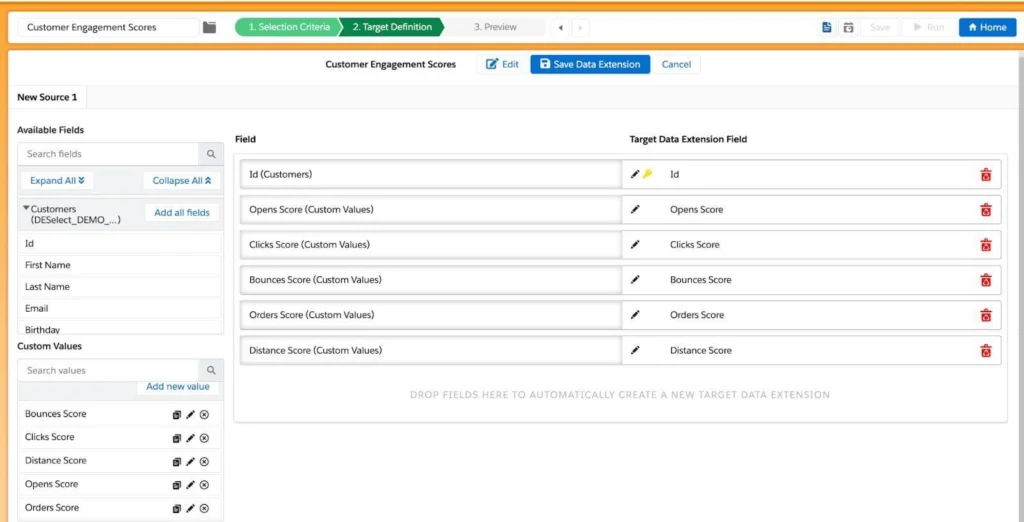
Total Amount Average
Finally we want to assign a different score based on the average of the total dollar amount a customer has spent on purchases in this time period (in our example, one year). We identified the following groups.
- Average between 0 – 25 gets 1 point.
- Average between 25 – 50 gets 2 points.
- Average between 50 – 75 gets 3 points.
- Average between 75 – 100 gets 4 points.
- Average above 100 gets 5 points.
To get the customers of each group we need to first calculate the average of the total amount for each customer.
1. Click on Add new value under the custom values section.
2. Set the name to Total Amount Average, choose Aggregation as type and click on Next.
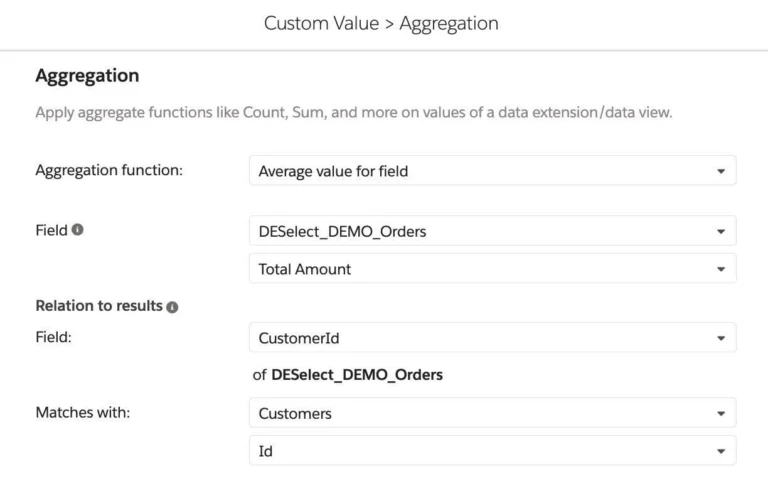
3. Select Average value for field as the aggregation function.
4. Choose Total Amount from the Orders Data Extension as the field.
5. Match Orders’ CustomerId field with Customers’ Id field. Our Custom Value looks like this.
6. Click on Save.
7. Add the created value to our Target DE’s fields.
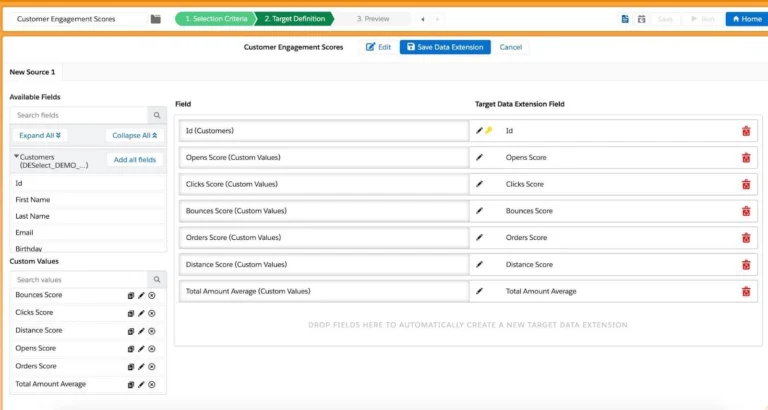
8. Click on the Save Data Extension button.
9. Save your work on the Selection itself. Exit to the DESelect Segment homepage.
10. Click on the Create button.
In order to create the Total Amount Score based on the Total Amount Average we need to create a new selection.
1. Click on Run to populate our Customer Engagement Scores Data Extension with results.
2. Click on the New Selection button.
3. Name it Final Customer Engagement Scores.
4. Add Customer Engagement Scores Data Extension to our Selected Data Extensions.
5. Move on to the Target Definition screen and click on Create Data Extension.
6. Provide the name Final Customer Engagement Scores and click Save.
7. Click on the Add All Fields button.
8. Remove the Total Amount Average field.
Total Amount Score
Now we can calculate the Total Amount Score by implementing the following steps.
1. Click on Add new value inside the Custom Values section.
2. Set the name to Total Amount Score, choose Dynamic Value as type, and click on Next.
3. Select Number as field type and click on Add Criteria.
4. Add Total Amount Average from Customer Engagement Scores Data Extension to the filters section.
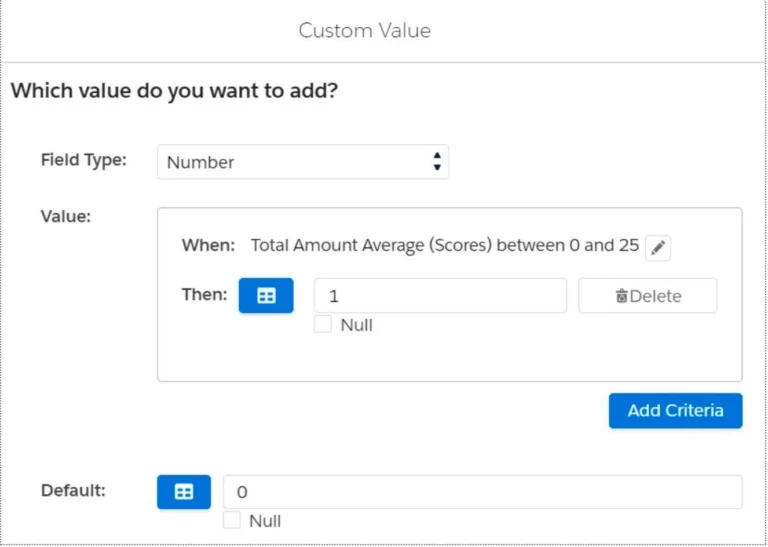
5. Choose Between as the filter type.
6. Set the first input field to 0 and the second to 25.

7. Click on Save and set the Then value equal to 1. Our Custom Value looks like this.
8. We repeat the steps 3 – 7 for the rest of the averages mentioned above, each time increasing the Then value by 1. In the last group choose Greater Than as filter type.
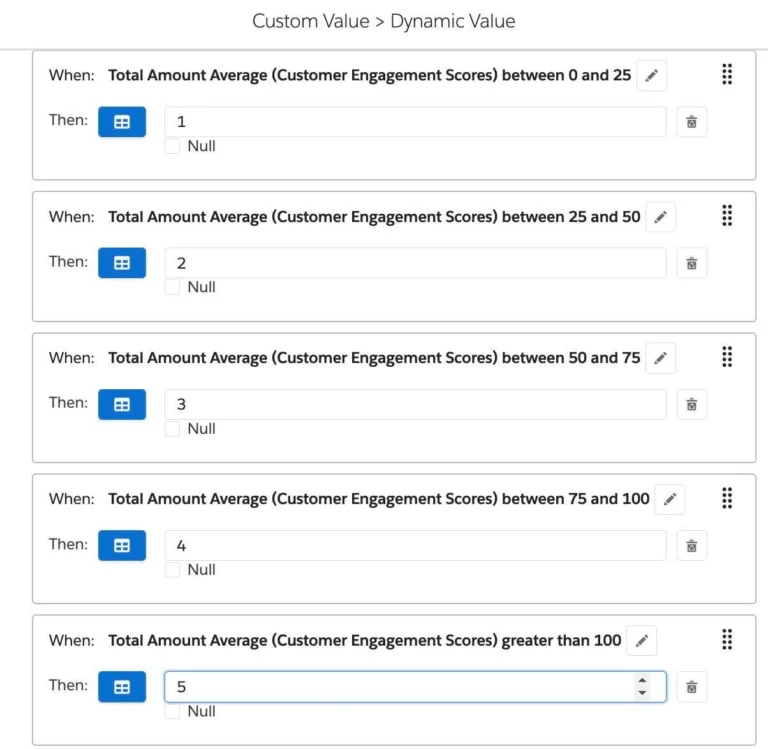
9. We make sure the Default value is 0 and click on Save.
10. We add the created value to our Target DE’s fields.
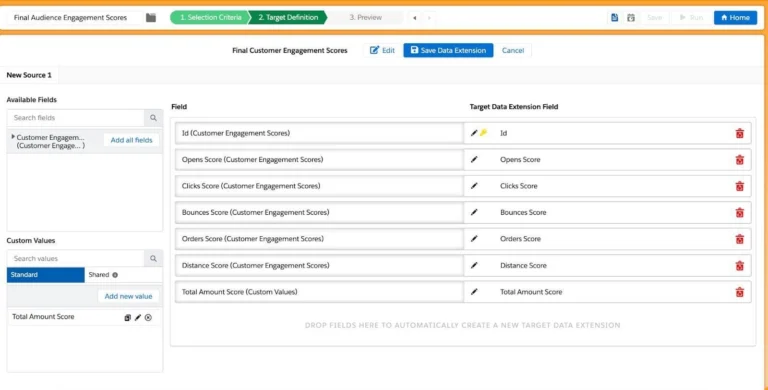
11. At the top click to Save Data Extension, then confirm with Create.
12. Click on Run to create the data extension. You can also Preview beforehand in the Preview section.
Calculate each customer’s Total Engagement Score
After calculating each criteria score separately, it is time to sum them up and end up with a single audience engagement score per customer.
1. Create a new selection and name it Customers With Score.
2. Add our Final Customer Engagement Scores Data Extension.
3. On the target definition screen create a Customers with Score Data Extension.
4. Add the Id field to our Target Data Extension.
5. Click on the Add new value button.
6. Set the name Total Engagement Score, choose Apply formula to a field and click Next.
7. Click Apply any function and Next.
8. Choose Number as the field type.
9. Select the Opens Score field of Final Customer Engagement Scores DE in the dropdown and click Insert Field.
10. Add a plus operator (+).
11. Do the same for Clicks Score , Bounces Score, OrdersScore, Distance Score and Total Amount Score. Though because Bounces has a negative score, we change the plus (+) icon in front of this field to a minus (-). The formula should look like this.
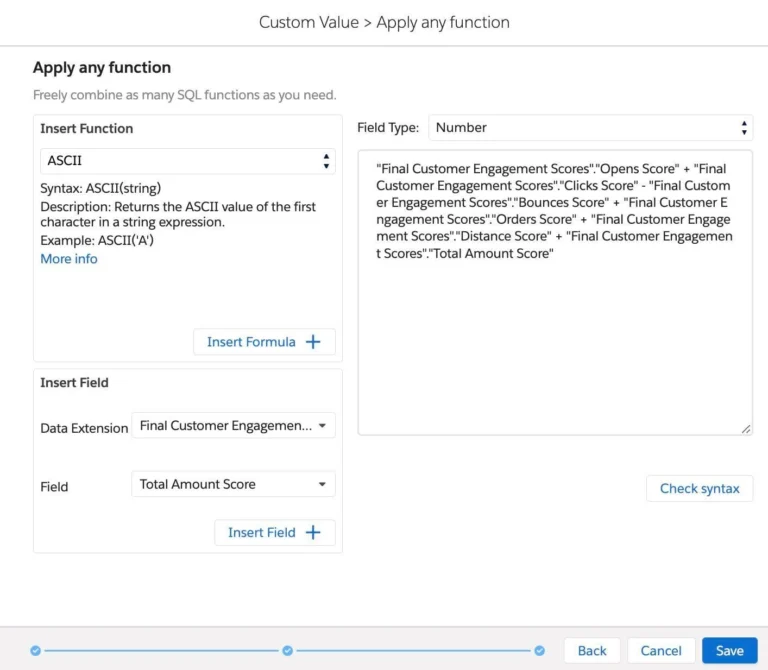
12. Double-check the accuracy of your SQL syntax with Check syntax.
13. Add the Total Engagement Score field to the Target Data Extension.

14. Click on Save Data Extension.
15. Click Create.
16. Click on Run.
Conclusion
After following these steps, you should be able to rank your most valuable subscribers and identify the ones that haven’t been engaging with your content. Just because a customer has a low engagement score, it does not mean they should be crossed out of your contact list. In fact, the opposite is true: contacts with low scores indicate they need a different type of content to engage with.
Engagement scoring is just one way to create detailed audiences that take your customer communications to the next level. Learn how DESelect Segment’s advanced segmentation allows marketers to create highly personalized campaigns based on behavioral data, advanced logic, transaction data, and more – all without code.
Table of Contents
Austin Salesforce User Group Recap – Summer 2023
On July 11, DESelect had its first in-person Salesforce user group meetup for Marketing Cloud (SFMC) users in Austin, Texas this year. The speakers explored the world of Marketing Cloud certifications and how to use that knowledge to master and maximize SFMC for career growth and better customer engagement.
Did you miss the meetup? No worries! In this recap, we’ll reiterate the unique framework that will help you pass Marketing Cloud certifications, gain a deep understanding of the platform, and best engage your audiences.
RELATED: Heroes of Marketing Cloud: Eduardo Ruiz de Pascual
How to prepare for Salesforce Marketing Cloud (SFMC) certification
Kaelan Moss, Salesforce Golden Hoodie Recipient 2023, and founder of MinuteAdmin presented how to obtain any of the four Marketing Cloud certificates!
Step 1: Follow the 5-Step Marketing Cloud project framework
- Administration setup – understand how to properly implement Marketing Cloud across an entire organization
- Data management – understand, manage, and expand the data available for use
- Content creation and delivery – create and test messages that go out to subscribers
- Automation – develop customer journeys and expand marketing output
- Reporting – analyze performance through standard and custom reporting
Step 2: Understand the exam outline
Familiarize yourself with the exam outline specific to the certification you are pursuing. Getting acquainted with the outline will help you identify the essential concepts and skills you need for your desired course.
Step 3: Convert exam sections into real-life questions
Transform bullet points from exam sections into real-life questions so you can grasp the concepts and their practical applications.
For example, try changing “Evaluate elements and techniques of email marketing to design effective emails and email programs” to “What elements and techniques are essential for designing effective emails and email programs in Marketing Cloud?”
Step 4: Gather resources for studying
Kaelan then explained to the Salesforce user group how to gather relevant learning resources to optimize studying, while sticking to the topics covered in the exam outline.
How to get the most out of Salesforce Marketing Cloud certification
Step 1: Understand the bullet points
Before diving into the specifics of any Marketing Cloud course, you should understand the bullet points and questions presented in the exam scenarios. These questions help you navigate the topics efficiently.
Step 2: Use the “5 W’s and H” formula
Use the “Who, What, When, Where, Why, and How” formula to approach unfamiliar topics. This method will help you break down the scenarios and develop relevant questions for yourself or your team.
Typical questions may include:
- What is an email program, and how does it relate to a marketing campaign?
- What are the different elements of an email message that impact deliverability?
- How do you set up data extensions in Marketing Cloud?
Step 3: Research and study
Try the tips below for an in-depth study.
- Utilize Google and Salesforce for helpful documentation and technical information.
- Watch YouTube tutorials for more experiential knowledge.
- Leverage ChatGPT for help with specific questions.
- Enroll in specialized courses to gain practical insights.
Step 4: Apply the framework to your industry
Understand the use cases relevant to your business and how to implement them in Marketing Cloud. This approach ensures you are well-prepared to handle real-world scenarios within your industry.
Step 5: Implement frequency capping and campaign prioritization
Frequency capping solutions like DESelect Engage help optimize your marketing content and prioritize sends with the highest ROI, ensuring effective customer engagement and proper saturation while reducing the risk of unsubscribes.
Ensure proper audience saturation with the right contact strategy
Next up, DESelect CEO Anthony Lamot spoke to the Austin Salesforce user group about how a comprehensive contact strategy not only ensures subscribers receive enough emails, but that messages are capped at a desired frequency to avoid marketing fatigue and the accompanying unsubscribes.
Why does this process matter? In addition to ensuring ideal customer experiences, frequency capping formalizes what is often guesswork and avoids cross-team collision through campaign prioritization. There are also fiscal benefits, as ideal cadences optimize revenue opportunities and maintain audiences’ subscriber base values through minimal unsubscribes.
Conclusion
Salesforce Marketing Cloud offers incredible opportunities for users to enhance their marketing skillsets and effectively engage with customers. The steps highlighted from this Salesforce user group meetup can help you pass your SFMC certifications and become a Marketing Cloud expert.
Embrace the learning process, explore your industry-specific use cases, and unleash the full potential of Salesforce Marketing Cloud. Join (or at least sign up for future content from) the Austin Trailblazer Community Group here.

Ensure SFMC Doesn’t Skip Leap Day Birthdays from Offers
How would you feel if your birthday was forgotten for multiple years in a row and you feel left out on your special day? That’s exactly the feeling most companies give their customers who were born on the infamous Leap Day – February 29th.
Companies often overlook Leap Day birthdays due to its rarity. February 29th happens once every four years – 2.5 times per decade. Many people never even meet a person with this birthday, so it’s easy to miss when marketers set up their birthday campaigns.
How about your birthday or anniversary campaigns?
Did you think about leap years? If not, it is time to change that.
You may think that the group of people affected is probably very small – this might be true, but spending just a little time to include Leap Day birthdays in your marketing campaigns can generate great reactions from your customers!
If you take that special date into account but only send an email the day February 28th with your usual birthday wishes plus a coupon, it won’t have a huge effect. However, if you combine that with dynamic content in your email, you can create personalized communications that drive action.
As an example,
“We’d never forget your birthday, even if there isn’t a Leap Day this year. We’re sure others do, and therefore we celebrate your special day even more – instead of the usual 10% off, you’ll get 5% on top of that. Happy Birthday!”
would put a smile on any customer’s face and strengthen the customer relationship for sure! And isn’t that what it’s all about?!
How can you select the relevant people in your birthday campaign segmentation?
There’s three rules that allow us to find out if a given year is a leap year:
- If the year is evenly divisible by 4 – check step 2; if not, it isn’t a Leap Year
- If the year is evenly divisible by 100 – check step 3; if not, it is a Leap Year
- If the year is evenly divisible by 400 – it is a Leap Year; if not, it isn’t a Leap Year
So after following this criteria, if the current year is not a leap year, then you need to check your audience for people born on February 29th already a day early.
Note: If you’re wondering why a year divisible by 100 but not 400 isn’t considered a Leap Year, the length of the solar year is slightly less than 365.25 days. By skipping the leap year every 100 years (but not every 400 years), we can keep our calendar in closer alignment with the solar year. For example, the year 2000 was a leap year (divisible by 400), but the year 1900 was not (only divisible by 100).
And this is how it’s done using SQL
In order to check if something is evenly divisible you can use the so-called “Modulus” operator or Mod-function in SQL. This will return the remainder of one number divided by the other.
Everything else that needs to be done is comparing the date parts (month, day and year) to the ones of today (using the getdate function) – once for the current date and in case we found out that this year isn’t a leap year, we also check for February 29th if it is still the 28th. That’s all that’s needed.
SELECT
SubscriberKey,
Birthdate,
Email,
FirstName,
LastName
FROM
Your_Segment
WHERE
(
(
DAY(Birthdate) = DAY(GETDATE())
AND
MONTH(Birthdate) = MONTH(GETDATE())
)
OR
(
(
CASE
WHEN DATEPART(year, GETDATE()) % 4 <> 0 THEN 0
ELSE
CASE
WHEN DATEPART(year, GETDATE()) % 100 = 0 THEN
CASE
WHEN DATEPART(year, GETDATE()) % 400 = 0 THEN 1
ELSE 0
END
ELSE 1
END
END
) = 0
AND
DAY(GETDATE()) = 28
AND
DAY(Birthdate) = 29
AND
MONTH(GETDATE()) = 2
AND
MONTH(Birthdate) = 2
)
)
Note: Depending on the relevant time zone and in which time zone the dates are, you might need to use the “AT TIME ZONE” function in combination with the getdate function call. For better readability this is omitted in the example.
If you use DESelect, follow this easy step:
When creating a new Selection in DESelect, all it takes is adding an advanced custom value to the Target Data Extension. Just copy and paste the SQL code into the field. Here’s the step-by-step.
- Add New Value
- Name your value – in this case ‘Birthday’ makes sense
- Select the option to ‘Apply formula to a field’
- Select the option to ‘Apply any function’ – this will let you add freehand SQL code
- Paste above SQL code into the open field and save
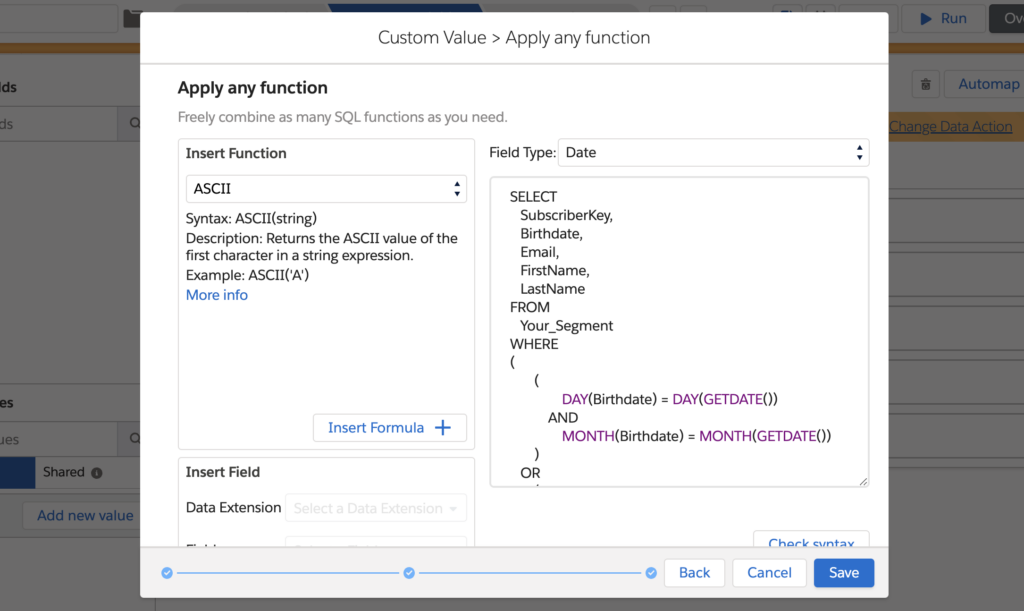
It’s that easy!
Conclusion
Even if it won’t have the biggest business impact, going the extra mile to show a subscriber you care builds trust. And all that with just a little SQL required in addition to what you normally do for your birthday segments – and as you now have the code in this article it is now a quick fix.

Markus Dang
Markus is a guest author at DESelect. He's a Marketing Cloud Unit Lead & Solution Architect. He is also a Salesforce Marketing Cloud Champion.

Why Technical Marketing Cloud Users Love DESelect, Pt. 2
Salesforce Marketing Cloud’s nearly infinite data storage makes the novice marketer’s head spin. Such highly technical, complicated processes take time to complete and leave users anxious over the effects of potential mistakes.
Marketing Cloud expert Markus Dang previously demoed some of his favorite admin features in DESelect Segment to reduce the risk and time requirements associated with routine audience segmentation.
In this article, Markus reviews more of his favorite features, designed to automate many of the complex SQL JOINs and INNER JOIN queries that can frustrate any user.
Templates
Part one of this series focused on how Marketing Cloud admins can best set safeguards for less-technical marketers. Now we move more into the DESelect core – complex audience segmentation.
Whereas data sets allow more technical marketers to prepare data for tasks like joins and relationships between data extensions, templates get used later in the segmentation process.
Templates are used when you have similar Selections that rely on complex criteria. It’s a straightforward process.
- Create a Selection
- Save it as a template
- Adjust the filters with new selections going forward
Now teams don’t have to repeat every task repeatedly when creating similar or routine segmentations.
As you can see, data sets act more like expansive data extensions, quickly giving marketers the complex data necessary for advanced segmentation. They can then convert the overall Selection created from these data extensions or data sets into a template, so later segmentations will immediately complete most steps.
As Markus mentions, DESelect Selections use the INNER JOIN of SQL, replacing the need for technical marketers to write any code for these highly complex segmentations.
Data Views
Data views are system-generated data extensions in Marketing Cloud containing behavioral information on how subscribers interact with campaigns, such as communication sends, email opens, unsubscribes or links clicked.
In DESelect, all data views start with an underscore for easy reference when segmenting. You can access all 24 data views in Marketing Cloud via DESelect.
Waterfall Selections have the following benefits:
- Create more complex segmentations when you also want the original results of each contributing Selection
- Avoid the timeouts common when handling large data quantities in Marketing Cloud
- Easily use complex filters that may otherwise timeout
With the ability to upload highly complex Selections into Journey Builder, marketers receive granular segmentations in minutes, ensuring ultra-personalization without stereotypical time requirements.
Conclusion
Rather than have developers create endless SQL JOINs, DESelect Segment ensures your team launches campaigns with the desired level of personalized, on time.
Markus isn’t our only fan. See why the CMO of Simplify Compliance loves DESelect’s intuitive segmentation features.
(Spoiler: With DESelect, campaign output grew significantly, campaign production has become much quicker, and marketers now segment without reliance on the IT department.)

Audience personalization in Salesforce Marketing Cloud heavily relies on the UNION SQL (Structured Query Language) clause for data manipulation, analysis, and segmentation. This complex code has been a language many creative marketers struggle to master, making it the “French” of marketing ops.
What better way to understand how DESelect solves this problem other than demo videos? Keep reading to get to the video content below.
The Traditional Importance of UNION and SQL Overall
SQL is the language of Marketing Cloud. Without a strong understanding, users and teams typically face several challenges, including:
- Data Retrieval: Difficulty accessing and using data needed to make informed decisions
- Data Analysis: Absent UNION or SQL knowledge altogether, users struggle to segment, aggregate, and filter data to gain necessary insights into customer behavior
- Data Segmentation: Marketers use SQL to segment their audience based on various criteria, such as behavior, demographics, and purchase history
- Automated Campaigns: Marketers rely on SQL to define the conditions that trigger automated, personalized campaigns
- Data Management: SQL allows users to import, export, and manipulate large amounts of data
Often, teams rely on technical marketers and IT professionals to fill these roles. However, too great a reliance limits the effectiveness of Salesforce Marketing Cloud’s capabilities and distracts these employees from primary functions, leading to reduced output and efficiency across the entire team.
Worst case scenario: marketers do not know enough about SQL to create correct UNION sequences. Still, they have to try anyway, leading to hours of lost productivity waiting on IT ticket resolution to iron out mistakes.
How Marketing Cloud Architects Make Life Easier for Marketers and Limit Mistakes
Recreational bowlers are all too familiar with lane bumpers, designed to prevent novices from spending every turn helplessly watching gutterball after gutterball. CRM architects can set similar safeguards in Marketing Cloud to ensure all marketers effectively segment without UNION or SQL errors.
Some effective tactics:
- Training: Frequent training sessions help users become more familiar with SQL and practical use cases. Supplemental training materials, such as tutorials and guides, help users learn at their own pace.
- Templates: Create pre-built templates as a starting point for campaigns, segments, and other tasks. These templates should be designed to minimize the need for manual data manipulation and SQL coding.
- Process Documentation: Develop and share clear process documentation that explains the steps to execute everyday tasks within Salesforce Marketing Cloud.
- Validation Rules: Implement validation rules to help prevent data errors and ensure data entry in a consistent, correct format. This reduces the risk of data quality issues and improves the accuracy of data-driven insights.
- Quality Assurance: Implement a review-and-approve workflow or automated quality assurance process to ensure that all campaigns, segments, and data manipulations are reviewed and approved by an experienced user before being executed.
By following these strategies, architects help ensure Marketing Cloud users of all skill sets can execute their tasks effectively and confidently, reducing the risk of errors and mistakes.
DESelect: The Bowling Bumpers of Marketing Cloud
With DESelect Segment, Marketing Cloud users of all backgrounds no longer worry about UNION or SQL when creating audiences. The tool provides intuitive drag-and-drop features, replacing the heavy code otherwise required.
With this ease comes peace of mind for Marketing Cloud admins, as DESelect provides many of the guideposts mentioned above. Below are two of the most popular features that ensure creative marketers quickly and accurately create their audience segmentations for campaigns.
Data Sets
With data sets, an experienced technical marketer or admin intimately familiar with the data model can prepare a data set with multiple data extensions and set the relationships between each. This way, marketers can segment based on multiple data extensions without necessarily knowing how to connect them – and still get the data needed.
To connect data extensions, you can create a custom relation in the DESelect admin panel or import one from an external source. Marketing Cloud and DESelect expert Markus Dang demonstrates a use case connecting sample Orders with Products Ordered.
Once the relations have been defined across data extensions, you are ready to define the data set.
To summarize, data sets give marketers pre-filled segmentation tailored to the common campaign requirements of your organization. With these templates in hand, marketers eliminate much of the time requirements and prevent UNION SQL errors.
Picklists
Another popular DESelect admin feature, picklists, simplify data entry for marketers and remove the room for typos when creating segmentation filters. Picklists also reduce the need to remember complex or technical values, further protecting against mistakes.
Marketers can then use picklists in all subsequent segmentations involving the selected data extension. Picklists can be enabled or disabled depending on current conditions.
Once defined, admins can relabel values to make for easier use. Once set up, marketers will see a dropdown list to choose from, enabling faster, more accurate segmentations.
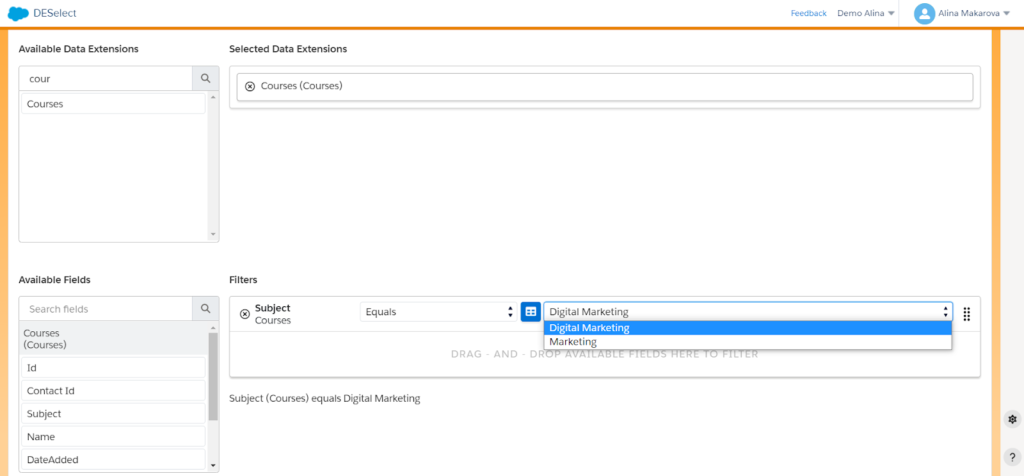
In other words, marketers don’t need to know the values beforehand because DESelect retrieves them.
Conclusion
With Marketing Cloud already such a complex platform, providing guard rails helps ensure creative marketers quickly get their campaigns in front of the right audience without bogging down technical teams with requests and distractions.
We will cover more DESelect admin features in Part Two. In the meantime, if you want to learn more, see how Pon Automotive uses DESelect data sets (and other built-in templates) to speed up campaign operations and onboard new employees quicker.

Personalization hacks in Salesforce Marketing Cloud | DESelect
Why are marketers obsessed with personalization? There are three burning reasons:
- It’s the opportunity to have one-to-one interactions with each customer.
- From the customer’s perspective, it feels much more like we (brands) are listening to them, welcoming their engagement.
- In preparation for a cookie-less world, you really should know your customer.
We spoke with Marketing Cloud professionals to understand their go-to solutions for personalization in SFMC. Here are the tips they shared.
Aman Batra
Director at Genetrix Technology and Salesforce Marketing Champion
It’s not too late
First-party data is always reliable for segmentation and personalization. But sometimes, lacking first-party data can become a pain for marketers. That’s the best time to do some out-of-the-box thinking.
While working for a healthcare client, we wanted to send an email to a set of contacts. The email was to have the location of a nearby medical facility. But the dataset we were going to target did not contain location information.
After some investigation, we found that this data set had already received some promotional and transactional emails in the past month.
The automation studio tracking extract came to the rescue. We ran a tracking extract for the last three months and included geo-location. The extract came to the FTP, and we imported it back into a Marketing Cloud data extension.
As expected, the extract had most of our target contacts and their geo-information like IP Address, Region, Country, City, Latitude, Longitude, Metro Code, and Areacode.
We successfully used this information to recommend nearby medical facilities.”
There’s some more info on tracking extract here.
Michał Rzepka
Senior Salesforce Marketing Cloud Technical Consultant, Cloudity
Let the fallback have your back
“We all know personalization is excellent – unless it’s missing critical elements. When blazing the trail, prepare yourself for any unpredictable circumstances. Regarding data quality, do your best—try and foresee the unforeseen.
Imagine having the perfect, personalized opening line of your email like “%%FirstName%%, check out our top three summer picks.” If the value of FirstName is missing for some subscribers, you will end with an awkward sentence starting with a comma that spoils the joy of your meticulously crafted design. Don’t worry because, as the old saying goes – ‘there’s an AMP for that!’
Add just two more ingredients to the mix – an Empty() function that will check if the FirstName holds a value and an Iif() – inline if clause that will provide the fallback. I’m a huge fan of handy one-liners like this one: %%=Iif(Empty(FirstName), ”Hello”, FirstName)=%%.
Now there might be a situation where you would rather not send at all than sending with the crucial values missing. In this case you need an if clause with the Empty() checks – and maybe even RowCount() for your LookupRows() – and then call RaiseError() inside it. It’s your last resort when stopping the send, so use it wisely and rarely – like an emergency brake! Even if the send is skipped, you will be charged Super Message, and the reporting would be skewed because the email was pre-processed and not sent at all.
As per documentation, RaiseError() works only in email sends but what about skipping the SMS send? We can use another clever trick here. MobileConnect will skip the send of an empty message, so again, build your logic in a way that will output the message body only when all required personalizations are present.
Last but not least, you should log the skipped sends to the Data Extension to investigate later or even build an automation that will try to resend it when the correct data is available.
Conclusion
There’s no getting away from it: personalization is critical to the success of all marketing campaigns. However, without a keen eye on data management, we can lose as many potential customers as we might gain. So you must know what tools can make the boat go faster and how to take advantage of such tools and their functionality.
Personalization is all about the data you gather. If optimized and used correctly, you can transform your data marketing, creating unique experiences for audiences; giving them what they want, when they want. In a value economy, this is the difference between succeeding or failing at this game.
Latest Articles
-
The Ultimate Practical Guide to AI-Powered Content Creation If you’re ready, actually, to use AI in your marketing workflow, you don’t need another blog about what AI is; you need a hands-on playbook. This guide is a practical walkthrough of how to use AI to ideate, draft, edit, optimize, and publish content consistently at scale. […]October 31, 2025How to Measure the ROI of AI Copywriting Tools AI copywriting tools have become essential for SaaS and consumer brands alike, not just for cutting the cost of content creation but also for winning new customers. But measuring the ROI of these tools goes beyond counting words generated or hours saved. Today, ROI also includes […]October 24, 2025The Future of Generative AI in Copywriting Generative AI is already rewriting how copywriters, marketers, and brands create content. But the future? It’s far bigger than “faster blogs and ads.” The next decade of AI in copywriting will go beyond efficiency; it will reshape creativity itself, reframe how brands tell stories, and even redefine the […]October 23, 2025Why AI Outputs Often Feel Too Generic Content personalization has always been the holy grail of marketing. Delivering the right message to the right person at the right time can dramatically improve engagement, conversion rates, and trust. But scaling personalization across multiple buyer personas, industries, and customer journeys has traditionally been expensive and time-consuming. Generative […]October 23, 2025
eBook: Data driven personalization
Get your copy of our eBook and find out how you can improve customer experience with personalized data in Salesforce Marketing Cloud
We’ve been collecting data for years, and while more recently, there’ve been considerable advances in data science and marketing, we still continue to gather data en masse, often because “we can.” The truth is that companies collect too much data. 18% of companies are using 20 or more data sources for decision-making. Our survey results indicate that this figure will grow in the future. The questions to consider here are why are we collecting the data we collect? Have we truly defined its purpose, or is it a “just in case” scenario? Or do we simply not know?
Organize your Salesforce Marketing Cloud to improve your ROI
According to the Salesforce State of Marketing Report (7th Edition), marketers expect a 40% increase in the number of data sources they use between 2021 and 2022. This is a whopping increase that will bring new challenges to companies' data strategy. It will also naturally lead to companies holding inconsistent data problems with data governance and management that may well result in security breaches.
Pro tip: Count the data sources your company is collecting. We guess it's more than 20. Then take a moment to ask three fundamental questions:
- Do you utilize this data to its full potential?
- What is your goal in collecting all of this data?
- Are you satisfied with the state of your data collection at this point in time?
If you can quickly answer all these questions, you might not need this book, but if these questions resonate with your own doubts and concerns, we invite you to read further — we'll try to find a solution together.
Types of data you need to collect
Perhaps we should start by breaking down types of data into basics. In general terms, we can put data into two categories: quantitative and qualitative.
Quantitative data
Under the classification of quantitative data, the following types of data can be found:
Demographic data – a collection of all the data points about a person, such as their name, email, title, income, location, marital status, and more.
Firmographic data – a collection of all the data points about a business (a 'firm'), such as company name, industry, number of employees, annual revenue, and stage in the sales cycle.
Behavioral data – data on the interaction between website users and app users. This reveals the data collected from your website or app visitors, such as pages visited, links clicked, average time on site, and a count of visits, retention rate, churn rate, daily & monthly active use, and more.
Contextual data – data related to a visitor's unique properties while providing context to their behavior on a website or an app, such as device type, browser type, location, and time of the day.
Collecting demographic and firmographic data requires your visitors to fill out and submit a form. This may include a newsletter subscription, a demo registration, a live chat transaction, or a lead magnet download. This data typically ends up in your CRM, where you also obtain some automatic date and time stamping, lead source tracking, and lead activity insights.
Qualitative data
On the other hand, qualitative data can be collected through questionnaire-style methods to garner the customer's attitudes, motivations, and opinions. Some of the qualitative information that can be collected includes:
Opinion (e.g., their favorite journey destination for a holiday).
Motivations (why they requested a particular service).
Attitudinal (e.g., customer satisfaction reviews).
All the data you collect falls into one of these boxes. Later, and as you'll see, you need to design a process that allows you to create a single customer view.
Data you need to improve personalization
It'll come as no newsflash to you to hear that personalization is the key to successful data marketing. And with so many incredible sales & marketing automation tools at our disposal, there are myriad ways for us to interact with customers (and potential customers) in creative and engaging ways.
80% of consumers are more likely to purchase from a brand that provides personalized experiences.
— Epsilon
-
All data you collect - why do you need it and what to do with it?
-
Segmentation using the data you gather
-
What about cookies?
-
Getting to know the customer in a non-intrusive way
By clicking the “Get the eBook now” button, you agree to the DESelect Terms of Use and Privacy Policy.
Personalize customer experience in SFMC with data.
Sign up to get your free eBook now.

How to do aggregations in Salesforce Marketing Cloud? - DESelect Blog
Would you like to be able to find the number of orders each customer has made in a certain period of time? Or calculate the average order value for each customer? Or maybe you want to count the number of emails sent to each subscriber in the last 30 days? All that and more is possible with the aggregation functionality in Salesforce Marketing Cloud.
In this article, we will explain how to use aggregations in Salesforce Marketing Cloud (SFMC) using SQL and DESelect.
How to use aggregations in SFMC using SQL
SQL is great at aggregating data the way you might in a pivot table in Excel. The functions are similar to what you’ll find in Excel or certain analytical tools. For instance, The GROUP BY statement groups rows that have the same values as summary rows, like “find the number of customers in each country”.
The GROUP BY statement is often used with aggregate functions (COUNT(), MAX(), MIN(), SUM(), AVG()), to group the result-set by one or more columns. Here you can find a brief explanation of what each function means:
- AVG – calculates the average of a set of values
- COUNT – counts rows in a specified table or view
- MIN – gets the minimum value in a set of values
- MAX – gets the maximum value in a set of values
- SUM – calculates the sum of values.
In this article, we’re going to dig deeper into the COUNT aggregation that allows you to do a count on a data extension or data view and store the results in your target data extension.
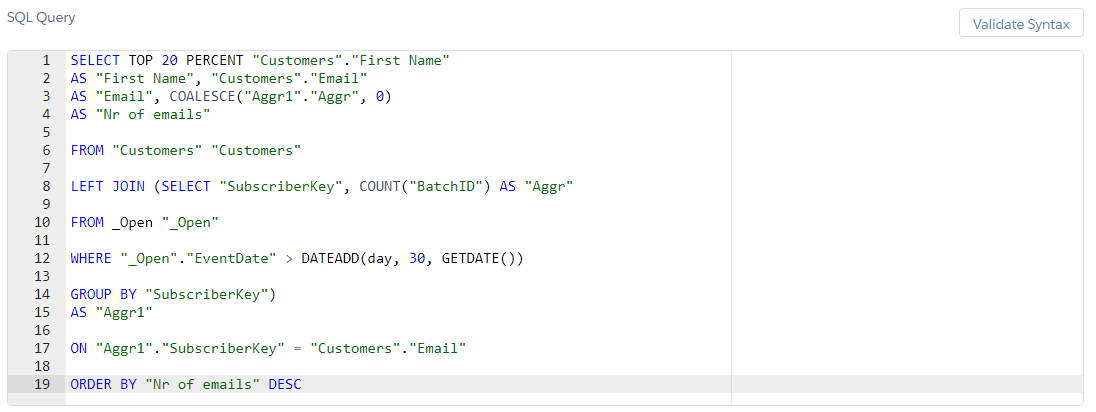
In the scenario we’re going to demonstrate, we’d like to know the number of times each subscriber has opened an email in the last 30 days. On top of that, we’d also like to limit the result to the first 20% of subscribers.
Here’s how the SQL query for the following scenario will look.
(SQL query using Aggregations)
In our example, we’re using the Customers data extension along with the data view _Open. Normally, an aggregation is only a part of the segmentation a marketer has to perform. However, for non-technical marketers it can sound like a challenge. Fortunately, there are alternatives to writing SQL in SFMC if you want to use aggregations… like DESelect!
How to use aggregations in SFMC using DESelect
In the video below you can find a step-by-step guide to using aggregations in DESelect.
For convenience, DESelect offers different screens depending on the level of the marketer’s maturity. For instance, if you don’t know how your data model is set up exactly, you can use the ‘Basic’ screen, where the relations between your data extensions are already pre-defined. In the video, for example we’re using this screen to create an aggregation. However, if you are more confident with your data model, you can use the advanced screen. You can read more about how to create a segment using the advanced aggregation screen here.
If you’d like to book a live demo to see how DESelect avoids the need for code in your advanced segmentation, one of our experts would love to help you.
Conclusion
In this article, we explained how to use aggregations in Salesforce Marketing Cloud using SQL and the no-code alternative, DESelect. If you want to see DESelect live and leverage aggregations with an easy drag-and-drop, book a demo with one of our experts.
- How to use aggregations in SFMC using SQL
- How to use aggregations in SFMC using DESelect
- Conclusion
Latest Articles
-
The Ultimate Guide to AI-Powered Content Creation
The Ultimate Practical Guide to AI-Powered Content Creation If you’re ready, actually, to use AI in your marketing workflow, you don’t need another blog about what AI is; you need a hands-on playbook. This guide is a practical walkthrough of how to use AI to ideate, draft, edit, optimize, and publish content consistently at scale. […]October 31, 2025How to Measure the ROI of AI Copywriting Tools
How to Measure the ROI of AI Copywriting Tools AI copywriting tools have become essential for SaaS and consumer brands alike, not just for cutting the cost of content creation but also for winning new customers. But measuring the ROI of these tools goes beyond counting words generated or hours saved. Today, ROI also includes […]October 24, 2025The Future of Generative AI in Copywriting
The Future of Generative AI in Copywriting Generative AI is already rewriting how copywriters, marketers, and brands create content. But the future? It’s far bigger than “faster blogs and ads.” The next decade of AI in copywriting will go beyond efficiency; it will reshape creativity itself, reframe how brands tell stories, and even redefine the […]October 23, 2025Why AI Outputs Often Feel Too Generic
Why AI Outputs Often Feel Too Generic Content personalization has always been the holy grail of marketing. Delivering the right message to the right person at the right time can dramatically improve engagement, conversion rates, and trust. But scaling personalization across multiple buyer personas, industries, and customer journeys has traditionally been expensive and time-consuming. Generative […]October 23, 2025Join our newsletter to receive updates and helpful SFMC guides.
How to combine data from 2 data extensions with or without using SQL
How would you find subscribers who’ve made no purchases or customers who’ve made orders, if the information is located in separate data extensions in Salesforce Marketing Cloud? For this you need to have a basic understanding of how your data works
In this article, we explain how to combine data from two data extensions, along with the concept of JOINs in Salesforce Marketing Cloud (SFMC). We’ll do this by reviewing how you can combine data using SQL, as well as DESelect.
Data extension 101: How to combine data extensions in Salesforce Marketing Cloud using SQL
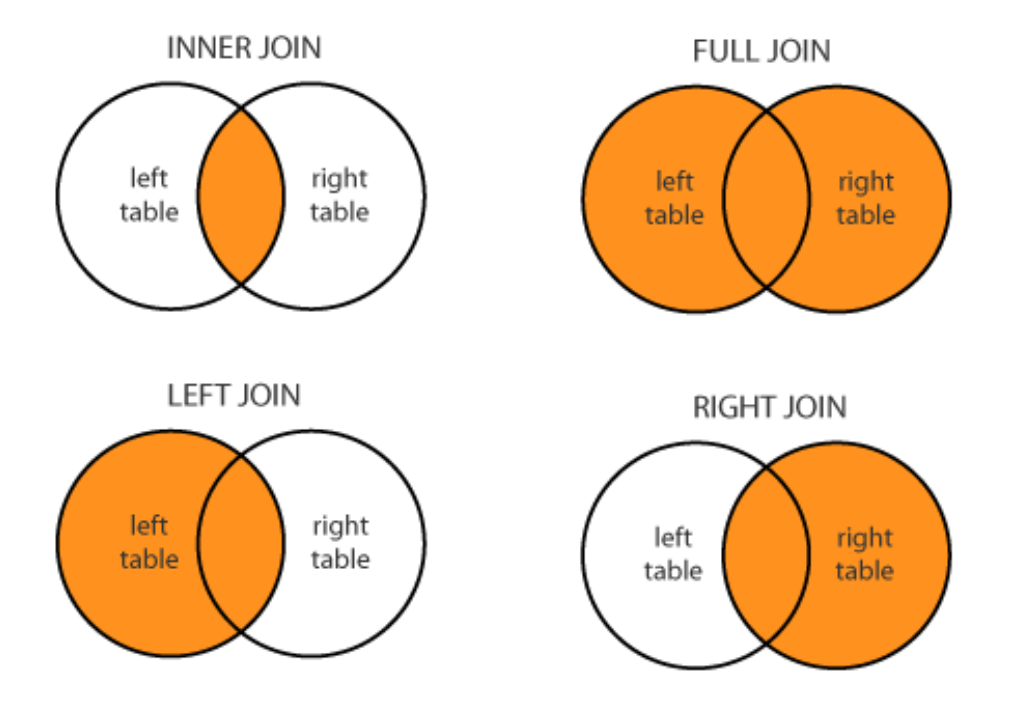
There are four main ways you can create a relationship between data extensions in SFMC using SQL. These are called JOINs.
(Data relationship using JOINs)
Before creating a JOIN between two data extensions, you need to understand how you want the data to be connected. You can choose to connect two data extensions (DEs) that have the same field. In our example, in the Customers DE it could be a Customer Id, which is a unique number that helps to identify them.
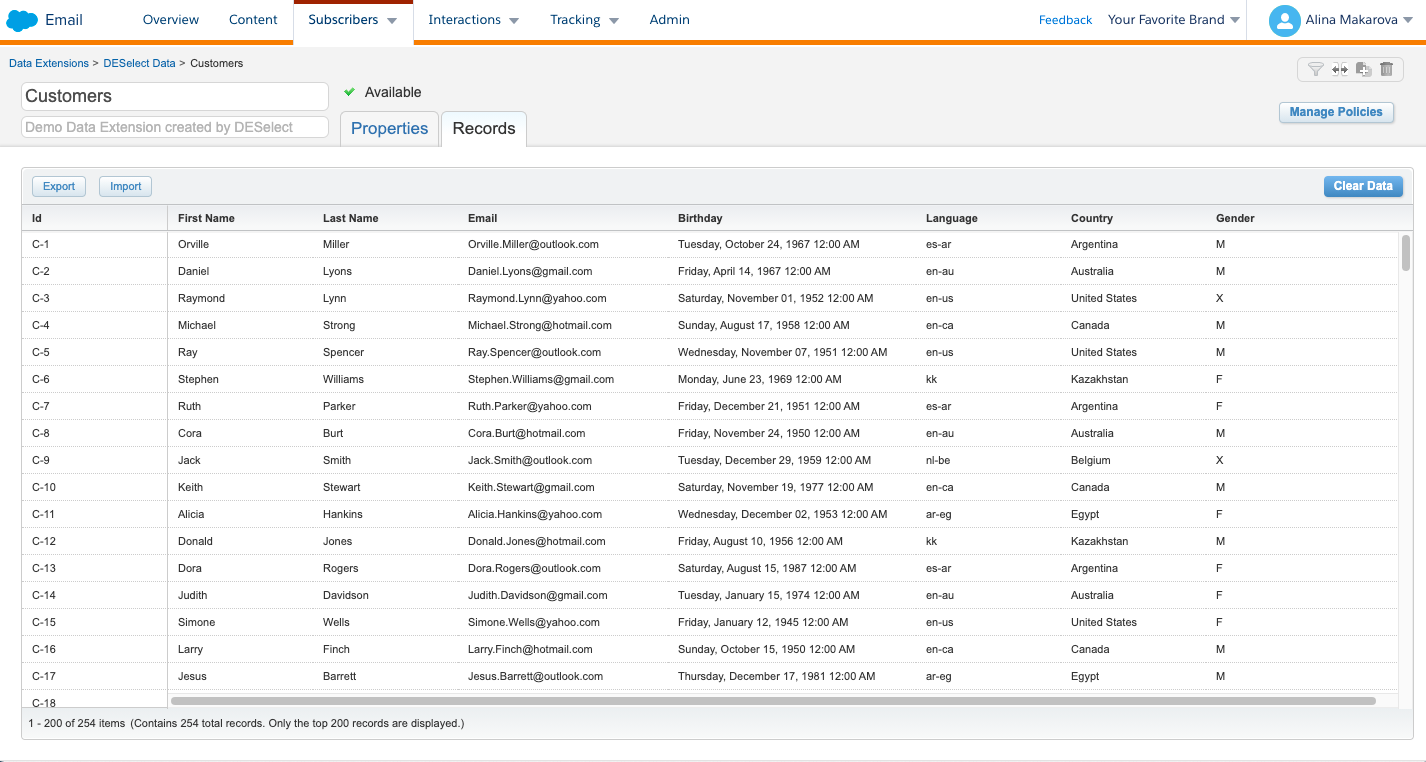
(Customers data extension)
You can also have a DE with Orders, where you can use a Customer Id field. This way you know what customer made what order. However, to send a communication to this customer, we need to combine the information about the order with his personal information, which is stored in another data extension.
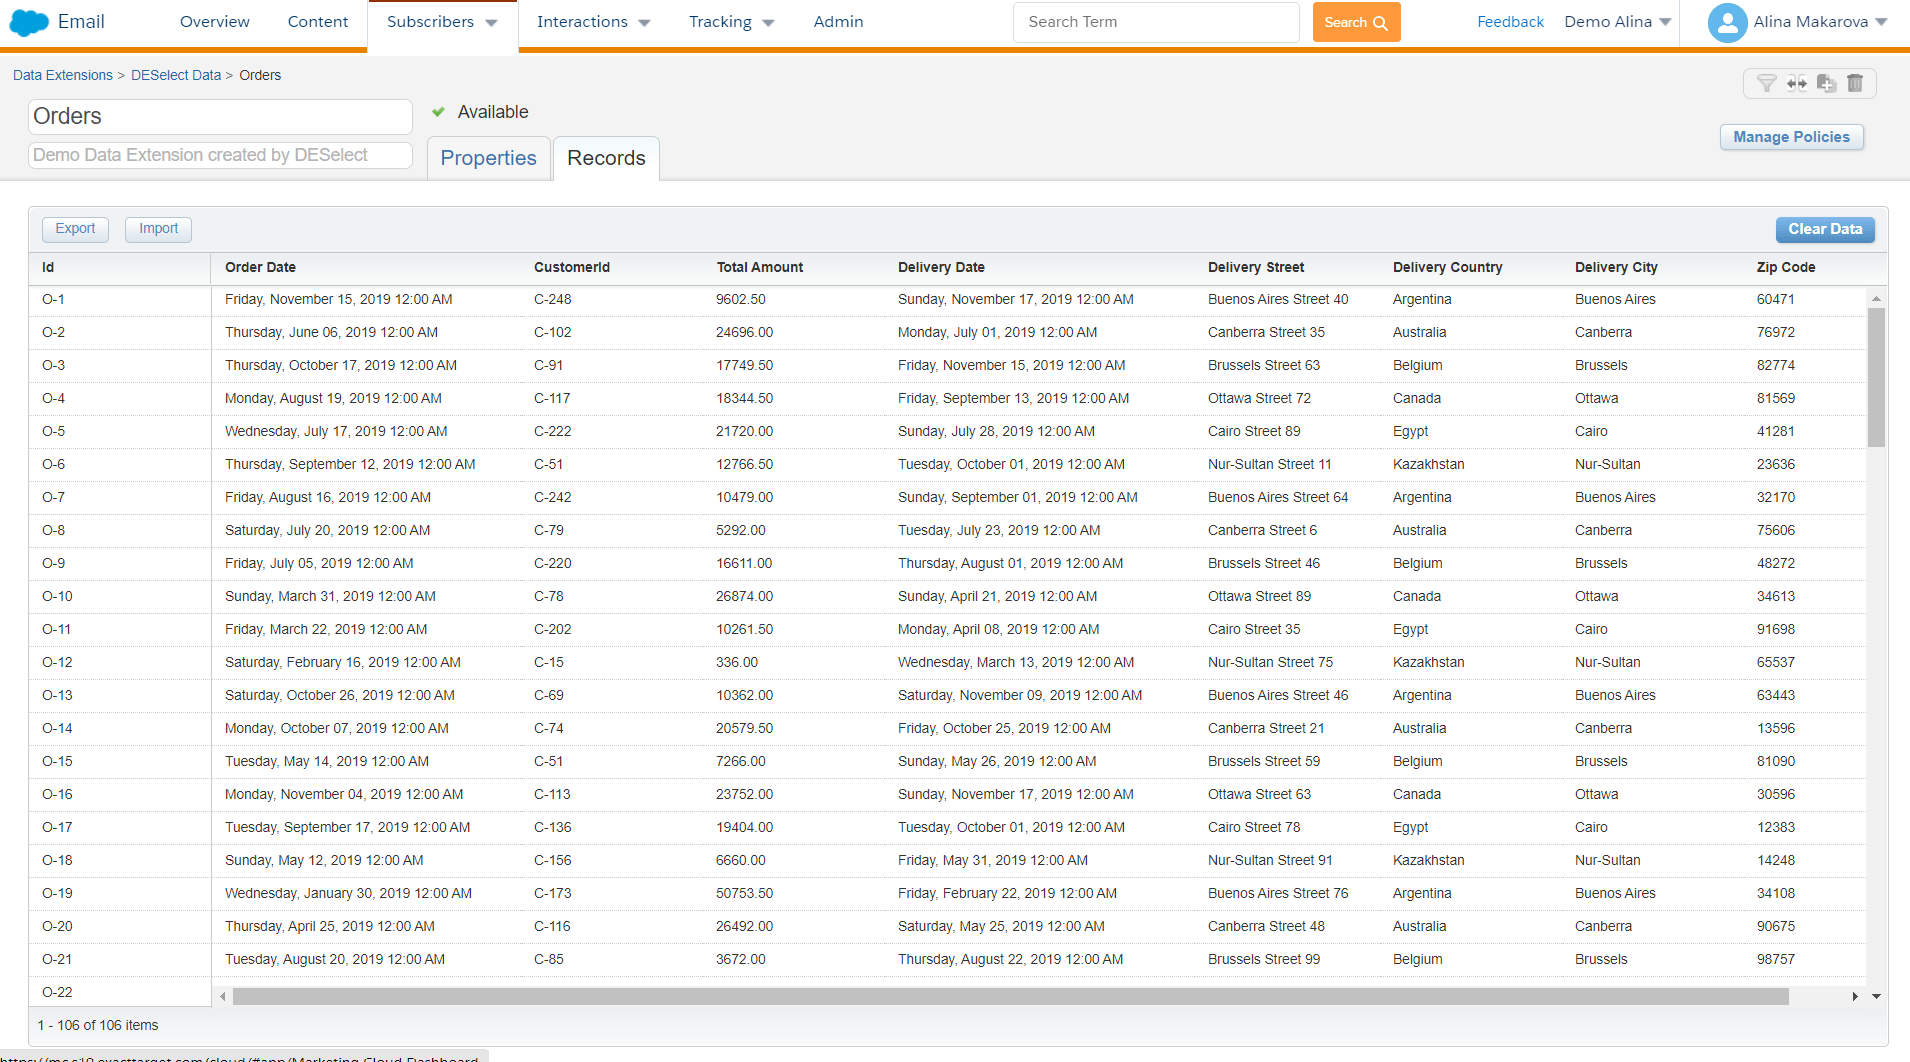
(Orders data extension)
Now, let’s go back to the four JOINs. Using the INNER JOIN we can find customers who have made an order. The SQL query for this scenario will look like this.
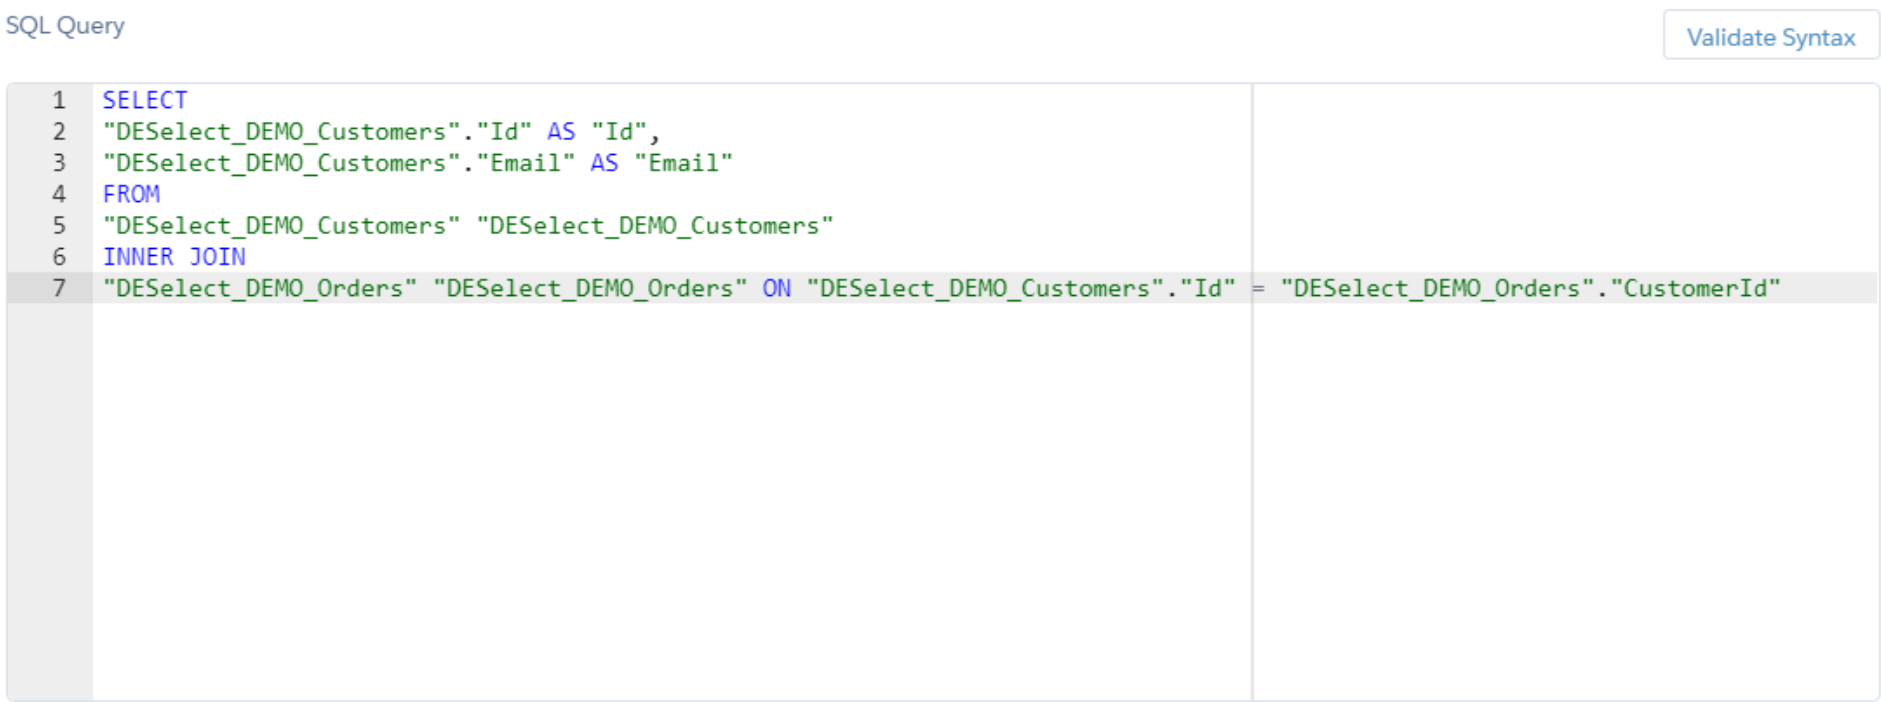
(SQL query in SFMC)
Since there is a common Customer Id field, it allows us to select only those customers who have made the orders.
For the purposes of this article, we are going to continue using Customers DE and Orders DE as examples. Let’s tackle FULL JOIN now. This obtains all matching records from both data extensions whether the other data extension matches or not. So, if there are fields in Customers DE that do not match in Orders DE, or if there are fields in Orders DE that do not have matches in Customers DE, those fields will be listed regardless.
The LEFT JOIN will bring you all the records from the Customers DE and then the corresponding data from the Orders DE. The RIGHT JOIN will do the same but now with the Orders DE since we chose it second. Now onto the remaining scenarios…
Using our example data extensions, for the LEFT JOIN, you would like to find Customers who have made the Order and those who did not, and for instance, target them with the campaign to encourage their first purchase.
For the example of the RIGHT JOIN let’s take an example of Customers and Subscribers data extensions. Applying the RIGHT JOIN would enable you to identify the subscribers who aren’t yet customers, and target them accordingly.
Combine any data extension in Salesforce Marketing Cloud using DESelect
Understanding data relationships is not the easiest part of segmentation in Marketing Cloud, but then writing code for it can be even less appealing. This is where DESelect comes in.
This solution allows you to combine data extensions by dragging and dropping them on top of each other. Our tool then lets you combine the DEs using a visual representation of the JOINS.
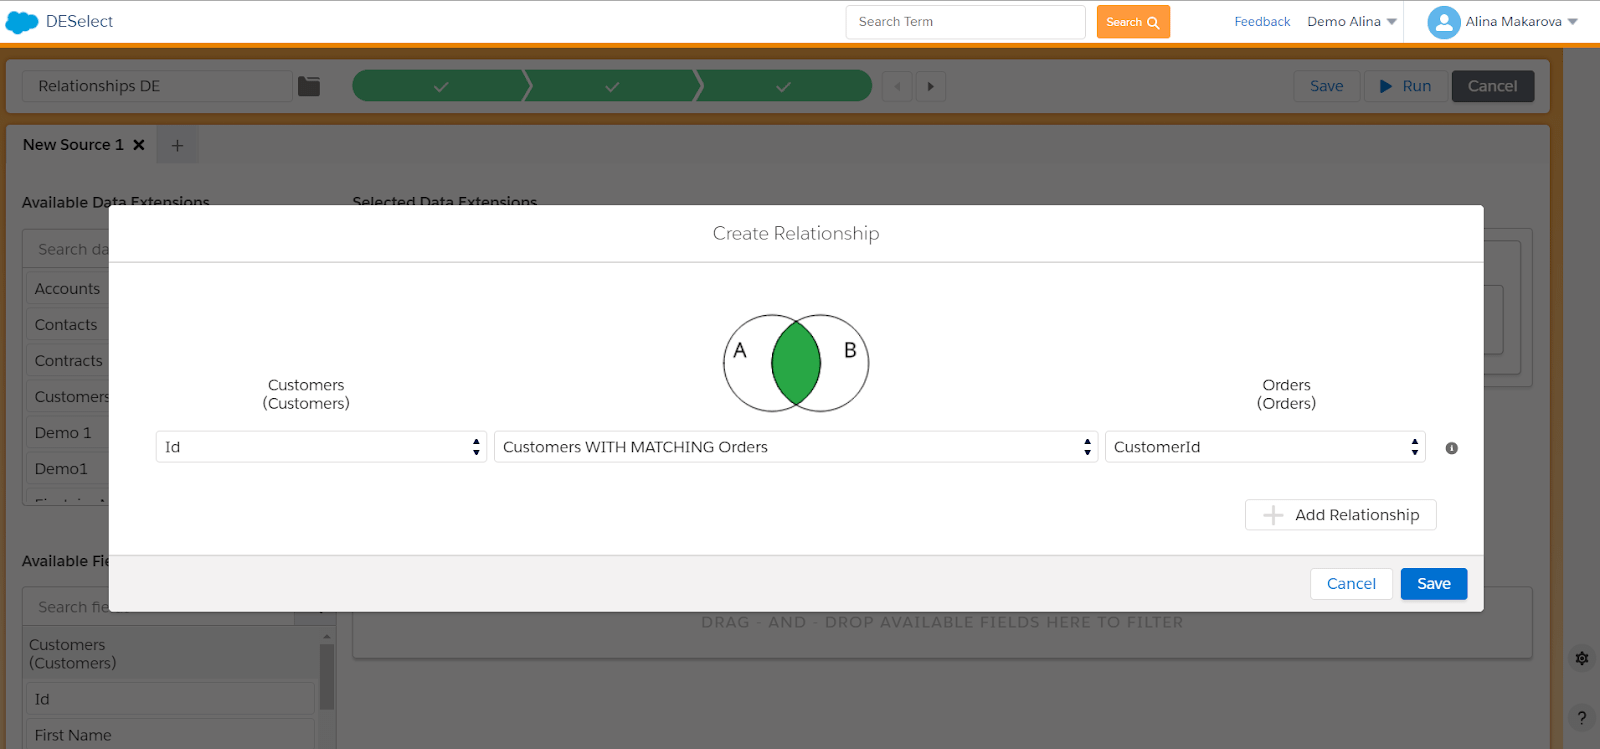
(Create data relationships in DESelect)
In this video we show you how to create relationships between data extensions in Salesforce Marketing Cloud using both SQL and DESelect.
Conclusion
We hope that this article explained the basic combinations of any data extension in the Salesforce Marketing Cloud. In most cases, more than two data extensions are involved in this process. Imagine writing an SQL query for a relationship between 12 DEs? Yes, that’s right, sounds like a lot of work.
If you’d like to book a live demo to see how DESelect avoids the need for code in your advanced segmentation, one of our experts would love to help you.
- How to combine data from 2 data extensions with or without using SQL
- Data extension 101: How to combine data extensions in Salesforce Marketing Cloud using SQL
- Combine any data extension in Salesforce Marketing Cloud using DESelect
- Conclusion
Latest Articles
-
The Ultimate Guide to AI-Powered Content Creation
The Ultimate Practical Guide to AI-Powered Content Creation If you’re ready, actually, to use AI in your marketing workflow, you don’t need another blog about what AI is; you need a hands-on playbook. This guide is a practical walkthrough of how to use AI to ideate, draft, edit, optimize, and publish content consistently at scale. […]October 31, 2025How to Measure the ROI of AI Copywriting Tools
How to Measure the ROI of AI Copywriting Tools AI copywriting tools have become essential for SaaS and consumer brands alike, not just for cutting the cost of content creation but also for winning new customers. But measuring the ROI of these tools goes beyond counting words generated or hours saved. Today, ROI also includes […]October 24, 2025The Future of Generative AI in Copywriting
The Future of Generative AI in Copywriting Generative AI is already rewriting how copywriters, marketers, and brands create content. But the future? It’s far bigger than “faster blogs and ads.” The next decade of AI in copywriting will go beyond efficiency; it will reshape creativity itself, reframe how brands tell stories, and even redefine the […]October 23, 2025Why AI Outputs Often Feel Too Generic
Why AI Outputs Often Feel Too Generic Content personalization has always been the holy grail of marketing. Delivering the right message to the right person at the right time can dramatically improve engagement, conversion rates, and trust. But scaling personalization across multiple buyer personas, industries, and customer journeys has traditionally been expensive and time-consuming. Generative […]October 23, 2025Join our newsletter to receive updates and helpful SFMC guides.
How to use date filters in Marketing Cloud - DESelect Blog
Imagine you’re creating a campaign to target a set of people that performed a certain action X time ago. In our example, we’d like to find people who attended an event 6 months ago and inform them about a new event coming up. But how can you do this in Salesforce Marketing Cloud? Out-of-the-box filters are no use when you want to find people from a certain period of time, so what’s left?
One option you can make use of is to write SQL queries. As you might already know, if you want to perform advanced segmentation in SFMC, you need to understand how SQL works. Some time ago we wrote a short guide on how to make use of SQL queries in Salesforce Marketing Cloud, which you can read here.
So, how will your query look if you want to find people who attended your event six months ago? Note that the examples we’re going to use most likely will not represent your own data model. We’re using them to show how the query can be technically done.
In our example, we have a data extension for Events with dates, and another extension for Event attendees.
Example data extensions:
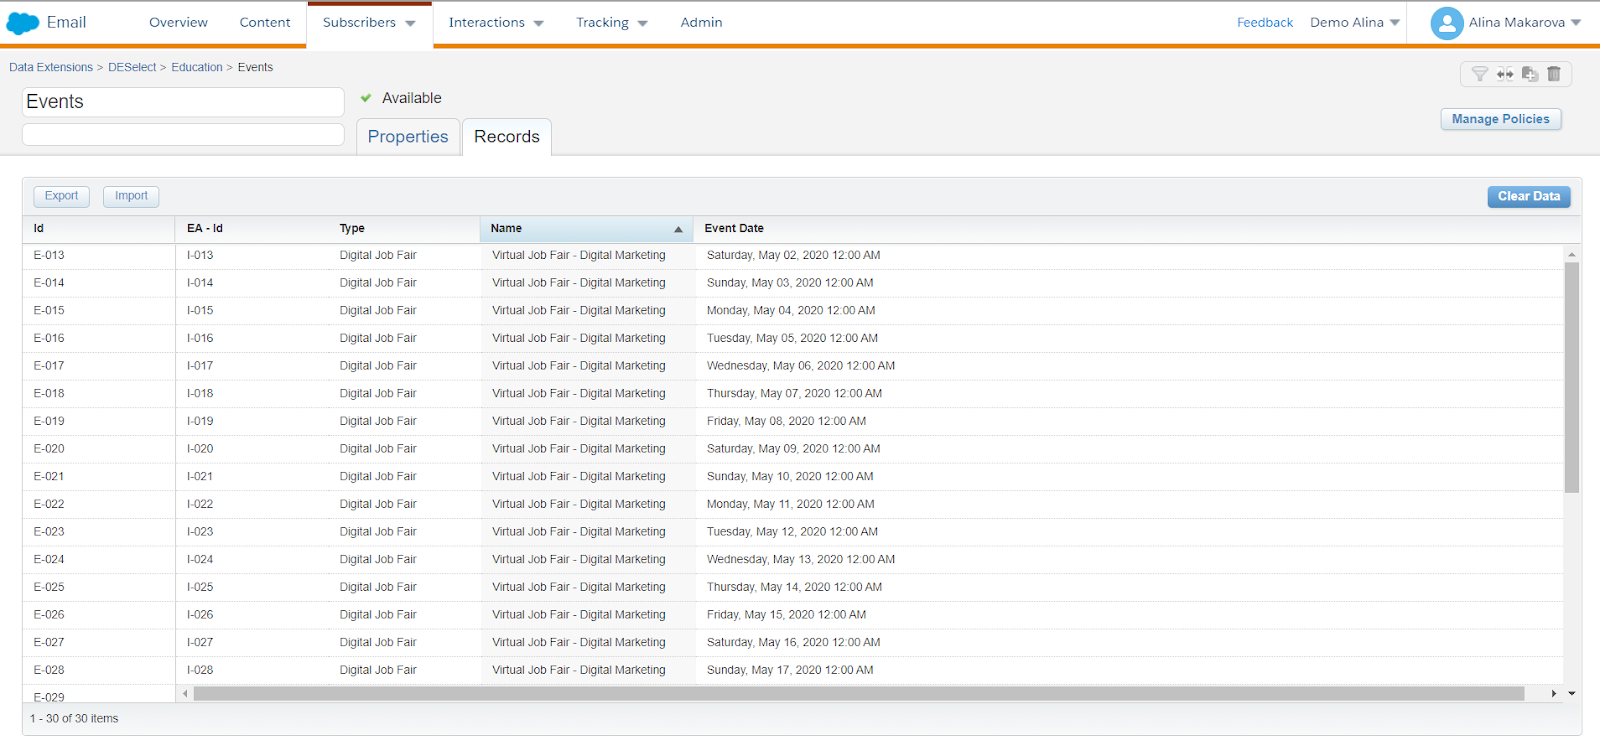
(Events data extension)
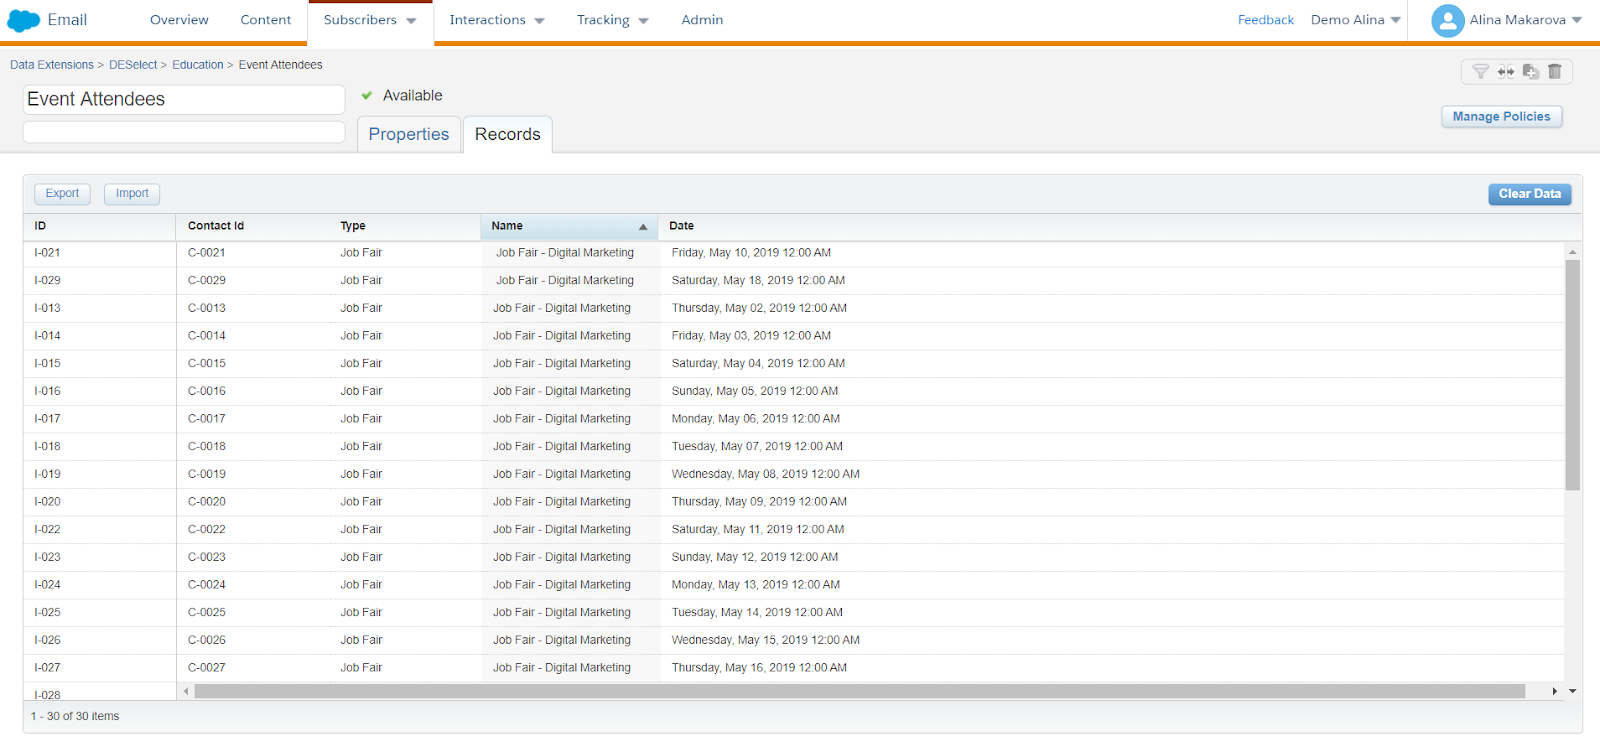
(Event Attendees data extension)
Filter on a date with SQL
Then you need to proceed to Automation Studio, located under Journey Builder and choose the tab Activities, where you can create a new SQL activity. Using the data extensions we have, your query will look like this:
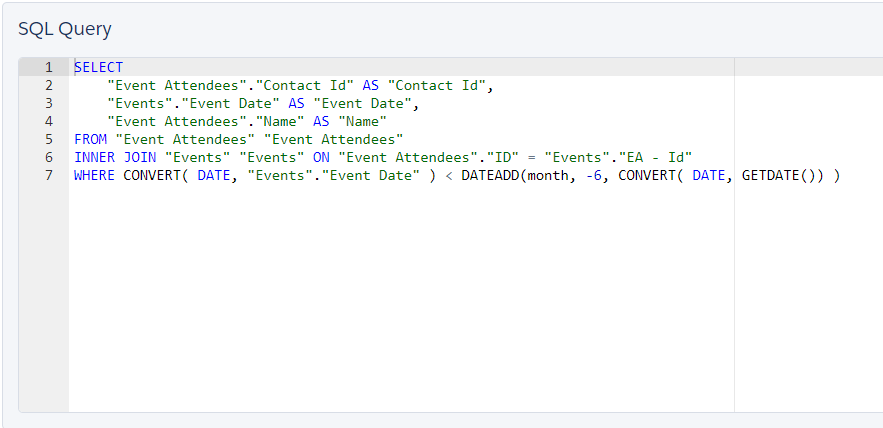
(SQL query example)
You have to combine two data extensions using INNER JOIN. That way we know that we are combining only the attendees who have actually been to the event. We combine them using an event attendees Id. Then we have to actually find the people who have attended the six-month-old event. For that, we query the relative date on the last line.
This is a rather simple query, however, even just querying the date can get messy if you’re not well acquainted with the information.
Alternatively, you can fall back to using Excel for this. First, you need to extract the data extensions into CSV files to modify them; filter the rows, and then create a lookup to join data together across tables. You use the lookup function to look up a value in a one-column or one-row range, and retrieve a value from the same position in another one-column or one-row range. You can learn more about this functionality and the example here. Of course, working with large data sets in this way is far from ideal due to the opportunities for human error. Furthermore, Excel needs time to process large data sets.
Filter on a date with DESelect
If you’re wondering whether there’s an alternative to writing code to segment Salesforce Marketing Cloud audiences or to Excel spreadsheets, the answer is yes. You can leverage the drag-and-drop SFMC segmentation solution, DESelect.
This walkthrough video will show you how to tackle the same activity in DESelect. Read on for a step-by-step guide.
First, you need to open DESelect, under the AppExchange icon on the tab bar. Then on the right-hand side, you click on the button and create a new selection. We refer to segments as selections in DESelect.
On the next screen, you choose the source data extensions, which in our scenario are Events and Event Attendees. On the left side, you can find all the available data extensions and Salesforce Marketing Cloud data views. The only thing you need to do is to drag-and-drop them to the right. Then drop one extension on top of the other.
You’ll see the following on-screen.
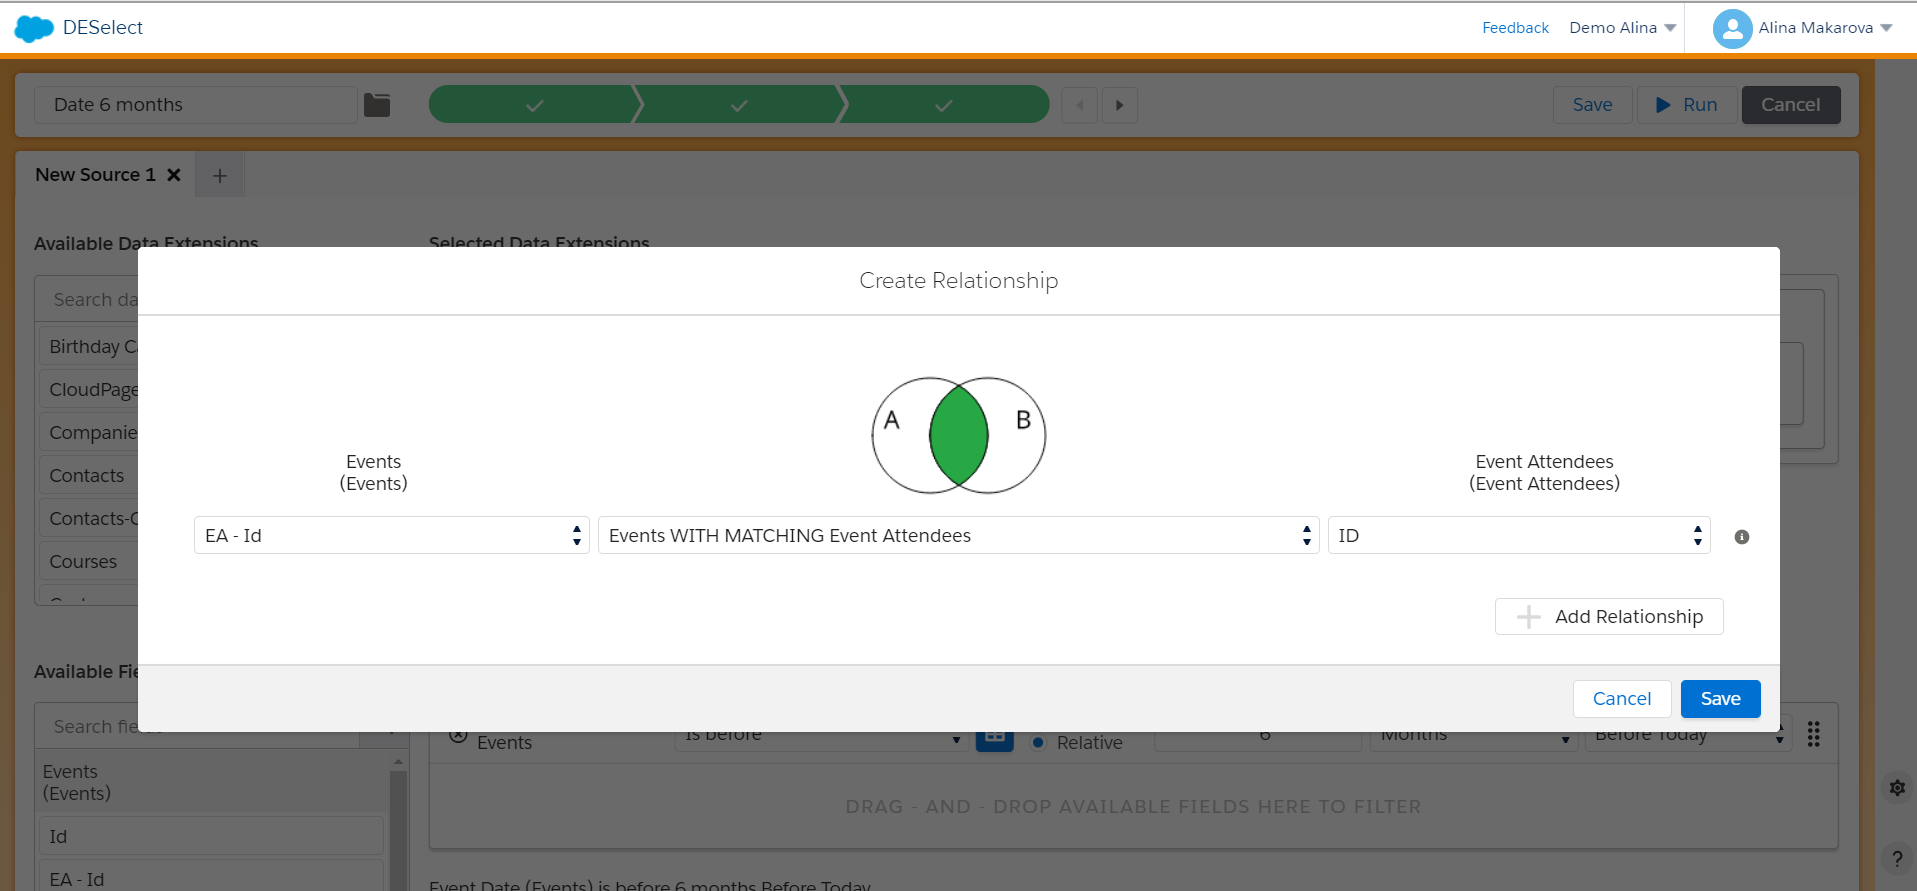
(Create a relationship in DESelect)
Here you define the relationship between two data extensions. As mentioned, you need Event Attendees Id from the Events data extensions and the Id from the Event Attendees data extensions. Note that you only need Events with matching Event attendees. You will note that this looks similar to the SQL JOIN function. This, however, is easier to understand, and no requires no code.
Then you need to move on to the actual date filters. Choose the fields from your data extensions that you want to filter. In the example below, you choose the Event date field from the Events data extension. Select is before and choose the relative date 6 months before today.

(Date filter in DESelect)
Apart from choosing the before today option, you can also choose the before now option. What’s the difference between these two?
Today is used to refer to a date value that contains a year, a month and a day without any time information.
Now is used to refer to a date value that in addition to the year, month, and day, information also contains hours, minutes, seconds, and milliseconds.
In this example, the exact time information isn’t relevant, so you can choose before today.
You can move on to the next step of target definition. At this step you choose where your segment will be saved. You can populate an existing data extension with it or create a data extension on the fly.
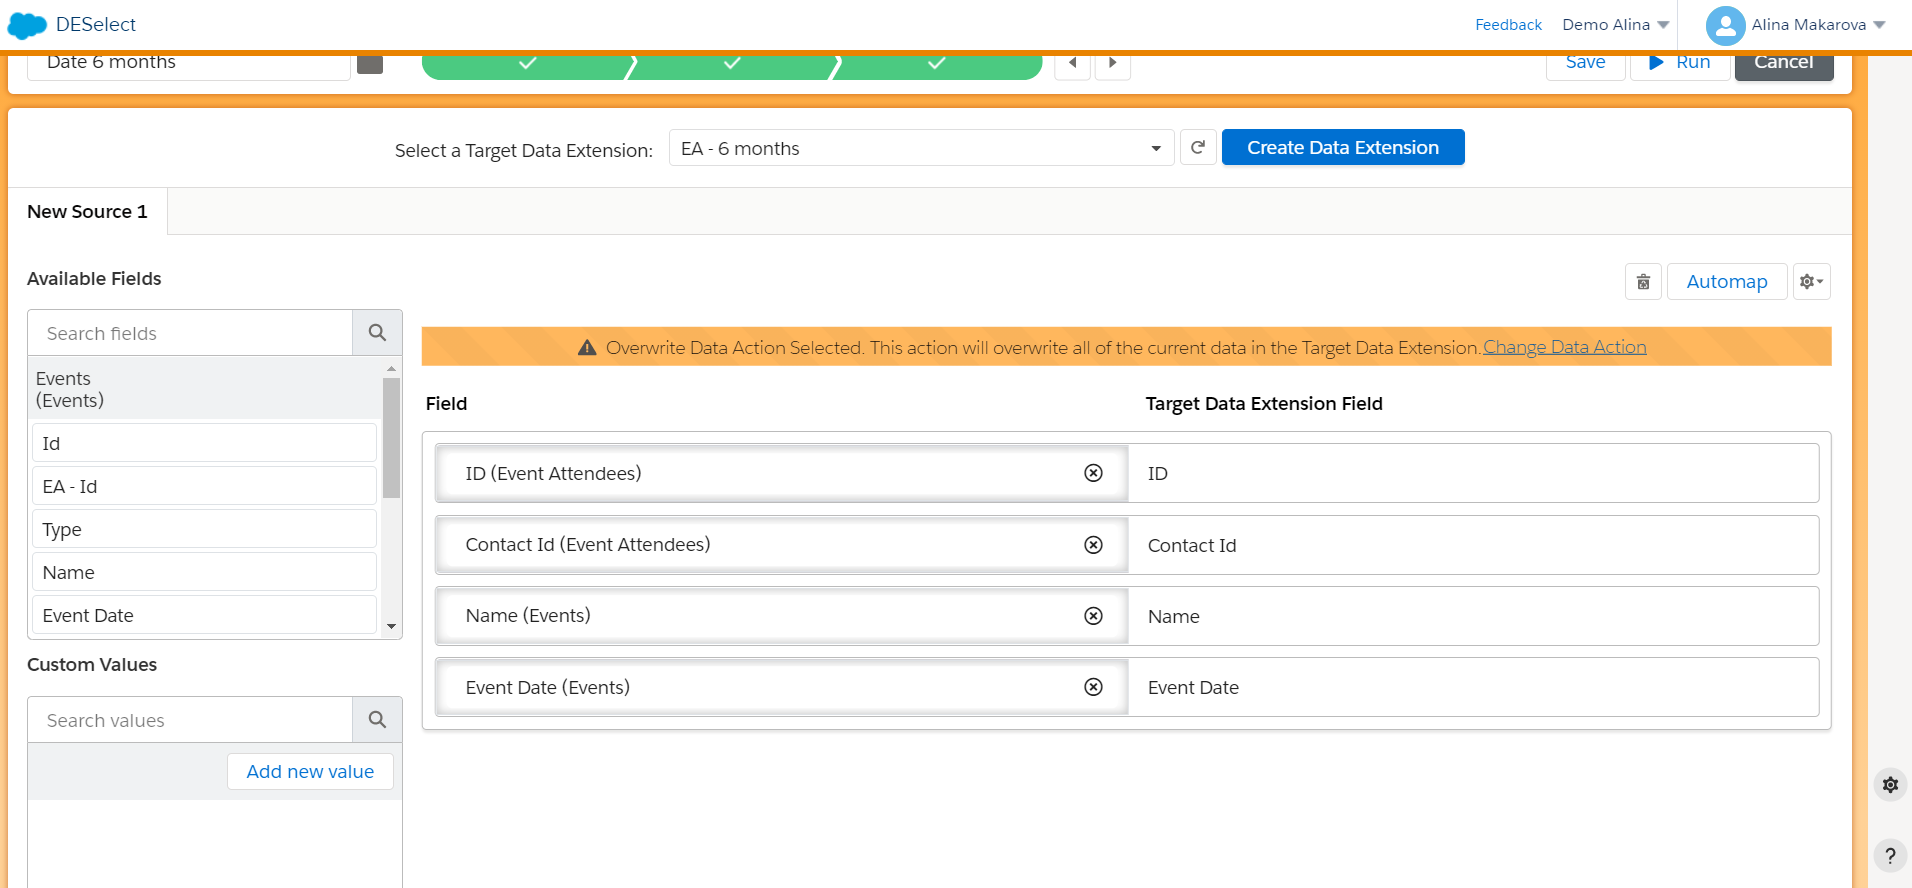
(Target definition in DESelect)
You can create a data extension right here in DESelect, and then simply choose what fields you would like to see in it. In this example, we chose Id of the Event Attendees, their Contact Id, the Name of the events they attended, and the Event Date.
The last step is to run a preview. The preview in DESelect doesn’t yet populate your data extension with the filtered data; it shows the first 20 results of the future selection. This gives you an opportunity to tweak and modify the selection if needed. Once you’re satisfied with the result, you can press run, which runs the selection in Salesforce Marketing Cloud, populating your data extension.
Conclusion
We hope this article has helped with your understanding of how to filter a date in Salesforce Marketing Cloud without the need for code. If you want to try DESelect to solve your date filtering needs and much more, book a demo with one of our professionals here.
- Filter on a date with SQL
- Filter on a date with DESelect
- Conclusion
Latest Articles
-
The Ultimate Guide to AI-Powered Content Creation
The Ultimate Practical Guide to AI-Powered Content Creation If you’re ready, actually, to use AI in your marketing workflow, you don’t need another blog about what AI is; you need a hands-on playbook. This guide is a practical walkthrough of how to use AI to ideate, draft, edit, optimize, and publish content consistently at scale. […]October 31, 2025How to Measure the ROI of AI Copywriting Tools
How to Measure the ROI of AI Copywriting Tools AI copywriting tools have become essential for SaaS and consumer brands alike, not just for cutting the cost of content creation but also for winning new customers. But measuring the ROI of these tools goes beyond counting words generated or hours saved. Today, ROI also includes […]October 24, 2025The Future of Generative AI in Copywriting
The Future of Generative AI in Copywriting Generative AI is already rewriting how copywriters, marketers, and brands create content. But the future? It’s far bigger than “faster blogs and ads.” The next decade of AI in copywriting will go beyond efficiency; it will reshape creativity itself, reframe how brands tell stories, and even redefine the […]October 23, 2025Why AI Outputs Often Feel Too Generic
Why AI Outputs Often Feel Too Generic Content personalization has always been the holy grail of marketing. Delivering the right message to the right person at the right time can dramatically improve engagement, conversion rates, and trust. But scaling personalization across multiple buyer personas, industries, and customer journeys has traditionally been expensive and time-consuming. Generative […]October 23, 2025Join our newsletter to receive updates and helpful SFMC guides.

